Stoogecon 2010

On Saturday I attended Stoogecon for the first time.  This was the second DBA tournament-type event I’ve played in.  I had a lot of fun, and hopefully learned a few “what not to do” lessons.  My goal was to win at least one game, and I won 2 (out of 6).

I don’t know if my experiences so far are typical, but my overall impression of DBA tournaments is that they’re basically just like friendly DBA gaming days, but you play more games against more people you don’t usually play with, and people aren’t quite as willing to tell you when you screw up.

There were 7 of us: Larry and Rich were running the event; Kevin, Jim, and I were also local; John came in from out of town and I’m not sure if Mike lives in Pittsburgh or was just visiting.

The first event was an open: Rich played, and Larry sat out to run things.  I hadn’t decided whether to play II/4c Warring States: Chao, or III/10 Hindu Indian, and didn’t have a strong preference.  Larry’s taunting convinced me I’d suffer less if I didn’t take the elephants, so I played II/4c.

My first game was against Kevin, who played Ayyubid Egyptians (IV/20).  I defended and placed one of my typical terrain setups: two woods and a steep hill at the corners of a triangle, disrupting deployment zones.  I deployed my spear line between bad going, with my bows to protect my left flank and my light horse screening the right.  Kevin attempted a wide sweep around my right flank with his light horse, which I repelled, and then sent in some cavalry.

He ran out of steam when he got around the hill and out of command radius of his general, but he did manage to take my camp.  That left the game tied at 4-4.  Taking back the camp was my surest way to win, but my general was out of range, so I’d need to hold out for a turn or so.

I got to the camp without losing any other elements, and the odds were in my favor: 5 to 3 with a quick kill gave me a 26/36 chance of success.  Unfortunately, the combat was tied, and play continued!  On Kevin’s turn, he killed my Psiloi, but lost the camp, so I won 5-3. 

This started a few trends for the night: I only ever beat Kevin, and all of the wide flank attacks failed.  It was also the first game I’ve played where a camp was taken.

My second game was against Rich, who played Italian Condotta (IV/61) as the defender.  This was a much more straightforward “line ’em up, knock ’em down” game.  There was a bit of back-and-forth between our bows on my right flank, but I lost on the left flank where my spears were crumpled by his knights.  Although “Diceman” had uncharacteristically good die rolls, I should have learned not to try to win against knights with my undersupported spears.  Rich won 5-2 in the end.

In the final round of the open, I played against Mike’s Teutonic Orders (IV/30).  I defended and placed a slightly different triangle of terrain.  As you can see in this picture, I didn’t learn any lesson regarding knights and spears.  The game went very quickly once we made contact: he crushed my spear and the psiloi behind it, and then an additional spear in two of the first three combats.  I managed to kill one element, I don’t remember what, but he killed one more element and I was done.  He won 4-1.

John won the open and took home an Essex Maccabean Jewish army pack to complement the Maccabeans he brought for matched pairs.

For the Matched Pairs event, I brought Later Spartans (II/5a), and Later Achaemenid Persians (II/7).  The Spartans had all the non-Spear options possible, and Persians chose 4 spears and another psiloi instead of a scythed chariot.  This time, Larry played and Rich sat out.

My first game was against Kevin again, and we played with my armies.  Kevin chose Persians, and somehow the Spartans ended up defending.  I set up virtually identical terrain to the first game we played (oops), but we ended up on different sides.  Once again, Kevin attempted a sweeping flank around my right side, to get to my camp.  But this time, he stopped too close to the woods, and I rolled a lot of PIPs on my first turn.  I sent my psiloi into the woods, flanked one light horse, and killed it (or pushed it off the board).

This game demonstrated again the difficulty of flanking attacks around terrain that blocks command.  I don’t remember anthing other than the complete failure of his flanking maneuver: I won 4-0.

The next game demonstrated that you learn a lot more by losing than by winning.  Unfortunately I don’t have any pictures of this game, but I played against Larry using his armies: Athenians (II/5b) vs. Thessalians (II/5d).  I chose the Thessalians with the light horse option.  I defended and played less terrain than in my other Arable games, but still placed it in the deployment zones.

Can you see where this is going yet?

Yes, obviously: I attempted a wide flanking maneuver around the woods at Larry’s right flank.  I got into trouble when my light horse were out of command, and he destroyed most of my attacking force.  I managed to pull some of the light horse out, but shortly after our main lines clashed I lost 0-4.

 In the final round, I played against Mike again.  We used his armies, and I chose Scots-Irish (II/54) against his Picts (II/68), both with the Warband option.  He defended, and placed a long marsh and large wood opposite his waterway.  We played with the waterway to our side.  We both deployed with our infantry in the bad going and our cavlary in the open.

My first move was to send my chariots across the board in front of my infantry to try to take on his cavalry force and avoid his spears.  In retrospect, it would obviously have been better to just deploy on that side in the first place.  The rest of the game was a bit of a muddle: it ended up being a bunch of disconnected skirmishes that clashed before our main lines formed ranks, so most of the kills were attacks of opportunity and not a clash between two straight lines.  Overall I think that may end up a bit better for the Auxilia when it’s fighting against Spears, and it’s probably not unlike historical fights between Picts and Scots-Irish.

I killed off his light horse, and failed several attempts to flank and kill his general.  In the end he beat me 4-2.  It was an interesting and hard-fought game whose outcome was never obvious, but we also both made mistakes and suffered from them.

Jim won the Matched Pairs event and took home an Essex Later Polish army pack.

It was still early, so we threw together a triple game of Knight armies using allied commands on a 2×5′ board.  On our side, John was on the right flank facing Kevin; I was in the center facing Jim; and Rich was on our left facing Larry.

We basically just lined up some useful matches and pushed ahead. Kevin’s command broke first, but that’s just because John’s knights were running the fastest.  I managed to kill off 4 of Jim’s elements in the middle when we clashed, and that ended the game because he was the C-in-C.

This was a very straightforward lineup: there isn’t as much subtlety in BBDBA style games when you have three allied commands instead of variable command sizes.  I continued to learn that I don’t find double-depth knights very useful.  I did inadvertantly learn a useful tactic against them, however: if you aim bows at their front corner, they won’t necessarily have enough room to contact you due to their extreme length.

This was a good day of DBA, I’m glad I attended it.  I enjoyed facing opponents and armies I don’t usually play against.  Thanks go to the Stooges (Larry and Rich) for organizing this shindig and providing a full day of meals (donuts)!

Scratchbuilt: Mongol Trebuchet

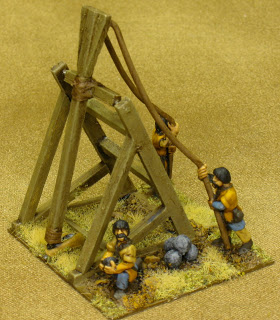
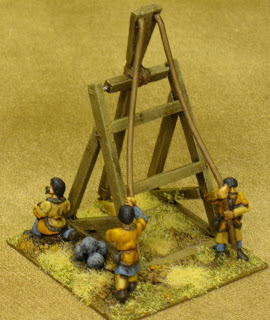
This is the traction trebuchet (human-powered stone thrower) I built for my DBA army IV/35: Mongol Conquest.

I purchased a Perrier (traction trebuchet) model from Museum Miniatures, but it’s way too big to fit on a DBA 40mmx40mm base.  I also think it’s stretching the upper size limit of historically used human-powered trebuchets.  So, I decided to find a design that would fit on a base and scratch build it.

The crew is from Museum Miniatures, and was originally intended to man their trebuchet.  These guys are monsters: they stand about as tall as the rest of my Mongols, but those guys are riding horses!  The only reason they fit in with the rest of the army at all is because they’re on a separate base with a big machine.

The catapult itself is constructed from balsa wood, thin brass rod for the pivot, and thread for the small ropes on the throwing arm.  The pulling ropes came with the crew figures.  The stones are round pin heads.  I used greenstuff to build up the cloth-looking sling around the loaded stone.  The base has sand glued on, and it’s finished with some flock and static grass to match the rest of my Mongol bases.

The design of this trebuchet was based on an image I found online of a reconstructed Mongol traction trebuchet in a museum, as well as images in Osprey’s Siege Weapons of the Far East (1).  The reconstructed trebuchet has no size reference, but looks about 6′ high judging by the sign placement on the wall, which seems too small.  The images in the Osprey book are primitive contemporary drawings which make it look as if the catapult should have a hundred crew pulling its ropes.  I opted for something in between: small enough to be relatively portable but not so small that you’re better off not bothering.

The Mongols used a variety of siege weapons as they expanded their empire.  They learned how to use gunpowder when they conquered China, and gained a lot of experience sieging cities.  I wanted my Mongol army to represent the time of the European invasion: the early 1240’s when the Mongols defeated Russian, Hungary and Poland.  Accounts of the campaign in Europe describe the use of stone-throwers, but don’t mention the rockets or cannons that were used elsewhere (and later) by the Mongols.

In retrospect this design is possibly a bit too tall for the size of its base; and clearly it’d need a larger crew.  But it’s a lot more usable in DBA than the Museum model.

DBA Army I/6c: Early Bedouins

I purchased some DBA army packs “not for a squeamish General” from a denizen of the Fanaticus forums.  These are packs assembled from mixed manufacturers, and might not contain all of the army’s options, but they’re playable and inexpensive.  The first I’ve painted is Early Bedouin.

I have no particular attachment to this army, or I’d have gotten a more quality-controlled army pack.  It’s also an easy paint job, so I decided to do some experimentation and try some new techniques.  In the past, these experiments have succeeded, so I forget that sometimes they don’t.  Although not everything went as smoothly as I had hoped, it’s a playable army that looks basically fine in the end; but it’s not my favorite paint job.

The infantry are all Essex Midianite figures, appropriate for the Early Bedouin (c) list. The light camelry and camelry that match it are also Essex, but they originally would have two riders per camel. The other non-general camelry stand is from Falcon Figures.  They’re the worst figures in the lot: the camels are far taller than the rest, and are smooth like dinosaurs.  The men look like pudgy cave men with poorly defined faces.  I don’t know which manufacturer made the General and companions, but their armor, robes, and turbans are definitely out of place in an army this early.  I can only assume they’ve faced some Persians and Medes and stolen their fashion magazines.

Unfortunately, the army pack came with 4 oddball figures for the Auxilia: a Nubian, a few Philistines, and an inappropriately elaborate standard bearer.  Luckily it also came with twice as much Psiloi as was required, including some slingers that were easy to convert into additional javelinmen for the Auxilia.  The guys holding their javelins low were originally slingers.

I used only bowmen for the psiloi, to make it less obvious that I converted slingers for the Auxilia. 

I tried a new technique on the bases: I used spackling compound to blend the individual figure bases smoothly into the base, and a dusting of sand for texture.  For both the psiloi and auxilia, I based the figures prior to painting them, and this worked out great. Thanks for the idea, JM!

The color progression for the sandy base came from a Flames of War article about desert basing.  I chose the Middlestone/Tan Yellow/Buff colors.  Unfortuantely this didn’t do what I intended, but it looks fine in the end.  Middlestone is very green, and Tan Yellow is pinkish (flesh colored).  Buff goes well with Middlestone, but the overall effect is not “sand” if you look at it closely enough.

This is my first army with Camelry and Light Camelry.  For these stands, I painted the figures first and then applied spackle after basing them.  Unfortunately this resulted in a few white spots on the camels’ legs, but overall it worked well.  I could’ve painted the Light Camelry when it was already based, but probably not the 3 camel stands.  To affix the sand to the base before painting, I sprayed with dull varnish prior to painting.  Usually the primer takes care of this, but not if your figures are already painted.  I used Army Painter dull varnish for the first time on this army, and it came out almost as dull as Testors Dullcote at a lower cost: that change was a success.

The other thing that didn’t work as well as I had hoped is the flesh color.  I started by trying a new color, Vallejo Dark Flesh.  I prefer Tan Yellow for a middle eastern flesh color; Dark Flesh is too orange.  The inking didn’t work well either.  I used my now-standard Didi’s Magic Ink, which usually works well, but it needs to be applied over very dry paint.  I applied it too soon after painting, and it pooled and caused some very dark spots.  I mostly fixed these problems with Tan Yellow highlights, but the shading is a lot more harsh and messy than I prefer.

I look forward to seeing this army in action!  With all these light troops I don’t expect it to perform particularly well against any random army, but I can’t wait to see what the Camel General can do against enemy mounted: it’s even odds against an elephant.

DBA Army IV/35: Mongol Conquest

I haven’t finished painting a DBA army since February?  Weird.  I blame it on the goblins.

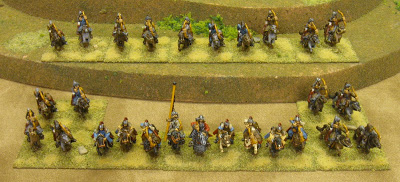
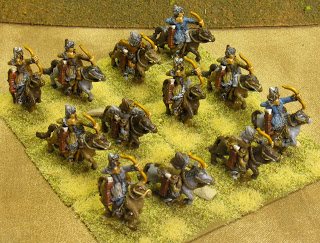
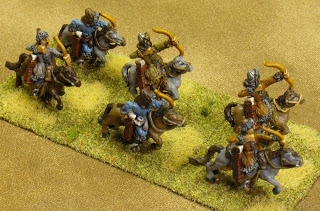
I chose to paint a Mongol Conquest army to participate in the Baltic Crusades themed campaign event at Historicon 2010. This is a fairly one-dimensional army in this configuration: 3x3Cv, 9x2LH.  The figures are Museum Miniatures from their Mongol line.  I also purchased a traction trebuchet model from Museum for the artillery option, but it was way too huge to fit on a DBA base.  A future update shows the alternate model I scratch built.

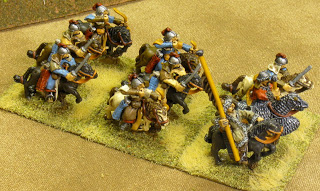
I used medium cavalry with swords and bows for the Cavalry elements.  They’re helmeted, but otherwise look very much like the light horse archers.

Painting this army was an exercise in finding all my different shades of brown paint.  I used a grey-blue and dark red for highlights, based on images in the Osprey Mongol Warrior book.

There are two cavalry poses (MG09BP, MG09CP) except for the general (MG01P) and standard bearer (MG02P), and three poses for the light horse archers (MG06P).

This will be another challenging army to play (along with the Skythians).  Maybe I just like losing.  I’m not very good at playing light horse armies yet, but I want to be.

The surface of these figures is glossier than I prefer. This time I used a few base coats of semi-gloss varnish before topcoating with Dullcote.  I probably should’ve waited longer before the dullcote layer.

My next DBA army is already in the works, so it won’t be 2 months before that one’s finished. I also need to paint one more army before Historicon for another theme.

DBA at Legions, Friday April 2nd

I think the Stooges will have a bit of a shock on Monday; the DBA population at Legions seems to have almost doubled in a month.  I suppose in the long term view… most of us noobs will probably stop playing in less than a year anyway.

Tonight I made it out to Legions again, and got 3 games in against JM and John.  I played my Hindu Indian (III/10c) army all night, because I hadn’t had a chance to play it since I painted it: 3xEl (gen), 2x3Cv, 4x3Bw, 2x2Ps, 1x3Bd.   My overall impression is that I really like this army; but I was playing very deliberately, so games took longer than I’m used to.  I’m not sure if it’s the fact that it’s a new army to me, but I’m not sure it’d be a good choice for finishing tournament games on time.

My first game was against JM playing his Athenians (II/5b).  I was defending.  I placed a good sized central rough ground and two mostly insignificant corners of rough and woods.  My initial deployment was based on an idea I had (always a dangerous thing):  If I alternate bow/elephant units in a line to end up with a line of 7 elephants/bows, my two swaps can place a block of 3 elephants anywhere along that line.

JM deployed most of his spear to one side of the bad going, with his bad going troops towards the center.  I swapped my elephants to his spear side, and ended up with most of my slow bows on the denied flank opposite.

Most of the game was spent maneuvering: I advanced my bows and psiloi towards the center to take the bad going, and he maneuvered elements in front of my elephants to try to improve his chances on that side.

He tried very hard to face my elephants with his non-spear elements, but that requires a lot of help to succeed.  Yes, psiloi and light horse quick-kill elephant… but at 2 to 4 the psiloi have only a 1 in 6 chance of actually doing it… while I have a 9 in 36 chance of doubling the psiloi and killing it.  With light horse it’s even worse.  You need to have overlaps for that to be a winning proposition.

It was a very tight game, and a lot more interesting than we expected it to be.  I think I won 4 elements to 3. 

Next, my Hindu Indians faced John’s Early Egyptians (II/2a).  That’s a nice little army: blades, bows, psiloi, and a horde for good measure… apparently Egyptian hordes like hanging out in camp. 

I was the attacker, so he had to place a waterway.  He placed two smallish rough grounds in the center of the two quarters opposite the waterway, and I ended up playing with the waterway to my right.  He didn’t do a littoral landing.

He deployed with most of his bow next to the waterway, blades in the middle, and a group of bows and psiloi in the bad going.  I faced my elephants against his blades, my bow against his bow, and my cav/psiloi against his bad going troops. 

This was also a long, tight game and I barely pulled it off.  His bows were winning on my right flank, while I had some initial success on my left flank.  When the center clashed I was eventually able to kill a fourth element and win 4-3, but it had all of the back-and-forth of a hoplite battle, with his psiloi-backed blade (4) against my elephants (4).

I liked the element composition of his Early Egyptian army enough that I bought the other Essex army pack Legions had on hand.  It should be very quick to paint up after my Mongols are finished.

After a break while John and JM played, I faced JM who was playing Alexandrian Macedonians.   He attacked, and I set up rough/rough/woods in a triangular pattern.  I depoyed on the point of the triangle and he deployed the edge opposite.  My elephants ended up on my left flank opposite his pike block and mounted, and my bows and cavalry were opposite his artillery and bad going troops on my right flank.

We were both dancing around a lot: it took a long time for my Elephants to wheel around and turn the flank of his Pike… talk about a slow motion train wreck.  On the other side, his artillery was a real nuisance, mostly due to my hesitation in committing to attack it: my bows danced around at the edge of his range for a long time.  When I tried to maneuver my Cavalry in to charge, he brought up his bad going troops to delay me.  While I killed his Auxilia he brought some pike in from behind the Artillery to delay the Cavalry further… that should give an indication of how long this was taking.

Eventually my bows decided to suck it up, stand in a line, and charge, but while I was trying to find alternate solutions I got a bit lucky with shooting rolls: I only lost one bow against his artillery. If you start out doubling someone you only have a 1 in 4 chance of still doubling them after the die roll, so it wasn’t insanely good luck, just enough luck to stay alive.  That was my only element lost this game, I think.  Eventually I maneuvered my blade in for the kill, and the tide turned.  It was getting late, so JM charged with his Pike and I ended up getting 2 quick kills, and winning 5-1.

If he hadn’t charged I probably would have, and it wouldn’t have gone much differently.  I think I spent too much time obsessing over his artillery instead of just charging it.  It would’ve helped if I remembered it was only 2 against foot in close combat…

Overall I really enjoyed playing the Indians.  I like elephants, they’re scary.  I like bows as well.  I don’t like artillery, it’s scary… though maybe I’d like it if I was standing on the other end.

DBA Summary: Miniature Warfare

This is just a quick summary of the single DBA games I played at Miniature Warfare last Saturday, before I forget.

First, my Spartans (II/5a) faced JM’s Athenians (II/5b).  The terrain didn’t play any role in the battle.  I took 9x4Sp, 1x4Ax, 1x2Ps, 1x3Cv option, and he took 8x4Sp, 1x4Ax, 1x2Ps, 1x3Cv, 1x2LH.  JM deployed double ranked spear, and I deployed a longer line of single rank spear since he had a greater flanking force.  Hoplite battles are pretty fun in DBA, and this one didn’t disappoint.  He advanced his 2LH on my right flank and I was able to pick it off with a spear and psiloi.  After that, I won mostly with good die rolls, and because my longer line was able to turn his left flank. I lost a few elements, I don’t remember how many, and won by killing 4 elements.

Next, my Mountain Indians (II/2) faced John’s Nikephorian Byzantines (II/64).  I placed terrain, too much bad going in fact, and this one took a while.  The terrain an deployment attempted to funnel his troops towards my Elephant.  In the end, he carefully and deliberately pulled me out of the bad going and killed me.  Although I intended to try to learn how to play the Mountain Indians, I don’t think I learned enough about how to play them correctly.  I think I needed less terrain, and needed to use my Psiloi-backed Auxilia out in the open against his mounted a bit more.

Next I had a break while JM and John played Nikephorian Byzantines versus Alexandrian Macedonians; there were 3 DBA players there almost all day, so usually someone was sitting out.

Then Jim cleaned up his Napolean’s Battles and we played DBA: his Ariarathid Kappadokian (II/12) against my Warring States Ch’in (II/4a).  I wanted to learn how to play with Warbands.  Instead, I quickly learned how not to play with warbands: I lost double ranked 4Wb stands against his Aux on a 6-1 split, and the rest of my force quickly dissolved after that.  We tried to play a follow up game but time ran out an I eeded to leave in the middle.

BBDBA: Later Achaemenid Persians vs. Ghaznavids

(Updated below.  Discussion of my choices is happening here.)

Steve, JM, and I played BBDBA at Legions on Saturday, before the Miniature Warfare event.  Steve brought III/63(b) Ghaznavid, (1002-1186AD), and I played my II/7 Later Achaemenid Persians (420-329BC) again.  With almost 1500 years between these armies’ historical dates, this battle is more anachronistic than the Ghaznavids fighting against Rommel’s 7th Panzer Division.  Let’s hear it for fantasy gaming!

In my previous BBDBA battle, the C-in-C (me) was demoralized immediately after deployment.  This time I wanted to be more prepared, so I thought a bit more about dividing my commands and initial deployment.  The Persians’ low aggression means they usually set up terrain and deploy first. My goal was to find a flexible way to divide my commands, and to have a plan for setting up terrain and deploying my first two commands against an army with superior cavalry.

My army composition was the same as last game: 6x2LH, 7x3Cv, 2xLCh, 9x4Sp, 3x3Ax, and 9x2Ps.  That time I divided my troops into heavy foot, light foot, and mounted. However, with one huge psiloi backed spear command, I had few deployment options if I wanted to protect its flanks.  I could only protect one flank with bad going troops, which either left the other flank open or left the deployment of my third command too obvious.

This time, I used more combined arms in my commands.  My high PIP command had 3x4Sp, 3x3Ax, 2x2Ps, 2xLCh (gen), and 6x3Cv. Mid PIP was 6x4Sp (gen), 7x2Ps.  Low PIP was 6x2LH (gen), 1x3Cv.

With more light infantry along with the spears, they can anchor one or both flanks in bad going or against another command.  The combined arms high PIP command gave a lot more options in one location on the board, and is better at dealing with unpredictable threats. This is important when you deploy first.  The low PIP light horse command may seem foolish; in fact the evidence suggests it was foolish since it didn’t live long enough for me to see if it could be effective. But my thought was that this command could act as an independent flanking force or bolster my high PIP cavalry force, whichever I needed most.

For deployment, I wanted a plan that would allow me to avoid what happened last time: the enemy’s superior cavalry in two separate commands ganged up on my single cavalry command and took it apart.  I decided that to counter this, I’d use a deployment that led the enemy to believe they could use this tactic easily, but then deny its effectiveness.

The first image shows our initial deployment.  I’m on the bottom of the board.  I deployed a steep hill and a wood on one side of the board, to effectively split it in half.  On the other side I used a central wood to anchor my flank.  The road played no part in the battle or my plan.

I deployed my two rightmost commands first.  My psiloi-supported spear line has a block of psiloi on the left flank to take the wood and protect that flank, and three psiloi-supported auxilia on the right.  I deployed my cavalry behind, in a position meant to entice a cavalry attack and suggest I might place my third command on that side as well.

If I remember correctly, Steve’s army had 5 elephants, 6 bows, 3 auxilia, 6 spear, 3 light horse and 3 psiloi; that would leave 10 cavalry.  Steve and JM’s deployment went mostly according to my plan.  They placed the bulk of their cavalry (most importantly their elephants) on the far side of the wall of bad going.  This allowed me to more effectively avoid and pester them.  Their bows and auxilia were set up to take the steep hill, and their right flank was primarily foot with some linking cavalry.

I placed my light horse command on my far left flank, in position to harrass their relatively unprotected spear line on that flank.  My plan was working so far, but it hadn’t survived contact with the enemy yet.  I intended to win on the left flank, and not lose on the right flank by denying it.  It felt inefficient to “not lose” with my high PIP command, and this might have been a mistake.

As an aside: In many tactical discussions in the Fanaticus forums, it is emphasized that you need a clear plan, simply stated; and that in BBDBA each command should have a clear mission it is capable of achieving.  However, my understanding of what such a plan looks like has been elusive.  In this battle I formed a clear plan, so as an example I’ll state it:

The Plan: My overall plan was to deny the enemy on my right flank using the terrain to delay and confuse, and to attack on my left flank and turn the enemy’s line.  The high PIP command’s mission was to delay the enemy and prevent their passage through the wall of bad going.  The mid PIP command’s mission was to advance towards the enemy in good going, secure the woods on the left flank, and attack.  The low PIP command’s mission was to turn the enemy’s flank.

My first moves on the right flank were to consolidate my position.  I pulled my dangling cavalry back to deny the flank, while advancing my Auxilia into the woods, intending to fill the line with my cavalry from the rear.  Here, it turns out I made a mistake: according to a recent thread on the Fanaticus forums, you can’t form a column with elements that are currently in bad going.  Oops!  But Larry disagrees with that assessment, so I can probably get away with it in Pittsburgh… besides, I think my poor maneuvering in the woods caused me to use more PIPs than I would with single element moves anyway.

In the center I advanced my spear, and I was aggressive on the left flank. I advanced my psiloi to control the woods, and ran my light horse around them.

Unfortunately, my right flank became messy quickly.  I was able to avoid the elephants, but my decision to bolster the front line with cavalry turned out to be a bad idea against Steve’s bows.  I lost the cavalry in front of my C-in-C, which was also blocking reinforcements from coming in from behind.  Luckily Steve was also split into several groups, and had a hard time maneuvering his mounted columns through and between the bad going.

The center was somewhat split up by my spear trying to cover for the lost cavalry, but it was advancing steadily on the left. On my left flank I was doing much better. I got around JM’s flank and forced them to redeploy their psiloi, and put my general into position for a 3-3 quick kill against JM’s spear. Unfortunately, not only did I not kill the spear, I also didn’t recoil!  Cue ironic foreshadowing soundtrack.  Now you see it…

… and now you don’t.  With his one PIP command roll, JM flanked my 2LH (gen) and killed it.  Doh!  This decisive die roll demoralized my low PIP command.  The only part it played for the rest of the game was for the lead 2LH element to ZOC one psiloi and keep it out of trouble for a few turns.

I managed to survive a lot longer than I expected after this, and actually felt like I had a chance for a while, but it ended up being a battle of attrition.  I made some progress on the left flank, but it wasn’t killing as fast as my right flank was dying. 


On the right, most of my losses were my light troops in the woods.  This allowed some of Steve’s cavalry through the wall, where it helped JM’s cavalry against my spear. He finally got around the southern end of the wood with some of his elephants, but as you can see here he had a real command nightmare: elephants in 4 separate groups, with at least one group of elephants and two groups of cavalry out of command range due to the terrain.  Although this is what I hoped would happen, I didn’t plan on spending as many elements to do it.

In the end, my high PIP command broke due to the loss of its sixth element, and the game was over.  I had killed 3 elements in their low PIP command (breakpoint 4), 3 in their mid PIP (breakpoint 5), and 3 in their high PIP (breakpoint 5).

Overall I had a lot of fun, it was a tense and tricky game throughout.  I consider it a success even though I lost, because:

  1. I was able to formulate a clear, well defined plan
  2. My terrain placement and deployment effectively supported the plan
  3. My feint on the right flank worked, in its basic principle
  4. I didn’t think I was going to lose immediately after deployment was finished

On the other hand, I made the same mistake several times, and suffered heavily for it: I am not very good at ensuring that I have space to recoil when I make an attack (as evidenced by the Ax and Ps in the woods in the last image: the psiloi was my last element lost, killed by a simple recoil result).  I’m good at seeing when other players are poorly positioned, and I know when to take advantage of it… but I can’t seem to protect myself adequately.

I’m more excited to play BBDBA than I was after my previous game, but I clearly need a lot more practice with single DBA tactics as well.

Thanks for the great game!

Update: Some caveats and thoughts after some of Steve’s feedback:

  1. I had a plan, but I don’t claim it was a good one.  I did lose, after all.
  2. Steve and JM deployed mostly as I hoped they would, but I don’t know what my response would have been if they hadn’t.
  3. I don’t think my Cavalry deployment was very good.  I think my high PIP Ax/Sp line could’ve been done better as well.
  4. I may be better off with more 4Sp and less 3Ax.  I may be better off with one or two SCh instead of 2Ps.

DBA at Legions… on a Friday??

I met JM at Legions this Friday, to play some DBA, and discovered a latent desire to play DBA in several other Legions gamers as well. They should really get out on a First Monday of the Month, since the Stooge crowd has other plans on Friday nights.

I arrived shortly after 9pm and waited for JM to finish up his Flames of War game while I tried to wake up… I really could’ve used a nap. I brought 5 armies so there would be plenty of different opponents, and ended up playing 4 games total.  Unfortunately, I forgot to take any pictures while I was playing…  I’m writing down my thoughts primarily so I’ll remember them.

In the first game, JM played II/12: Alexandrian Macedonians with the 4Ax option, against my II/7: Later Achaemenid Persians. I took my now-standard mix of 3x4Sp, 1x3Ax and 1x2Ps.

At this point I hadn’t waken up yet, and I don’t remember much of the game. But I do remember it was fairly tight, and I remember the pivotal event: I had my mounted force on my right flank, and I was able to surround Alexander (3Kn) on the front, one flank, and rear, for a +2 (or +3?) to +3 quick kill. Of course, it ended up 1-6 against me: I lost an element and the rest of my mounted fled in all directions. Alexander easily picked off one last element for the win… pretty much a historical match up the whole way.

In retrospect, the one error I know I made but failed to correct was to deploy three woods instead of two woods and a steep hill, for arable terrain. Oops! It obviously didn’t help me much…

During the first game, John ran home to get his DBA army, which he had never played yet: III/64, Nikephorian Byzantine. This is a bit of an oddball with its large base elements: 1x6Kn, 3x8Bw. In the second game I played against John, once again with my Later Achaemenid Persians. I tend to use them when teaching the game since it’s a fairly straightforward force from a rules perspective (if not a tactical perspective).

John had read the rules but never played the game, but despite the Byzantine general’s inexperience, my Persians remembered their recent defeat by superior Yuan cavalry and were fearful. I deployed two woods and one steep hill at three points of a triangle, 6-7″ from the edges. John won the edge with the steep hill, which I had planned for, but that left me with the two woods on my flanks, and not quite enough room to deploy my full force as widely as I’d prefer.

I deployed my spear block between the woods with my General in reserve, my bad going troops on the right flank, and my cavalry on the left. My 2x3Cv snuck in next to the woods, and my 2x2LH were in column behind my line, faced left to sweep out around the flank.

John deployed his bow elements on the hill (as I hoped), his cavalry facing my left flank with a rear line in reserve, and his light horse on my right flank in position to threaten my camp. He had a lot more room to deploy than the space between the woods, so he was cramped when trying to move in on my left flank.

On my right, he threatened my camp with his light horse. In response, I directed my psiloi through the woods towards his light horse and also redeployed my two light horse elements to the opposite (right) flank behind my main line. The psiloi forced his horse to retreat, gaining advantage on that flank.

Meanwhile, in the center he walked down from the steep hill as I wheeled my spear to reduce the room for his cavalry even more. Eventually the light infantry on my right flank joined in the battle against his bows while my light horse prevented his light horse from threatening my camp. In the end I killed some of his bows, while he punched a hole in my spear line with his Knight, leaving him with 2 kills and me with 3. But my spear line was now vulnerable, so I needed to get one more kill…

I advanced out of the woods toward his remaining bows, and flanked his light horse with my two light horse. I killed his light horse with mine and ended the game, but the bow fight was fruitless.

But wait! I think my light horse were out of command range and I didn’t have enough PIPs to move them both… but I’m not sure. We decided it was a Pyhrric victory at best, since we couldn’t determine the initial element positions closely enough to be sure of the command radius, and we were both glad we learned from that game.

In the third game, JM played Warring States Chao Chinese (II/4c) against my Skythians (I/43a). While he went to the rest room, I swapped out the 24″ board for a 30″ board so I’d stand a chance. I ended up being the attacker (no surprise), and he deployed with two woods on one side and an empty board on the other.  I got my preferred board edge and he got no terrain on his side at all.  If I were him I’d probably have used more terrain to ensure the Skythians had to attack a defensible position.

He deployed with all his bow on my left flank near the board edge, with the line extending to his cavalry near the center of the board. Wow, 30″ boards look a lot bigger, there’s plenty of room to get around the sides.

In response, I deployed my light horse in two columns of four with my general between them, and my bad going troops on my right flank in case he swapped some bow over to that side. My plan was to outnumber his cavalry on the right flank, possibly using my bad going troops to screen his bow if he swapped it to that side (he didn’t), and to ignore his slow-walking foot on my left.

This worked as planned, with a little help from JM. In the first turn, he launched his LH far out into my field, isolated and alone, and I picked them off. I don’t think this was the best move for his LH, since it’s easy to kill elements when you outnumber and surround them.

This initial Light Horse battle reminded me a bit of my very limited understanding of the tactics used in Go. JM used a PIP to move into a disadvantageous combat, despite my warning against it: he had a plan. I told him it may be better to force me to use my PIPs instead. This is similar to how I understand Go should be played. Technically, the rules say that you use stones to surround your opponent and capture their stones, but in reality good players use only the stones required to demonstrate that it is inevitable that you will eventually surround your opponent, and no more. If they force the issue you prove it to them, but there’s no use in either side expending any resources on a foregone conclusion.

Similarly, in DBA if you know the outcome of a situation is inevitable, then force the other player to spend PIPs to resolve it. Since DBA has randomness (unlike Go), they might not have the PIPs required, and may not be able to complete the attack. It may not be the most important way for your enemy to spend PIPs, especially if you can use other troops to increase the threat somewhere else. At the very least, making the enemy spend 1 PIP instead of you incurs a 2 PIP advantage overall.

This realization begins to show me how to see DBA primarily as a PIP management game, rather than a combat result game. 

After his second LH was inevitably destroyed, I moved on to the rest of his flank and faced his 3xKn (gen), though I thought it was a non-general knight. Oops! He killed a light horse or two while I surrounded his flank, but I never doubted the outcome: my concentrated forces eventually took out his general and I won.

In the last game, I played II/4c Warring States Chinese (Chao) against JM with II/12 Alexandrian Macedonian. Apparently we met in India somewhere, judging by the palm trees we used for terrain.

I was defending and once again, laid out 3 large terrain pieces: two woods and one steep hill in a triangle, directly in the deployment zone. This time I got the steep hill on my right flank and a wood on my left, and JM got a central wood opposite me. It was a very tight deployment for me between the bad going, with barely enough room for my 4x4Sp. I deployed my spear line centrally with 2x4Cb in the woods to the left, 1x4Cb on the hill to the right, my chariots behind the main line, and my light horse on my far right flank to the right of the steep hill.

He deployed everything on my left flank, with his artillery and bad going troops centrally in the wood. He advanced, and I brought my LH around the flank to threaten his Artillery if he left the woods. On the left flank, he wheeled in to line up his pike block between the bad going, and send his light horse around my flank to my camp. I responded by sending my bow through the woods to ZoC his pike block’s flank, and by sending my reserve HCh to protect the camp.

He shot one of my LH with his artillery, while my spear block moved up to take on his bad going troops. On the left flank, my two bow units successfully delayed the advance of the Pike block to meet my spear’s advance.

I ended up killing his 2LH, a few pike with my bows, and enough elements in the center to seal a victory.

I think JM put up a good defense, especially with his use of the artillery, but he was really trying to shove too many units into too small a space on my left flank, without any bad going support on his flank.

Update:  Oops!  We made a mistake: artillery can’t enter bad going off-road.  That would have changed things significantly on that flank.  

During my last games with JM, John coached Mike through his first game of DBA with some help from JM and I. Mike borrowed my Persians to face John’s Nikephorian Byzantines again, but they didn’t fare as well this time: John deployed as the attacker to set up some very good matchups, and wore down Mike’s cavalry with his bows.  It was a fine demonstration of the game mechanics, and Mike is also interested in playing again.

I managed to get out of the store at around 1:30am after paying my “play at the local game store” tax.

Overall, we all seemed to enjoy these games and learn from them. Playing with relatively new players fooled me into thinking I knew what I was doing… sometimes. And I really do enjoy the 30″ board more than 24″. Maybe Friday can be 30″ DBA night and first Monday of the Month can be reserved for 24″ boards?

Thanks for the great games! I’m inspired to paint more armies now so we can have more unique opponents.

More Skythian Pictures

Here are some better, less day-glo pictures of my Skythians.

Here is one element of Camp Followers, and two Psiloi.  I painted the CF more recently, and I much prefer the slightly less intense colors I chose for them.  These are all Falcon figures, 15mm.

Two Auxilia.  The army list includes only one, but I painted the element on the right for the Battle at the Crossroads 2010, where Skythians were allowed a 13th element in their army.  Essex figures.

The back side of the cavalry general (Falcon) and two elements of 2LH (Essex).  Apparently those skins on the light horse are the flayed skins of their enemies.

Same elements, front view.

3x2LH, Falcon.

3 more 2LH, Falcon.

The last 4x2LH, Falcon.

Eureka 15mm Tlingit figures


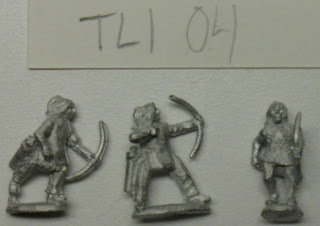
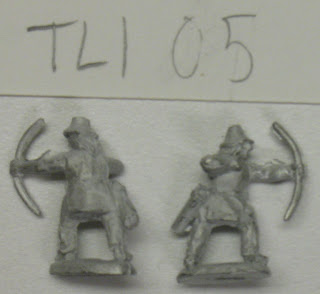
I ordered enough Eureka 15mm Tlingit figures to build DBA army IV/11: North-Western American.  The elements are: 1x3Bw (Gen), 9x3Bw, 2x2Ps; and the army is Littoral, so sometimes it can drop some of the bow in the rear or flank of the enemy.  Shooting entirely on the rear edge, anyone?

I am inspired to build this army mainly because my sister Sarah fled to Alaska after college and never looked back.  Now, she’s living in Sitka, where the Battle of Sitka took place in 1804 between Tlingit warriors and Russian traders with the help of the Russian navy.  That time period is well outside the scope of the DBA rule set, but the Tlingit lived in the area long before the Russians ever arrived.

These warriors were equipped in a very unique way, with wooden helmets in the form of animal heads, and wooden slat armor.  I’d like to do a reasonable job painting them accurately, with the understanding that I’m not capable of reproducing much detail on masks that are only 3-4mm high. 

The figures come in several different combinations of weapons and armor.  I’m not sure if all of the sculpts are accurate or not, or if the DBA army list (primarily massed bowmen) represents the actual fighting style used by the Tlingit in the 12-14th centuries.  Unfortunately, this selection of figures and army list definition are the only choice I have right now.  If there are any major problems, I’m sure Slingshot, the publication of the Society of Ancients, would publish an article containing any better information that is available.

The main features I need to know how to color correctly are:

  • I think the wooden slat armor is natural wood colored.
  • The skin armor/clothing seems to either have the fur on the inside, or to be scraped clean; some have fur edges on the bottom.  I don’t know whether these would be “natural” skin color, or whether they’d have designs painted on them.
  • There are several wooden masks in animal forms, and an odd one (in the image TLI 03) that looks a bit like an upturned colander or medieval great helm.  I understand these are typically painted in a light blue (turquoise? copper oxide?), black, and red (iron oxide?), but I’m not sure what patterns should be used (or whether I can pull them off in 15mm scale anyway). I’m also not sure if the hemet in TLI 03 is accurate or not.
  • The conical wooden hats seem to be almost the correct shape compared to pictures I’ve seen, but I don’t know if they’d be worn in battle or what color they should be.
  • What material would knives and spear points be made of, prior to European contact?  Or would they be unavailable that early?
  • I presume the sword-like implement is actually a wooden club?
  • I’m not sure whether bows, clubs, and spear shafts would be plain wood, or painted.  My initial inclination is to use my standard ochre yellow “wood-like color” for all of them.

So, Sarah: Please tell me if these pictures are any better than the ones already available on Eureka’s web site.  I don’t have a great photo setup, and I tend to have problems with getting proper focus in macro mode.  Unpainted miniatures, especially this small, are notoriously difficult to photograph well unless you give them a black wash to bring out the highlights.

The dime is here for scale comparison purposes, for those unfamiliar with the diminutive size of 15mm figures.

Thanks!

Edit: One more thing: how are an army’s leaders distinguished from its “rank and file” soldiers, so to speak?  In DBA, the army’s “general” (or army-appropriate leader) must be visually different from other similar elements.