Scratchbuilt: Mongol Trebuchet

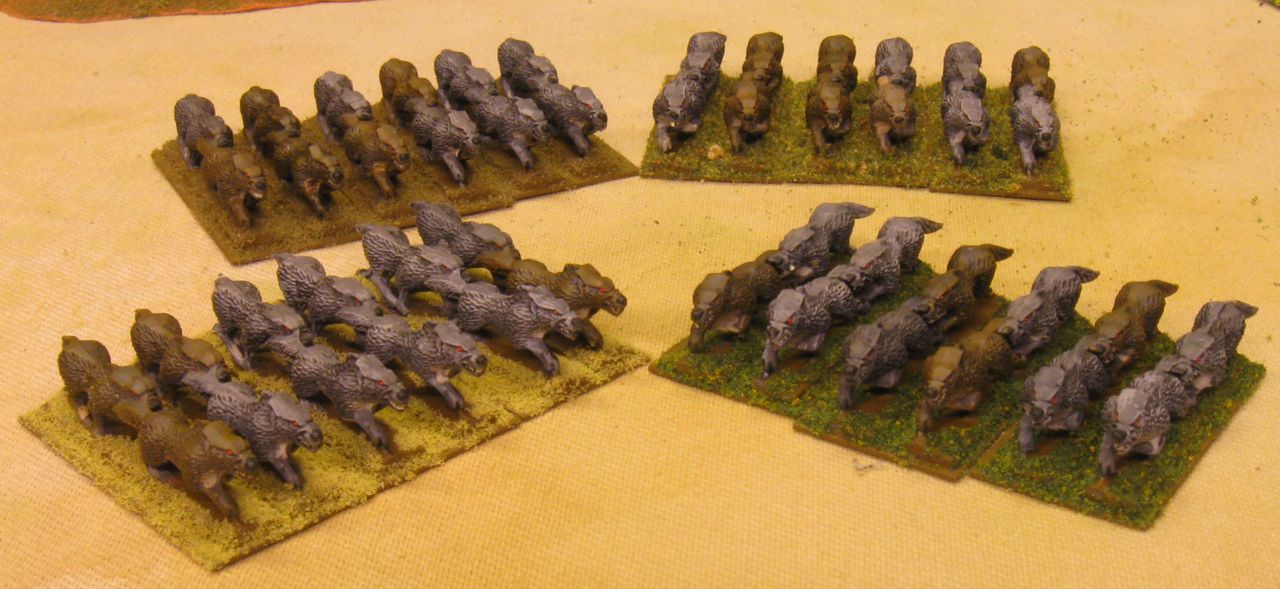
This is the traction trebuchet (human-powered stone thrower) I built for my DBA army IV/35: Mongol Conquest.

I purchased a Perrier (traction trebuchet) model from Museum Miniatures, but it’s way too big to fit on a DBA 40mmx40mm base.  I also think it’s stretching the upper size limit of historically used human-powered trebuchets.  So, I decided to find a design that would fit on a base and scratch build it.

The crew is from Museum Miniatures, and was originally intended to man their trebuchet.  These guys are monsters: they stand about as tall as the rest of my Mongols, but those guys are riding horses!  The only reason they fit in with the rest of the army at all is because they’re on a separate base with a big machine.

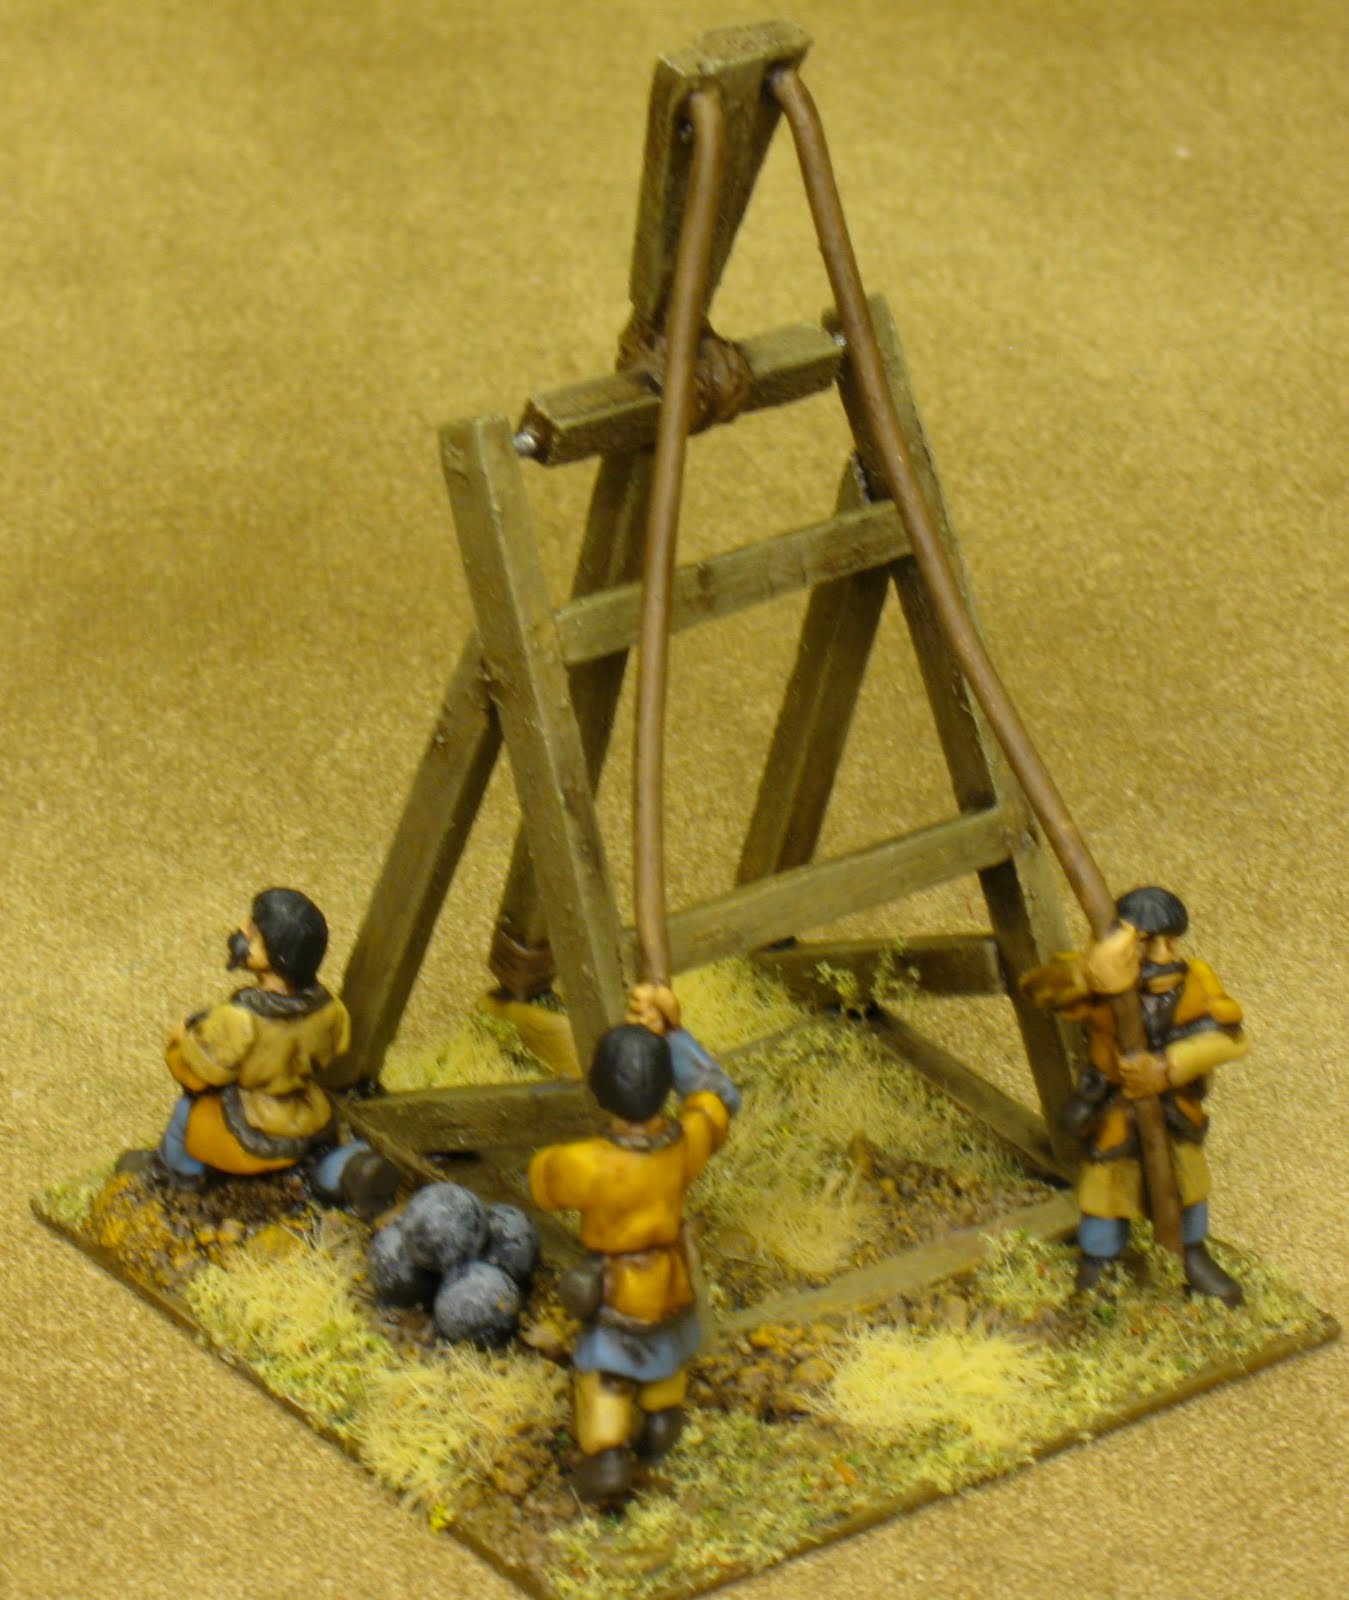
The catapult itself is constructed from balsa wood, thin brass rod for the pivot, and thread for the small ropes on the throwing arm.  The pulling ropes came with the crew figures.  The stones are round pin heads.  I used greenstuff to build up the cloth-looking sling around the loaded stone.  The base has sand glued on, and it’s finished with some flock and static grass to match the rest of my Mongol bases.

The design of this trebuchet was based on an image I found online of a reconstructed Mongol traction trebuchet in a museum, as well as images in Osprey’s Siege Weapons of the Far East (1).  The reconstructed trebuchet has no size reference, but looks about 6′ high judging by the sign placement on the wall, which seems too small.  The images in the Osprey book are primitive contemporary drawings which make it look as if the catapult should have a hundred crew pulling its ropes.  I opted for something in between: small enough to be relatively portable but not so small that you’re better off not bothering.

The Mongols used a variety of siege weapons as they expanded their empire.  They learned how to use gunpowder when they conquered China, and gained a lot of experience sieging cities.  I wanted my Mongol army to represent the time of the European invasion: the early 1240’s when the Mongols defeated Russian, Hungary and Poland.  Accounts of the campaign in Europe describe the use of stone-throwers, but don’t mention the rockets or cannons that were used elsewhere (and later) by the Mongols.

In retrospect this design is possibly a bit too tall for the size of its base; and clearly it’d need a larger crew.  But it’s a lot more usable in DBA than the Museum model.

DBA Army I/6c: Early Bedouins

I purchased some DBA army packs “not for a squeamish General” from a denizen of the Fanaticus forums.  These are packs assembled from mixed manufacturers, and might not contain all of the army’s options, but they’re playable and inexpensive.  The first I’ve painted is Early Bedouin.

I have no particular attachment to this army, or I’d have gotten a more quality-controlled army pack.  It’s also an easy paint job, so I decided to do some experimentation and try some new techniques.  In the past, these experiments have succeeded, so I forget that sometimes they don’t.  Although not everything went as smoothly as I had hoped, it’s a playable army that looks basically fine in the end; but it’s not my favorite paint job.

The infantry are all Essex Midianite figures, appropriate for the Early Bedouin (c) list. The light camelry and camelry that match it are also Essex, but they originally would have two riders per camel. The other non-general camelry stand is from Falcon Figures.  They’re the worst figures in the lot: the camels are far taller than the rest, and are smooth like dinosaurs.  The men look like pudgy cave men with poorly defined faces.  I don’t know which manufacturer made the General and companions, but their armor, robes, and turbans are definitely out of place in an army this early.  I can only assume they’ve faced some Persians and Medes and stolen their fashion magazines.

Unfortunately, the army pack came with 4 oddball figures for the Auxilia: a Nubian, a few Philistines, and an inappropriately elaborate standard bearer.  Luckily it also came with twice as much Psiloi as was required, including some slingers that were easy to convert into additional javelinmen for the Auxilia.  The guys holding their javelins low were originally slingers.

I used only bowmen for the psiloi, to make it less obvious that I converted slingers for the Auxilia. 

I tried a new technique on the bases: I used spackling compound to blend the individual figure bases smoothly into the base, and a dusting of sand for texture.  For both the psiloi and auxilia, I based the figures prior to painting them, and this worked out great. Thanks for the idea, JM!

The color progression for the sandy base came from a Flames of War article about desert basing.  I chose the Middlestone/Tan Yellow/Buff colors.  Unfortuantely this didn’t do what I intended, but it looks fine in the end.  Middlestone is very green, and Tan Yellow is pinkish (flesh colored).  Buff goes well with Middlestone, but the overall effect is not “sand” if you look at it closely enough.

This is my first army with Camelry and Light Camelry.  For these stands, I painted the figures first and then applied spackle after basing them.  Unfortunately this resulted in a few white spots on the camels’ legs, but overall it worked well.  I could’ve painted the Light Camelry when it was already based, but probably not the 3 camel stands.  To affix the sand to the base before painting, I sprayed with dull varnish prior to painting.  Usually the primer takes care of this, but not if your figures are already painted.  I used Army Painter dull varnish for the first time on this army, and it came out almost as dull as Testors Dullcote at a lower cost: that change was a success.

The other thing that didn’t work as well as I had hoped is the flesh color.  I started by trying a new color, Vallejo Dark Flesh.  I prefer Tan Yellow for a middle eastern flesh color; Dark Flesh is too orange.  The inking didn’t work well either.  I used my now-standard Didi’s Magic Ink, which usually works well, but it needs to be applied over very dry paint.  I applied it too soon after painting, and it pooled and caused some very dark spots.  I mostly fixed these problems with Tan Yellow highlights, but the shading is a lot more harsh and messy than I prefer.

I look forward to seeing this army in action!  With all these light troops I don’t expect it to perform particularly well against any random army, but I can’t wait to see what the Camel General can do against enemy mounted: it’s even odds against an elephant.

DBA Army IV/35: Mongol Conquest

I haven’t finished painting a DBA army since February?  Weird.  I blame it on the goblins.

I chose to paint a Mongol Conquest army to participate in the Baltic Crusades themed campaign event at Historicon 2010. This is a fairly one-dimensional army in this configuration: 3x3Cv, 9x2LH.  The figures are Museum Miniatures from their Mongol line.  I also purchased a traction trebuchet model from Museum for the artillery option, but it was way too huge to fit on a DBA base.  A future update shows the alternate model I scratch built.

I used medium cavalry with swords and bows for the Cavalry elements.  They’re helmeted, but otherwise look very much like the light horse archers.

Painting this army was an exercise in finding all my different shades of brown paint.  I used a grey-blue and dark red for highlights, based on images in the Osprey Mongol Warrior book.

There are two cavalry poses (MG09BP, MG09CP) except for the general (MG01P) and standard bearer (MG02P), and three poses for the light horse archers (MG06P).

This will be another challenging army to play (along with the Skythians).  Maybe I just like losing.  I’m not very good at playing light horse armies yet, but I want to be.

The surface of these figures is glossier than I prefer. This time I used a few base coats of semi-gloss varnish before topcoating with Dullcote.  I probably should’ve waited longer before the dullcote layer.

My next DBA army is already in the works, so it won’t be 2 months before that one’s finished. I also need to paint one more army before Historicon for another theme.

Malifaux: Ramos’ Crew

Wyrd Miniatures makes some very nice miniatures.  They also make some really creepy ones, if that fits your tastes.

Personally, I really enjoy the steam punk elements available in their line.  After perusing their miniatures for quite some time, I settled on purchasing Ramos the Steampunk Sorceror and his crew.  He builds robot spiders out of scrap, and sends them off to do his dirty work.

I started by painting the arachnids.  Assembling these figures was a big pain in the butt, and there was almost no gluing surface at all.  They were definitely designed as display figures and not gaming figures.

The spiders are painted black with metallic dry brushing.  Except for a few lights and lenses they’re very straightforward.  In real life they have a nice monochrom metallic look that doesn’t come across well in images, and they have just enough color to be interesting.

Three arachnids on a single base are a Swarm. 

They can break up into individually based spiders for more flexibility. They can explode!  And Ramos can summon new ones when the old ones die.  We’ll see if any of this is worth doing, once we actually play the game.

The larger Brass Arachnid is Ramos’ totem: basically a magical familiar, but his is appropriately a spider.  This guy is quite large for his 30mm base.  I like the model a lot, though the paint job looks better in person as usual.

All the bases are from Dragon Forge’s Wastelands II series.  I intend to find some long grass to tune the bases, but can’t seem to get it locally.

I chose Johann, a mercenary, for my other main dude.  Although he’s usually part of a different crew, his special ability allows me to take him with Ramos as if he were also an Arcanist.

I painted Ramos (above) and Johann using a blending technique for basically everything except the metallic portions and the base.  I’m very happy with how they turned out, especially considering how long it’s been since I’ve tried to do a good job on a 28mm+ figure, and also considering the amount of time I spent on them.

These figures are just enough to play a 25 point game, which is kind of small.  I’ll provide some feedback on the rules once we try it out, but I’m very hopeful.

New Hops Trellis

Spring has sprung a bit sooner than I anticipated.  I saw the hops buds peeking their noses out; it seemed like only a week or so ago.  Now all of a sudden they’re 3-4′ long.

I decided I needed a higher hops trellis this year, since last year’s yield wasn’t that good.  I suppose another way to look at it is: I haven’t actually used last year’s hops yet, so what does the yield matter anyway?  But where’s the fun in that? This is all about the process and not the result.

In past years, I saw others’ complicated trellis systems, but didn’t think much about building anything similar.  But I brainstormed a bit since last weekend, and came up with a plan for a taller trellis that lets me lower the top beam for picking. 

My previous trellis was made from 1″ galvanized pipe, and it seemed strong enough.  It was about 9′ high in the center, with twine running horizontally from there.  However, the main hops bines don’t like to grow horizontally, so that was mostly a waste.

The new trellis uses a 12′ 2″x4″ with a metal ring on top, screwed to my fence post.  A rope is attached to the top beam, through the ring, and down to a rope cleat mounted on the post.  I raised it above the ground somewhat, so the total height is closer to 13′.  The twines are tied tightly to the top beam, but they’re lashed at the bottom so I can tighten or loosen them there if necessary.  I also left a small amount of slack in the main rope in case it needs tightening. The twine goes slacker and tighter depending on the weather, and needs adjustment throughout the season.

Until the hop bine grows to the top, the weak link is the twine.  The bines are much thicker than the twine, so once it reaches the top the main concern will probably be with the pulley ripping out at the top.

Unfortunately, many of the strongest looking bines had their tops broken off before I could train them.  I cut a lot of spare bines off, and trained about 7 bines up the twine.

We’ll see how well it works as the season progresses, but I’m happy with how inexpensive and easy this was to set up.

Too Many Goblins!

I’m glad I only bought one box of Battle of the Five Armies for now, because I am totally sick of painting these tiny goblins!

This is 8 units of goblins, with 3 stands per unit and 2 rows of figures per stand, or 48 rows total.  These 8 units are also a bit under 1/3 of all of the figures in the box.

As I mentioned in the Fanaticus forum: there are always too many goblins, they’re almost as bad as Romans!  At least these are in 10mm scale, I don’t think I could handle painting many of these in 28mm.

The Battle of Five Armies: The Dogs

I’ve started painting figures from GW’s Battle of the Five Armies boxed game. I started with the Wolves and Goblin Warg Riders because I like dogs, and find them easy to paint.  The four units of Wolves and four units of Goblin Warg Rider cavalry represent just under 1/3 of the figures in the Battle of Five Armies box.

These are 10mm miniatures, quite a bit smaller than my 15mm DBA armies.  This is the scale where sane people stop shading anything and resort to block colors with black lining between them.  The results are quite reasonable at normal playing distance (arm’s length), but as seen in the pictures here, they’re not meant for closeups.

These are plastic figures, and the shape of the wolves is exactly the same as the 28mm Warhammer wolves.  All of the plastics are modelled at 4x scale or larger, and then they somehow shrink them down when making the molds.  The figures lose some detail on the top and bottom, since there can’t be any undercuts in the mold, but leaving black primer there hides the defect well enough.

The main complaint I have about the figures themselves is the fact that the poses are all identical.  They’re packed tightly onto the bases and you can’t get much variation in their position.  As far as accuracy goes: the wolves and wargs are the same models, unfortunately.

I’ve heard a theory that Tolkien’s Wargs are actually Andrewsarchus Mongoliensis.  This makes sense from a morphological perspective, and I enjoy the idea and its possible implications. Although it’s hard to interpret the intent of the author when it comes to fictional works, I think that once a book is written, the interpretation of the reader is far more important than the intent of the author.  Stories that stand the test of time will inevitably suffer no end of interpretations inconsistent with the author’s designs, but they will survive them all.

However, I’ve also decided that I don’t really enjoy painting these 10mm guys.  It’s not hard, despite how small they seem, and it’s impressive how little paint it takes to make a figure look painted if you’re leaving black lines between the block colors.  But it’s a very tedious, repetitive process.  Watching (listening to?) the olympics helped a lot, but that’s over now.

I’ve finished painting the goblin infantry as well, but they aren’t all based yet, because I ran out of metal 40mm x 20mm bases until I got more tonight at Legions. That leaves “the good guys” and leaders.  I’ve started the elves, but haven’t gotten very far on them yet.

Making Things to Make Things

Some folks get so caught up in building jigs that they never end up building the things they intended to make with the jig.  I think this is an unfortunate position to be in: halfway between making tools, and gaining the skills appropriate to work on the project you want to finish.  Although I don’t like building jigs for their own sake, many improvised tools are extremely useful to the project at hand and well worth the effort.

For example, I built this rack to hold plastic miniatures on their sprues while I’m painting them.  I’ve only used it for a few days and it has already saved me more time than it took to build.

The first version used a coat hanger instead of a wooden frame, and the whole thing wobbled so much it dumped my figures on the ground.  With this one I can pick it up by the top portion, and it’s well balanced and sturdy enough to carry between the attic to the porch for spraying primer and varnish.

The figures here are from my latest project: Games Workshop’s Battle of the Five Armies boxed game. It’s based on the excellent Warmaster rules (also by GW), and comes with a metric pantload of plastic 10mm figures.

Pictured on the rack here are the 4 units of goblin wolf riders, and 4 units of wolves.  I like painting wolves and they go really quickly for me, so I did these first.  This represents just under 1/3 of the sprues in the game, but I am guessing considerably less than 1/3 of the total time to complete painting it all.  That said, the paining went more quickly than I expected on the goblins, so I have hope I’ll be able to finish all the miniatures without going insane.

This signals a shift away from DBA painting for a bit, hopefully at least until the BoFA armies are finished.  I may sneak in a few elephants and rough going terrain pieces for variety.  I expect I’ll eventually get back to 15mm historicals to paint DBA armies for Mongol Conquest, more Chinese, and more Alexandrian Macedonians.