Game report: Uncharted Seas

Games Workshop’s Man O’ War has been out of print for a long time. After failing to find any reasonably inexpensive copies, I started looking for alternatives, and came across The Uncharted Seas.

Uncharted Seas is a fantasy naval miniatures wargame released a year or so ago by Spartan Games in the UK. The ships are nominally 1/600 scale, but since they’re fantasy themed and there are no humans to compare them to, it’s hard to tell. The largest ship in the image above, the Dragon Lords Battleship, is over 6″ long, and the smallest ships, frigates, are just under 1.5″ long. The sails are metal and the hulls are separately cast resin.

Frank and I liked the look of this game, so we bought a starter set each and the rules. Frank chose Iron Dwarves, and I chose Dragon Lords. The dwarven boats are almost identical copies of some of the better looking Civil War ironclads. The dragon lords ships have sails patterned after dragon wings.

Each starter set comes with one battleship, a squadron of three cruisers, and two squadrons of three Frigates. The game is new and Spartan Games is fairly small, so they have a few additional ships available for each fleet, but certainly not an overwhelming volume of “stuff you need to buy.”

The models are quite pretty, and are high quality 
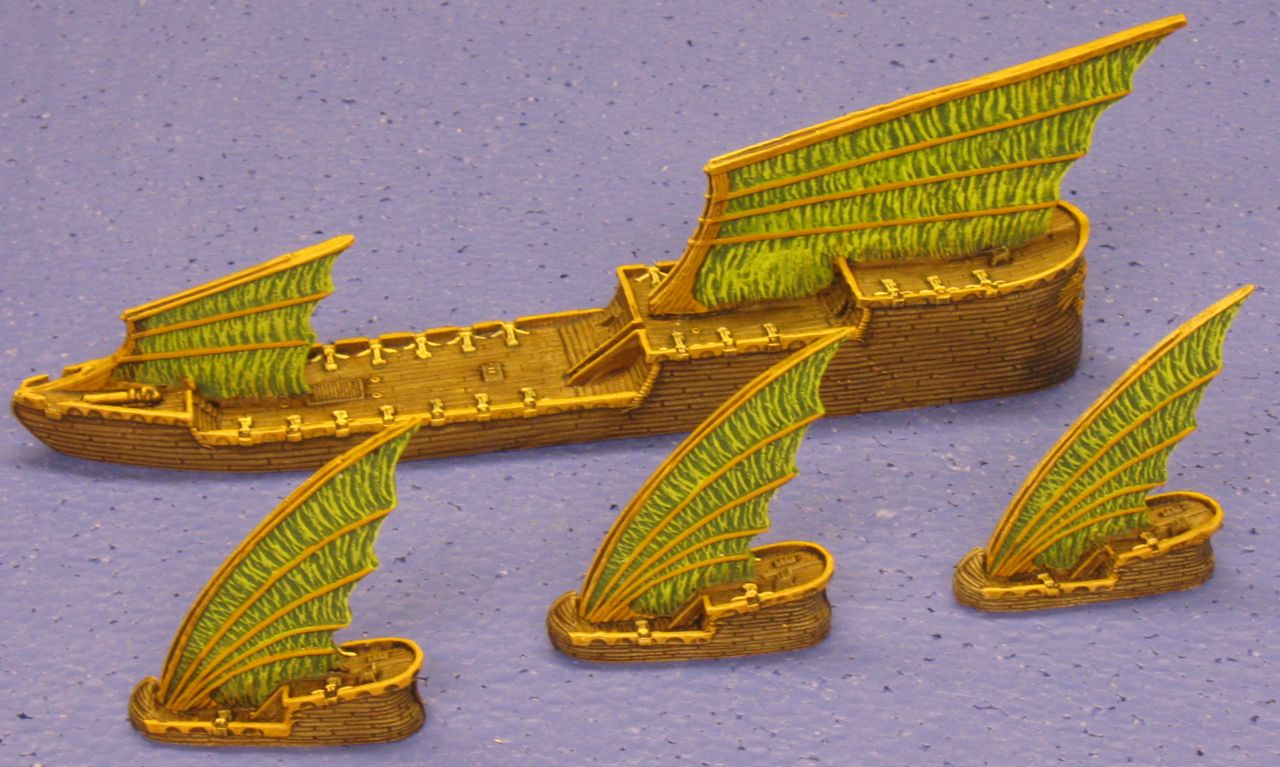
castings. The resin parts are cast very cleanly and needed minimal cleanup, but the bottoms needed a pass over sandpaper to flatten them out. The only flaw I had with the resin was evidence of its brittleness: the railing was cracked off in a few places, and I had to repair this with putty. The metal sails needed a bit more cleanup on their edges, and didn’t fit perfectly to the shape of the hulls. I chose to solve the problem with epoxy, but drilling the hulls and sails and using pins might have produced better results.

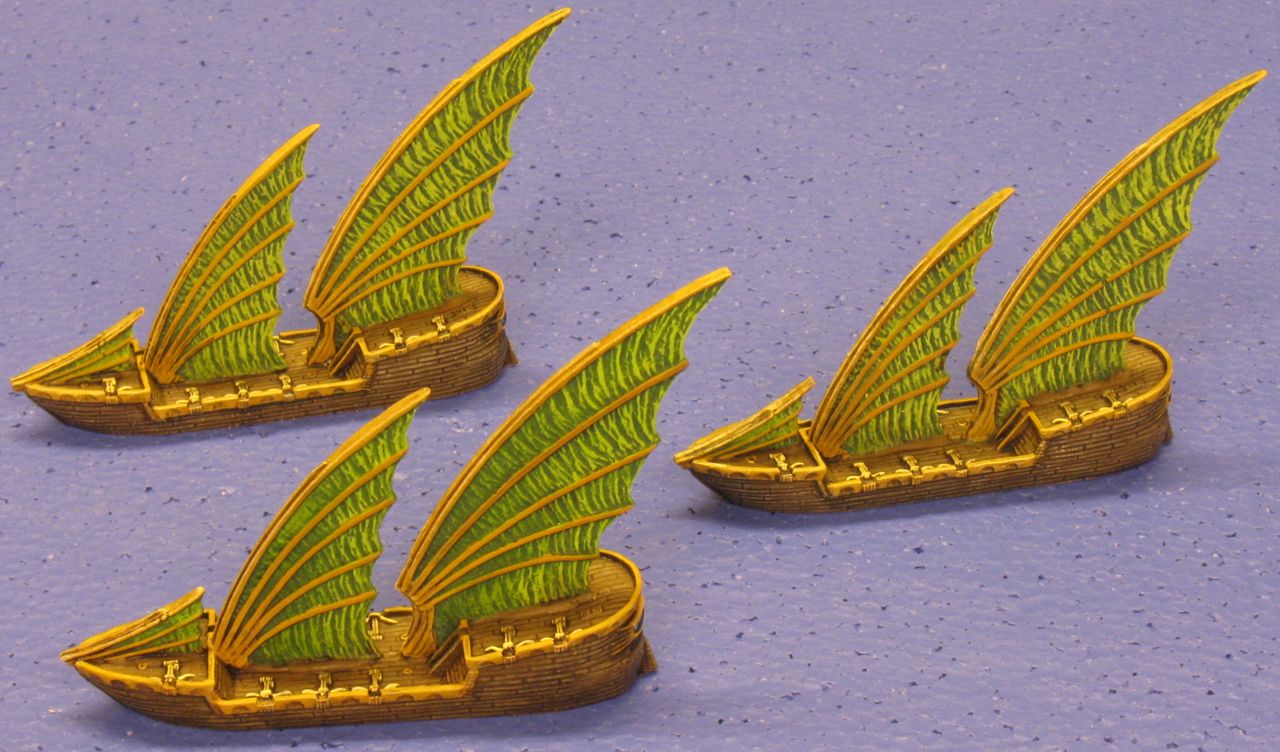
My initial color choice, shown in the oddball Frigate squadron above, was disappointing. The switch to a brown hull and dark yellow spines on the sails improved things immensely. Painting the ships was quite fast using standard inking and drybrushing techniques, but not as fun as I had hoped. The textured surface of the Dragon Lord takes drybrushing very well, and the boards in the hull show ink perfectly. The only real fiddly bits on the Dragon Lords ships are all of the tiny ballistae on the decks of the ship, which are smaller than crossbows for 15mm figures. Everyone else gets cannons, which would be much more fun to paint.

The rulebook has quite high production quality. It’s printed in full color and is very glossy. There are many inspiring photographs of painted fleets, as well as digital images showing other paint scheme ideas.

Unfortunately the text itself isn’t very good: this is YAUBR (Yet Another Unintelligible British Ruleset). Some rulebooks put 10 pages of rules in a 100 page book and fill the rest with fluff and exposition, making the rules hard to find when you need them. Others put 10 pages of rules on 1 page using tiny font sizes, arcanely terse writing styles, and a heavy dose of omission; an index is impossible without the use of line numbers instead of page numbers.

The Uncharted Seas rules don’t fall completely into either of these categories, but have some problems nonetheless. The rulebook constantly comments on the rules, explaining how simple they are and that they were chosen to make the game fast and exciting. Much of this would be better if it were left out, or put into a “designer’s notes” section. Unfortunately we came across questions which seemed to be unanswered in the rules, so we basically just made stuff up or decided how to handle things on the fly until we could consult a FAQ… except, there isn’t a rule FAQ, only a forum.

Another downside to the rulebook is, the rules have changed since the first printing. Updates are freely available on the Spartan Games website, but this is inconvenient. The new rules make sense where the old ones didn’t, at least. I’m not sure how much has been fixed in the second revision of the rulebook, but I’m going to wait for the next revision before I buy another copy.

The rule book comes with templates and counters you can copy and cut out, and third parties have already produced laser cut plywood/acrylic alternatives. At first I thought it might have been nice to have some thicker cardboard templates in the rules, but at this point I think I prefer the thin cardstock: the templates often get in the way of other ships, and you can slip the cardstock under another ship or bend it out of the way fairly easily.

Although the rulebook is not perfect, the rules themselves are quite good, and not difficult to learn or play. The basic feel of the game is very similar to Battlefleet Gothic (BFG), but it’s simpler and faster to play. Luckily, not much is lost in the process.

There are a few basic tactical problems you face in “broadsides” naval games like this:

  • Maneuvering a ship while taking into account the effects of wind
  • Lining yourself up for good shots, even though you move forward and shoot primarily to the side

We didn’t encounter the first problem, because both Dragon Lords and Iron Dragons are immune to the wind (human, elf, and orc ships are not). The “broadsides” problem was present in Battlefleet Gothic and showed itself here as well. The ships themselves felt faster than I remember ships being in BFG; the 4’x4′ board felt crowded with 5 islands and the two starter fleets, and the edge of the board came a lot more quickly than I expected.

The basic combat mechanic is well known to anyone who has played a Games Workshop game: roll more d6’s than you can hold in 2 hands, and hope you get a lot of 6’s. However, as anyone familiar with statistics knows: despite superstition, rolling more dice produces a much more even distribution of results than rolling only a few. Rolling lots of dice doesn’t necessarily make the game feel more random, and this combat system works quite well for its suited purpose.

In terms of ship effectiveness, it’s clear that the battleships kick butt and frigates are mostly useless. You can effectively take on a ship one class larger with several of your boats, but it would be very difficult to put much of a dent in a battleship with your frigates.

Overall, we both liked the game enough to be interested in buying more ships. I’ll likely get a Dragon Carrier, which launches dragons instead of airplanes, and a squadron of Heavy Cruisers. They also have a Flagship for each fleet, a slightly larger battleship, but the rules for those aren’t finished yet and the rough draft looked unimpressive. I may just get another battleship for variety though.

DBA Army II/7: Later Achaemenid Persians

Here is the Later Achaemenid Persian army, finished. These are Essex 15mm figures from their DBA army pack. The only optional elements I didn’t paint are the scythed chariot and the cavalry general.

The color schemes are all based on images in the Osprey book on the Achaemenid Persians, which are taken from the Alexander Sarcophagus and the Alexander Mosaic. “Yes, they really did wear that much purple and (saffron) yellow.” But also notice that almost everyone is wearing expensively dyed fabric instead of armor.

Here is the general on his light chariot. Since this army will be playing primarily against Alexander the Great, I consider him to be Darius III, king of Persia. I almost displayed him facing backwards, since he always seems to be fleeing from Alexander in historical images.

Two Cavalry elements. I’m least happy with the shading on these guys’ hoods. I should’ve used a lighter ink, but I didn’t. It’s not as obvious in pictures. I’m also not sure about the armor; it doesn’t match anything I’ve seen in books.

These are the two elements of Light Horse.

Here are four elements of spearmen. I’m not very happy with the choice of figures here, because I’m intending to use this for a very late army. These “Dipylon” shields are a hundred or more years out of date by Alexander’s time. The rear ranks are “immortals” from earlier Perisan armies, and it’s kind of weird that they’re carrying bows as well as spears and shields. They’re shown wearing older long Persian robes instead of the shorter Median style tunics and pants they adopted later. The front ranks are painted like Darius’ spear bearers (bodyguard).

They look nice, and work the same way on the table, but they aren’t likely the spearmen faced by Alexander.


In the front are 4 elements of Auxilia, Takabara. These are fairly good figures, but I think the shields are too small. I made an attempt at adding a few shield designs, but it didn’t work very well. In the rear are three elements of Psiloi: Persian slingers and javilenmen. I’d rather have bows tha javelins.

Overall, I’m happy with the way it turned out. I can’t bring myself to spend a lot more time on 15mm figures, but with only rudimentary shading.

Persians, almost done

Here’s an in-progress picture of my latest painting projects. This is another DBA army, II/7: Later Achaemenid Persians. There are also three frigates from Uncharted Seas in there, they aren’t Persian ships.

This shows how I hold the figures for painting. Similar figures are hot glued onto a stick, far enough apart that I can reach all parts of the figure. Horses are primed in brown or grey since that’s the primary color they’ll be when they’re done. The rest are primed in white, grey, or black depending on which color I think is best that day (and somewhat depending on what color is going over the primer).

For cavalry, sometimes I glue the riders on before painting, but sometimes I stake the riders on pins and paint them separately before epoxying them onto the horses.

These figures have just come in from being sprayed with matte varnish. After that, they’re removed from the sticks, and glued to bases. Then I paint and decorate the bases. These will fill 16 stands of figures (4 cavalry, 1 chariot, and 11 infantry elements).

I’ll have pictures of the finished army soon. This looks like it’ll be a fun army to play with, except for the fact that they’ll always have to lose against Alexander the Great.

New Elements

I painted up a few extra elements to augment my existing DBA/HotT armies.

First is two elements of Greek cavalry. This is intended for use with my later Spartan DBA army. It turns out I may have needed some allied cavalry instead of greeks, to be strictly correct; and I really only need one of these. But they’ll help me fake a non-Spartan later greek hoplite army. These are 15mm Essex figures. I got one pack of medium cavalry and a few packs of light horse, so there is one unarmored cavalry figure per element. The rest of the light horse figures would eventually let me paint up 3 2LH elements.

The other recent additions are 10mm Dwarven cannons. These are Citadel Warmaster figures, based as Hordes of the Things artillery elements.
I based these up years ago when I painted the rest of the Dwarf army, but only got around to painting them now. I think I still have a few elements of blades to paint, but that’s not on the schedule yet.

I’m making some progress on my Later Achaemenid Persian DBA army, but not enough to take pictures of yet.

DBA Army I/43a: Skythians

I finished painting another DBA army. This is a 15mm Skythian army, DBA I/43a, with all options.

These Skythians portray a skill that definitely falls outside the realm of the Jack: riding a horse with only a horse blanket, before stirrups were invented, while using both hands to fire your bow, and simultaneously avoiding being killed by your enemy.

The bulk of these figures are from a Falcon Figures DBA v1 army pack. The two stands of light horse with riders facing forward and the Auxilia are Essex. The Falcon metal was very brittle, so I mounted these on thick Litko Aerosystems plywood bases with plasteel on the bottom, to pick them up without touching the figures. I’m not that happy with the base edges, I’m more of a thin base sort of guy.

The general can be either cavalry (3Cv) or one of the light horse (2LH) elements. Just like in real life, it’s hard to tell who the general is. Skythians were famed for their hit and run horse archers, and in DBA the army can be fielded with all 12 elements as light horse. This can make them very difficult to control. I think they might also work better on a 30″ board instead of 24″, for extra room on the flanks to avoid the “end of the world” phenomenon.

Here, the Essex light horse figures are in the rightmost column. The Falcon horses were separate from their riders, which made them easier to paint and then assemble later. I epoxied the riders on, after clearing a spot down to bare metal on both parts. The epoxy is transparent, and not really visible even where there’s too much. In fact, I used epoxy on some of the bows to help prvent them from snapping off as well.

I used Essex figures to fill in the figures missing from the DBA v1 army list, to bring it up to DBA v2 standards. I was surprised to see the skins on the backs of the Essex light horse: I thought they all rode with saddle blankets. Reading about them in the Osprey book, it turns out those are “the flayed skins of their enemies,” thus the general lack of hair. On the other side of the horse, there’s also a scalp. The Falcon figures were portrayed as much more civilized.

Here is one element of auxilia (3Ax, Skythian javelins) and two elements of psiloi (2Ps, the archers). The auxilia are Essex figures.

Unfortunately I didn’t get any female horse archers. Apparently they rode side by side with the men, which would be wonderful to portray if the figures were more readily available. Skythians wore colorful tunics, with decorative stripes down their arm and leg seams, and around their necks, and goofy Smurf hats. I might have preferred to see more different horse and rider poses for the Falcon light horse, but they’re so colorful that it hardly matters.

I had fun painting this army, and I’m quite happy with how well it turned out. When I finished, I decided not to paint another DBA army for a while, but I think I’ve already changed my mind.

But after I finish painting a few DBA camps, I’ll most likely be painting fantasy naval vessels for Uncharted Seas.

More Middenheimers

I figured out how to push “painting miniatures” into the “thing I do now” slot: I just needed to listen to music or movies, and that made all the difference. I painted my second batch of 4 Middenheimer figures in no time at all, compared to the first 5.

After actually playing Mordheim, I decided to adjust my warband somewhat, and this required a tenth figure: Mack is on the left in this picture. In the center, One-eyed Mitt is named after his eyepatch and gigantic left hand. Mick is on the right.

These two figures are metal Middenheimer Youngbloods: Marion and Mike, aspiring carpenters. The metal castings have a lot more detail than the plastic figures, but these ones turned out not to be harder to paint.


These are the Henchmen: the no-name dudes who are most likely to die. The two on the left with hammers were painted more recently.

As far as Mordheim the game goes: we’ve played twice, and we enjoy it. It’s definitely a Games Workshop game, and can be abused if you let it. We’ve been playing 3 player scenarios, and we end up with a lot more casualties than I expect we should.

One of the good things about Mordheim is the fact that the rules are now freely available for download from the Games Workshop web site. The figures aren’t really available anymore for the most part, but you can use just about any figures you want, for them.

DBA Army II/12: Alexandrian Macedonians

Several years ago, I bought a 15mm Essex Miniatures Alexandrian Macedonian army for DBA. This is the army Alexander the Great used to conquer “the known world.” I wasn’t particularly interested in Alexander the Great, but he was a contemporary enemy of the Later Spartan army I already had. Conquering the known world tends to accumulate enemies, so there would be plenty of options for fighting reasonably historically matched battles with these guys.

Except for one thing: no one else actually plays DBA. At the very least I’d need to paint all the armies and bring all the terrain. So when it actually came down to painting the army, I basically finished the two Psiloi elements (two foot bowmen each, on the flanks) and stopped.

Now, years later, I’ve started painting again. I decided to sneak a few of Alexander’s troops in while I was painting my Middenheimers, but then I ran out of Middenheimers to paint, so I just finished these instead.

Alexander leads the cavalry charge from his right flank. Light troops link the cavalry to the pike block in the center, and prevent them from being encircled.

Wargamers tend to be pretty picky people. You can’t paint your American Revolutionary War British troops yellow without being ridiculed, for example. So I spent a lot of time researching what color Alexander’s troops should be painted. But I discovered something interesting: this happened so long ago, no one really knows. In the Ancients period, people don’t seem to be all that picky about getting the uniform colors perfect.

Alexander was a successful conqueror, so many of his documents survived long enough for historians to write about him in the following centuries. We know where he went, how many troops he had, and how they fought. But apparently no one bothered to write down what color the uniforms were. There are a few sources useful to extrapolate uniform colors, but there are only a handful of examples, and their pigments have surely changed color in the last 2300 years.

So, it’s impossible to tell whether all of Alexander’s pikemen were dressed in lavender with yellow stripes, or whether this was reserved for only certain troops, or special occasions. In any case, everyone seems to agree that Alexander’s uniforms were quite ugly.

The pike block in the center was the backbone of Alexander’s army. It formed the anvil against which the Cavalry’s hammer slammed the enemy.

While researching uniforms, I’ve learned a lot more about Alexander the Great’s major battles and overall conquests than I intended. It has been interesting.

On the left flank, more cavalry prevents the enemy from encircling the pike block in the center.

Alexander’s recurring major enemy seems to be Darius II, king of the Persian empire. He had huge numbers of troops, and almost always outnumbered Alexander (sometimes by more than a factor of 10). But Alexander always won because of Daruius’ weakness: he was very eager to run away whenever he saw Alexander anywhere near him, and the rest of his troops followed him even when the battle was going well.

This makes it difficult to accurately wargame battles between Alexander and the Persians, without making it seem contrived and broken. “Roll a die to see if Darius runs away this turn” isn’t very fun. DBA sacrifices numerical accuracy for playability: all armies are represented by exactly 12 elements (my army above contains a few different options that I’d choose 12 from before I started a game).

Hopefully I can convince some unsuspecting newcomers to play a game or two of DBA. In the mean time, I’ll start painting another of Alexander’s enemies: the Scythians. Horse archers, anyone?

Middenheimers

I decided to try painting some miniatures again, to see if it would capture my attention as my next “thing to do,” or not. The verdict is still out, but I did finish this batch of figures at least.

Here we have: one goblin, two treasure chests, and five Middenheimer warriors armed with axes, swords, and crossbows.

I never manage to take good pictures of my figures, most likely because I can’t produce enough light.

I did an adequate job painting these, but not a wonderful job. They’re fine for table gaming, which is all they’ll ever see (if they’re lucky). I haven’t painted anything in several years, at least since Ezra was born, and these figures I’ve had sitting in a box for probably 5 years or more, waiting to be assembled.

I have no clue where the goblin came from. It’s a random metal casting I picked up somewhere, not a Games Workshop piece. I started painting it last time I was painting, and decided to finish it while I was working on the rest, so it’s really out of place here.

The rest of the pieces are plastic models from the Games Workshop game Mordheim. I like the “mix and match” and posing you can do with these multi-part plastic models. In Mordheim terms, these are human mercenaries from Middenheim, but I tried to make them passable as pirates as well. I chose a civilized blue and green color scheme: maybe they pirated a shipment of fine French high school band uniforms?

There’s an equal likelihood that we’d play Blood and Swash with these. Martine’s just getting old enough for this, so maybe my secret plans to create a new opponent will finally reach fruition? She can handle the rules, but probably won’t like it when her guys start dying. Last time I tried playing with Martine, she convinced me the guys were going to start talking to each other instead of fighting. We’re going to have to work on her social skills. *

Blood and Swash is always really fun at conventions. It’s a simple, fast-paced skirmish scale miniatures game, originally designed for recreating barroom brawls in the age of Pirates. We played most recently on a regular Saturday game night, using some of Martine’s Playmobil soldiers and terrain (after she was in bed: she didn’t mind them dying when she wasn’t around). It worked really well: when Andy and Theresa’s guys died they took over a snake and a T-Rex, and chased Frank and I until we fled with the loot.

Blood and Swash has the fast gameplay of a miniatures wargame without any of the rules lawyering, combined with the open-ended nature of a role-playing game without any of the role playing (or rules lawyering); but the rules can be explained in 5 minutes and played by anyone who can count to 20. So it makes a great introduction to miniatures wargaming, but it can also be great fun as a light hearted wargame where how you kill someone is at least as important as whether you succeed or not.

It also doesn’t require many figures per player, to get started. However, I could probably use a few more just in case…

* Just kidding. Remember that post where I mentioned I like to say obviously false things for ironic effect? Besides, I think she has become much more caustic since last time we played.

Brew Day

Since Ezra was sick and no one showed up for “brew day” today, I took some pictures.

I generally write down my final recipe just before I start brewing, to refamiliarize myself with the ingredients and process. I also collect my measured ingredients in one place, a practice I picked up while cooking. Here are:

  • 6 lb Wheat/Barley Dry Malt Extract
  • 2 oz Hallertau hops
  • 1/4 lb Crystal Malt
  • 1 oz Bitter Orange peel
  • 1/2 oz Coriander seeds, crushed
  • Irish moss

First I heat about 3-4 gallons of water up to 160ºF, put the grains (only crystal malt, in this case) in a grain bag, and steep them for half an hour. This is the chimpanzee second cousin of the grain mashing process used to extract sugar from malted grains in a full-mash brew, but it’s fine for the small amount of grain used in extract brewing.

I use the thermometer at a few important points during the brewing process, but most of the time the temperature doesn’t matter or is known (boiling water):

  • Measure the temperature for grain steeping
  • Make sure you know when the wort’s about to boil, so it doesn’t boil over
  • Keep it in the boil to sanitize it
  • Measure the temperature of the water and the wort I’ll be mixing in the fermenter, to pitch the yeast at the right temperature

Aftter the grains have steeped, I remove the bag and squeeze it out. Before turning the heat back on, I add all of the dry malt extract, and stir until it’s dissolved. Then, stir constantly while bringing the pot to a boil. Watch out: it is very easy for the pot to boil over when it gets to the boiling point, as well as smelly and annoying to clean up.

Once it’s boiling, I add the bittering hops (all of them in this case), and start timing. At this point I’m boiling the “wort” or unfermented beer. I boil for an hour total. The bittering hops boil for an hour. If I had any finishing hops, they’d be in for 10-15 minutes. In this batch, I boiled the bitter orange and irish moss for 15 minutes, and the coriander for 10 minutes.

After everything is boiled, the wort needs to be cooled to fermentation temperature as quickly as possible, so no bad bugs start growing in it. With a partial boil as I do, where I don’t boil the full volume of wort, it’s a bit easier: I have to add several gallons of cold water, which cools things down quickly.

But first, I cool the wort to a low enough temperature that it won’t require any more cooling once it’s mixed with water. For that, I use a wort chiller. This is just a coil of copper pipe, which I pipe cold water through. I put the chiller in the pot while it’s still boiling to sanitize it. After the boil I just pump water through the chiller and shake it, while keeping an eye on the temperature, until it’s down to about 110ºF.

After dumping everything in the femernter bucket, I stir thoroughly and try to introduce air, which helps the yeast get a good footing early on. Before adding yeast, I take a sample and measure the specific gravity. This original gravity measurement can be used to approximate the potential alcohol content of the beer. Further gravity readings show how far along fermentation has progressed.

Next I pitch the yeast. These days I use liquid yeast cultures. I create a “yeast starter” a few days ahead of time to increase the amount of yeast I’ll pitch. I also take samples of yeast from past batches of beer and propagate those, so I end up buying yeast less often.

I always make complete notes of what I do on brew day, and update them throughout the process. Sometimes I even remember to take notes on how the beer tastes.

Finally, and most importantly, clean everything up.

Build a Wheel

Building a bicycle wheel is one of those endeavors which seems complicated to the uninitiated. It looks difficult, and seems like it would be dangerous if you screw up. It’s actually pretty easy to build a wheel, if you can follow step-by-step instructions. There are hundreds of machines in Taiwan doing that very thing, as you read this.

Building a good wheel may be slightly more difficult. I’m a Jack, not a Master, so it may be the case that I’ve never actually built a good wheel. But it’s easy to tell when you have an unridable wheel, and any wheel which is ridable probably passes quality control for a machine-built wheel. So if you’re satisfied riding on machine built wheels, then no worries: build a wheel! It’s fun!

Sheldon Brown has very good instructions on how to build a wheel, so I won’t try to bore you with the step-by-step. Instead, I’ll provide the background thought-track I used while I was building a wheel tonight.

The reason I’m building this wheel is because I bought a Sturmey-Archer 3-speed hub: just like the ones on the bikes of our parents’ generation (or: your generation, mom and dad) when they were young, a decade or so before the big bike boom of the early 1970’s. In fact, this hub was built in 1966: not the best year, but it should have a lot of life left.

The hub came with spokes and nipples, so I only had to supply the rim. I chose a Sun CR-18, which is a nice, strong, inexpensive rim which supports wide tires and looks nice on “retrogrouch” bikes. I also have Sun CR-18’s on a few of my other bikes, so I can swap wheels without mismatching anything. (I’m sure it’s not worth pointing out that I didn’t describe the rim as “light” or “aerodynamic.” At least it isn’t chromed steel.)

Lacing the wheel comes first. This seems like it should be the hard part, but it’s not!

Oops. I’m sure it’s impossible to tell, but all of the spokes in this picture are off by 2 spoke holes on the rim. If you put them in the wrong place, the valve stem will be obstructed by spokes and it’ll be hard to pump up your tire. The fewer spokes you have in your wheel, the more wrong places you have left to put them. Just like when weaving baskets, the key is to find your mistakes and fix them as soon as possible, to avoid taking apart anything you don’t absolutely need to.

I vaguely remember the first time I built a wheel. When I was a kid, I built a set of wheels for my BMX bike, with Dad’s help. I’m guessing I was around 13 years old? I’d guess we bought all the parts at Bike Nashbar, back in the days when it was an interesting enough store to sell things like frame building lugs, instead of just being a discount/clearance outlet. If I remember correctly I bought some kind of plastic rims? What the heck was I thinking?

I don’t know why I remember this, but I’m pretty sure we laced the wheel incorrectly. I think I interlaced the spokes over each other too many times. It was pretty tight, working on a small 20″ wheel. In any case: it didn’t matter. I wasn’t the hardest BMX/freestyle rider around, but I did certainly beat up those wheels; but I never had any broken spokes (though it may have gone out of true, I really don’t remember).

Eventually, I traded the wheels with a friend who had some solid-spoke “mag” wheels (they were plastic, not magnesium, but that’s what we called them all) which I put on my freestyle bike. (No more BMX for me!) It was a 1984 Haro Freestyler frame and fork, which I got cheap because it was a year or so out of date.

I rode that bike basically everywhere, at least until I got a driver’s license. When I was on an internship in Richland Washington after college, I had my parents mail it out there so I could ride with the other 13 year olds, because there was literally nothing better for a 23 year old to do in that gods-forsaken desert (so say we all). I left the bike there when I left; hopefully the neighborhood kids appreciated it, or at least made some money on ebay. (The family I stayed with lived in a type A converted to single-family use.)

When the wheel looks done, the fun has just begun!

Putting the spokes in properly is necessary, but not sufficient, to build a proper wheel. The next phase, which can be a lot trickier, is making sure the wheel is “true” and that the spokes have enough tension. The rim can’t wobble back and forth, and must be round without any any “bumps” in it. It also must be centered left-to-right with respect to the hub.

At this point, you’re basically debugging: identify the place where the wheel is the most out of spec, and correct it (preferrably without affecting any other adjustment in the process). Repeat
until you’re finished. (How close to perfect is “finished,” anyway? Sheldon doesn’t say.)

Wheel building machines are really good at making wheels perfectly straight and true when they come off the machine. The problem is, the wheels are often undertensioned: without enough tension in the spokes, wheels go out of true, and spokes fail prematurely.

Bicycle wheels work in a counterintuitive way. To most people, it seems that when riding a bike, the hub must “hang” from the spokes between the hub and the upper part of the rim. If that were the case, then when weight was added to the bicycle, those spokes would increase in tension. In fact, that’s not what happens at all for properly built wheels. Instead, the spokes between the hub and the ground decrease in tension: a bicycle wheel works as if it had thick spokes under compression, and the weight is borne by the lower spokes. This is why high tension is so important in bicycle spokes- weight on the bike reduces the tension in the spokes, it doesn’t increase the tension.

Improperly built wheels with tension that is too low do work as if the hub was hanging from the rim. In those wheels, the spokes fatigue and break much more quickly than in a properly tensioned wheel.

Machine built wheels also generally don’t stay true for very long, because machines can’t tell the difference between twisting a spoke, and turning the nipple on the end of the spoke. If a spoke is twisted without the nipple turning, eventually that stress will relieve itself, and the wheel will go out of true. You can reduce that effect by lowering spoke tension, but then you’ll have an undertensioned wheel: choose your poison.

I haven’t built many wheels from scratch, but I have rebuilt, repaired, and retrued many more machine built wheels. Machine built wheels are really inexepensive: cheaper than buying the parts reqiured to build the identical wheel, and far less expensive than a hand-built wheel. So, why not just buy a machine-built wheel, and finish it by hand? In fact, this is what a good bike shop should do for every new bike they send out the front door. Not many shops actually do this, unfortunately.

I think it’s a great deal to buy a machine-built wheel, then retension it myself. I’ve had much better luck with wheels I’ve finished this way, than with wheels I’ve ridden straight out of the box.

“Department store bikes” are ridden, on average, less than 20 miles over their entire lifetime. Yes, I ride more in 2 days than the average Wal-mart bike is ridden ever! The bikes are built with this in mind: most of them can’t ever be adjusted properly, or won’t stay in adjustment. Mike had a Wal-mart road bike. I built him a replacement, a 25 year old Schwinn with a handful of parts I had lying around the basement, and it worked better and he enjoyed it more than his brand new Wal-mart bike.

(Mike, are you still riding that World Sport? Do you still like it? Daniel has another World Sport from the same year, and he seems to be enjoying it as well. I think they must have been on sale that year.)

This is my truing stand and dish stick. I don’t have a multi-hundred-dollar Park Tools professional truing stand. I have a fork stuck into a hole in an ugly coffee table. It works just fine, and it was free. The truing stand is used to identify high and low spots on the rim, and locations where it is untrue from side to side. I used a few scraps of masonite and a nut and bolt attached to the fork’s cantilever post, as a feeler gauge. Although this is a completely adequate substitute for a proper truing stand, it requires understanding how a truing stand should be used, before you can build and use it effectively.

I also built my own “dish stick” out of plywood and masonite instead of paying for the real thing. A dish stick, or “wheel alignment gauge,” is used to make sure that the lock nuts on the hub axle and the sides of the rim are centered in relation to each other. If they aren’t centered, you’ll need to misalign your brakes to compensate for the crooked wheel.

At this point, my new wheel is “almost done” and only requires a bit of fine tuning before I put it on a bike and try it out. It took me about an hour and a half to get to that point on the wheel, and slightly longer to write about it (or, to write about what I was thinking while I was building it).