Building a bicycle wheel is one of those endeavors which seems complicated to the uninitiated. It looks difficult, and seems like it would be dangerous if you screw up. It’s actually pretty easy to build a wheel, if you can follow step-by-step instructions. There are hundreds of machines in Taiwan doing that very thing, as you read this.
Building a good wheel may be slightly more difficult. I’m a Jack, not a Master, so it may be the case that I’ve never actually built a good wheel. But it’s easy to tell when you have an unridable wheel, and any wheel which is ridable probably passes quality control for a machine-built wheel. So if you’re satisfied riding on machine built wheels, then no worries: build a wheel! It’s fun!
Sheldon Brown has very good instructions on how to build a wheel, so I won’t try to bore you with the step-by-step. Instead, I’ll provide the background thought-track I used while I was building a wheel tonight.
The reason I’m building this wheel is because I bought a Sturmey-Archer 3-speed hub: just like the ones on the bikes of our parents’ generation (or: your generation, mom and dad) when they were young, a decade or so before the big bike boom of the early 1970’s. In fact, this hub was built in 1966: not the best year, but it should have a lot of life left.
The hub came with spokes and nipples, so I only had to supply the rim. I chose a Sun CR-18, which is a nice, strong, inexpensive rim which supports wide tires and looks nice on “retrogrouch” bikes. I also have Sun CR-18’s on a few of my other bikes, so I can swap wheels without mismatching anything. (I’m sure it’s not worth pointing out that I didn’t describe the rim as “light” or “aerodynamic.” At least it isn’t chromed steel.)
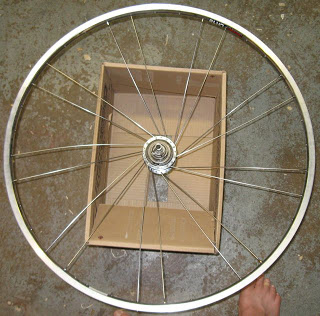
 Lacing the wheel comes first. This seems like it should be the hard part, but it’s not!
Oops. I’m sure it’s impossible to tell, but all of the spokes in this picture are off by 2 spoke holes on the rim. If you put them in the wrong place, the valve stem will be obstructed by spokes and it’ll be hard to pump up your tire. The fewer spokes you have in your wheel, the more wrong places you have left to put them. Just like when weaving baskets, the key is to find your mistakes and fix them as soon as possible, to avoid taking apart anything you don’t absolutely need to.
 I vaguely remember the first time I built a wheel. When I was a kid, I built a set of wheels for my BMX bike, with Dad’s help. I’m guessing I was around 13 years old? I’d guess we bought all the parts at Bike Nashbar, back in the days when it was an interesting enough store to sell things like frame building lugs, instead of just being a discount/clearance outlet. If I remember correctly I bought some kind of plastic rims? What the heck was I thinking?
I don’t know why I remember this, but I’m pretty sure we laced the wheel incorrectly. I think I interlaced the spokes over each other too many times. It was pretty tight, working on a small 20″ wheel. In any case: it didn’t matter. I wasn’t the hardest BMX/freestyle rider around, but I did certainly beat up those wheels; but I never had any broken spokes (though it may have gone out of true, I really don’t remember).
Eventually, I traded the wheels with a friend who had some solid-spoke “mag” wheels (they were plastic, not magnesium, but that’s what we called them all) which I put on my freestyle bike. (No more BMX for me!) It was a 1984 Haro Freestyler frame and fork, which I got cheap because it was a year or so out of date.
I rode that bike basically everywhere, at least until I got a driver’s license. When I was on an internship in Richland Washington after college, I had my parents mail it out there so I could ride with the other 13 year olds, because there was literally nothing better for a 23 year old to do in that gods-forsaken desert (so say we all). I left the bike there when I left; hopefully the neighborhood kids appreciated it, or at least made some money on ebay. (The family I stayed with lived in a type A converted to single-family use.)
 When the wheel looks done, the fun has just begun!
Putting the spokes in properly is necessary, but not sufficient, to build a proper wheel. The next phase, which can be a lot trickier, is making sure the wheel is “true” and that the spokes have enough tension. The rim can’t wobble back and forth, and must be round without any any “bumps” in it. It also must be centered left-to-right with respect to the hub.
At this point, you’re basically debugging: identify the place where the wheel is the most out of spec, and correct it (preferrably without affecting any other adjustment in the process). Repeat
until you’re finished. (How close to perfect is “finished,” anyway? Sheldon doesn’t say.)
Wheel building machines are really good at making wheels perfectly straight and true when they come off the machine. The problem is, the wheels are often undertensioned: without enough tension in the spokes, wheels go out of true, and spokes fail prematurely.
Bicycle wheels work in a counterintuitive way. To most people, it seems that when riding a bike, the hub must “hang” from the spokes between the hub and the upper part of the rim. If that were the case, then when weight was added to the bicycle, those spokes would increase in tension. In fact, that’s not what happens at all for properly built wheels. Instead, the spokes between the hub and the ground decrease in tension: a bicycle wheel works as if it had thick spokes under compression, and the weight is borne by the lower spokes. This is why high tension is so important in bicycle spokes- weight on the bike reduces the tension in the spokes, it doesn’t increase the tension.
Improperly built wheels with tension that is too low do work as if the hub was hanging from the rim. In those wheels, the spokes fatigue and break much more quickly than in a properly tensioned wheel.
Machine built wheels also generally don’t stay true for very long, because machines can’t tell the difference between twisting a spoke, and turning the nipple on the end of the spoke. If a spoke is twisted without the nipple turning, eventually that stress will relieve itself, and the wheel will go out of true. You can reduce that effect by lowering spoke tension, but then you’ll have an undertensioned wheel: choose your poison.
I haven’t built many wheels from scratch, but I have rebuilt, repaired, and retrued many more machine built wheels. Machine built wheels are really inexepensive: cheaper than buying the parts reqiured to build the identical wheel, and far less expensive than a hand-built wheel. So, why not just buy a machine-built wheel, and finish it by hand? In fact, this is what a good bike shop should do for every new bike they send out the front door. Not many shops actually do this, unfortunately.
I think it’s a great deal to buy a machine-built wheel, then retension it myself. I’ve had much better luck with wheels I’ve finished this way, than with wheels I’ve ridden straight out of the box.
“Department store bikes” are ridden, on average, less than 20 miles over their entire lifetime. Yes, I ride more in 2 days than the average Wal-mart bike is ridden ever! The bikes are built with this in mind: most of them can’t ever be adjusted properly, or won’t stay in adjustment. Mike had a Wal-mart road bike. I built him a replacement, a 25 year old Schwinn with a handful of parts I had lying around the basement, and it worked better and he enjoyed it more than his brand new Wal-mart bike.
(Mike, are you still riding that World Sport? Do you still like it? Daniel has another World Sport from the same year, and he seems to be enjoying it as well. I think they must have been on sale that year.)
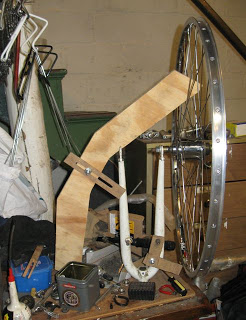
 This is my truing stand and dish stick. I don’t have a multi-hundred-dollar Park Tools professional truing stand. I have a fork stuck into a hole in an ugly coffee table. It works just fine, and it was free. The truing stand is used to identify high and low spots on the rim, and locations where it is untrue from side to side. I used a few scraps of masonite and a nut and bolt attached to the fork’s cantilever post, as a feeler gauge. Although this is a completely adequate substitute for a proper truing stand, it requires understanding how a truing stand should be used, before you can build and use it effectively.
I also built my own “dish stick” out of plywood and masonite instead of paying for the real thing. A dish stick, or “wheel alignment gauge,” is used to make sure that the lock nuts on the hub axle and the sides of the rim are centered in relation to each other. If they aren’t centered, you’ll need to misalign your brakes to compensate for the crooked wheel.
At this point, my new wheel is “almost done” and only requires a bit of fine tuning before I put it on a bike and try it out. It took me about an hour and a half to get to that point on the wheel, and slightly longer to write about it (or, to write about what I was thinking while I was building it).