Halloween 2018: Ezra’s Death Gun Costume

Ezra’s Death Gun costume

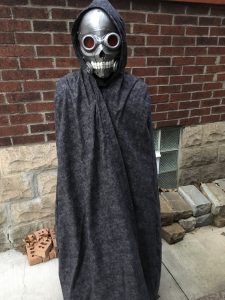
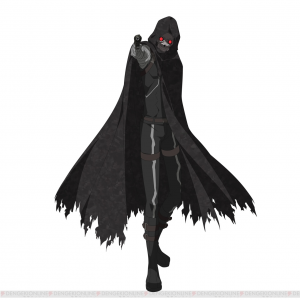
Another year, another Halloween costume!  This year Ezra chose the character Death Gun from the Anime series Sword Art Online II.

This one was supposed to be pretty easy: a mask, a cloak; maybe some arm coverings; he wasn’t allowed to bring costume weapons to school anyway.

Nothing is ever as easy as it’s supposed to be, though.

Death Gun reference image downloaded from tvtropes.com

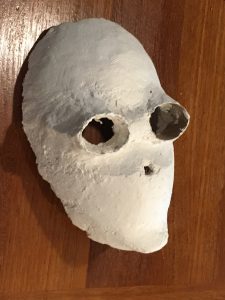
We started with a foam head from the craft store, and a cool material called Sculpt-a-Mold.  This is basically a mix of paper pulp and plaster. After mixing water to form a pasty consistency, you can form arbitrary shapes out of it. Because of the plaster, it dries in only half an hour; but the paper fibers make it much less brittle than plain plaster.

After many iterations of shaping and sanding, we identified a few fatal flaws with the approach.  The mask was relatively heavy, but it was still too brittle to attach straps securely to it.  More importantly, starting with a head-sized base meant that the mask fit too tightly on Ezra’s face, making it impossible to breathe or even open his mouth.

The abandoned Sculpt-a-Mold mask

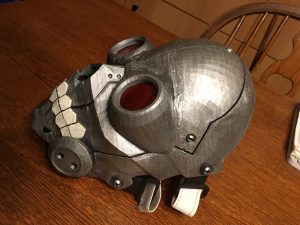
Solving this problem turned out to be a great excuse to get a 3d printer.  There was a model available on Thingiverse available, so all we needed to do was print, assemble, and paint it.

Even 3d printers that work well are a bit fiddly and require adjustment, experimentation, and maintenance to produce good results. I didn’t start printing this mask until I was confident I’d get good results, and overall, it succeeded. I didn’t have any completely failed prints, but there was a bit of underextrusion in the chin pieces, which led to a piece breaking off on Halloween night.

3d printed Death Gun mask based on a model from Thingiverse

The lenses were thin plastic from packaging material, painted with Testors transparent red paint.  We just glued them in, instead of using the lens holder pieces included in the 3d model. The mask itself was glued together using 5 minute epoxy, primed grey, and painted with craft acrylics.  I didn’t make any effort to smooth the surface prior to painting, and it turned out fine.  The printing layers aren’t really visible, but the polygonal facets of the 3d model can be seen in the finished product.

3d printed Death Gun mask

The cloak was made from a pattern and fabric found at Jo-Ann Fabrics. We tried several techniques to get arm wraps like Ezra wanted, but they didn’t work well, so we abandoned that.  Under the cloak, he wore all black, with the black strap chest harness we made for the Gaara costume.

This wasn’t the most satisfying costume project, but it turned out well,

Halloween 2017: Ezra’s Gaara Costume

Woohoo, I’m not an entire year late yet!  Since I have some newer projects I’d like to post, here’s an older one I haven’t gotten to yet.

Gaara costume
Ezra as Gaara
Gaara
Gaara

Ezra’s Halloween costume for 2017 was Gaara: a character from the Anime/Manga series Naruto.  The main props we needed to build for this costume were his sand gourd, and the leather bandolier. The clothing portions were all done with street clothing for simplicity.

Here are a few pictures of the finished costume, with a few more showing how it was constructed and made to work.

Gaara costume, back
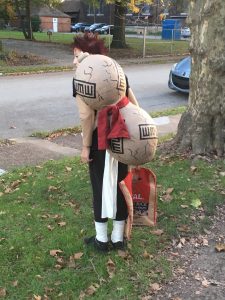
Gaara manipulates sand, and so he always carries with him a giant gourd-shaped container made of sand. This prop defines the character, but it’s huge and potentially unwieldy.  Construction was theoretically simple: use paper mache.  However, it wasn’t easy.

As a base, we used punching ball balloons, chosen because they’re larger and thicker than ordinary balloons. For our first few attempts, we taped the balloons together before applying paper mache.  This was a problem when one of the balloons deflated, and the half-finished shell shrank and wrinkled.  Extracting the bad half and replacing it didn’t work well, so we eventually ended up building up the second balloon separately and attaching them with masking tape and then paper mache after the shell was hard.

Gaara's sand gourd prop
Gaara’s sand gourd prop

The cork on top was a natural cork from the craft store, and the lip was formed using Crayola Model Magic, which is basically an air-dried clay with the consistency of foam.  It’s easy to work with, light, and takes paint well.

The whole giant peanut was painted tan, and then the seals were painted on after tracing the outline from a stencil, and cracks were hand-drawn.

Gourd harness
Test fitting the gourd harness. It’s usually worn under his shirt.

After the gourd was completed, it was obvious that the decorative pleather bandolier would not be strong enough to support it without it sliding around and looking horrible.  To solve this problem, I constructed a harness out of leftover nylon straps and buckles.  The picture here shows Ezra trying on the harness for fit. In actual use, the harness went under his black shirt, and the attachment buckle went through a small hole in the shirt.

Gaara costume, side view
The leather bandolier and buckles are slightly clearer here

The buckle was sewn to the red sash around the gourd, and clipped onto the harness.  This made it removable, so he could take it off at school, and supported the weight completely without putting any stress on the leather bandolier.

The leather bandolier was not difficult: I made a pattern out of paper, cut, and sewed it up.  The multiple matching metal buckles came from a snakeskin leather purse from the thrift store, and were hot-glued into place.

The pleather came from one of our many trips to Pittsburgh Center for Creative Reuse, and the white sash and foot wraps were muslin cloth. He rounded it out with red hair dye and Halloween face paint for the eye liner. The forehead tattoo worked better with acrylic paint than cheap Halloween face paint.

Wooden Weapons

The kids aren’t allowed to get wooden weapons at the Renaissance Festival, because then I don’t get to make them.

A wooden hammer (maul) prop I made for Ezra’s Dwarf costume. Wooden curtain rod, pine wood head, craft foam and fake leather on the handle.
Details of the hammer head show the Gunnerkrigg Court symbol carved into the side of the head, just as Ezra requested.
Short swords for Martine’s Ranger costume. Pine board blades, and masonite reinforcement at the hilt. Handles wrapped with pleather.
The props in use.


Fantasy Dwarf Helmet

Before I can post this year’s costume creations, I need to do last year’s.

Here are some in-process photos of a fantasy Dwarf helmet I made for Ezra’s costume last year.

It all started with a baseball batting helmet I found at Pittsburgh Center for Creative Reuse, and some chunks of 2×4 I glued into blocks.
I cut the helmet down and roughed out horns on the blocks.
I carved the horns with a spoke shave, and sanded them. They’re bolted into the helmet using large lag bolts from behind, with hot glue to fill in the gap between horn and helmet.
Details were applied using flexible craft foam attached with hot glue.
I sprayed the entire helmet black, and then painted most of it metallic steel. After spraying a protective varnish, I added fur to the horns.
The finished costume included a “wizard” beard that we braided, scale armor made from aluminum flashing that I had when I was a kid, one of many home made cloaks, and a wooden hammer I’ll show off in another post.