2010 Mike Daddy Memorial WWII Miniatures Game

“Hey, I remember when we used to play WWII games with Mike.”  So, when he’s in town over the holidays, I make an effort to do it again.

For the most part when we play WWII, we play skirmish scale games: individually based infantry and about a platoon on each side.  We also play infrequently, so we seem to have settled on the Disposable Heroes ruleset.  It’s easy to relearn for only one game per year, and it lacks most of the quirks we found in rules like BAPS.

For WWII, I prefer to play scenario games instead of point-based pickup games, so I’ve invested in a bunch of the Skirmish Campaigns scenario books.  They provide a lot of balanced scenarios with different sized forces and boards, with a credible but not overwhelming amount of research in support.
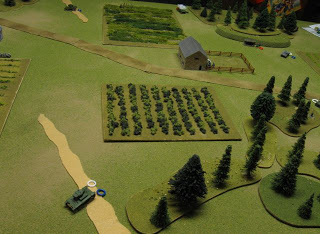
Russian tanks threaten the barn as Germans advance
from the right

This year we played Counter-Attack at Bereza, a scenario from Russia ’41 – Drive on Minsk.  Mike played the Russian force, and Frank and Andy were German.  I ran this as a single-blind game.  Both sides moved their forces on a map, and I made spotting checks. When units were visible, they were placed on the board for all to see.  This slows down the game significantly, but adds a lot: when you don’t know where the enemy is or what their objective is, you have to expect the unexpected.  It’s dangerous to move around not knowing where the enemy is, but you need to be aggressive in order to take your objectives.

In this case, both sides had the same objective: to take and hold the two buildings on the map.  Germans started off board and approached from one side, and the Russians started on the other end of the map but on the board. No one held the buildings initially, but they were closer to the Russian side.  However, the Germans didn’t know where the Russians started, so they didn’t know whether they’d need to assault the building or just walk in unopposed.
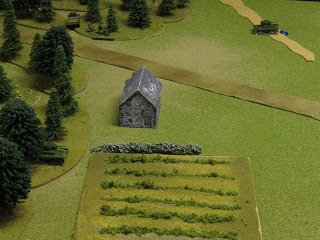
Russians hold the house and threaten the German advance

Both sides had only 2 squads of infantry to take and hold the buildings, and 5 tanks or antitank guns.  The tanks were all comparable: early war lightly armed and armored.  There seemed to be two main forces at play here.  The infantry had no anti-tank capability, but they were valuable to help spot the tanks before they were placed on the board.  Tanks also have a hard time shooting infantry in this game, but they can be deadly if they can acquire a target.  Achieving armor superiority was important to save the limited infantry for the buildings.

In the first half of the game, the Russians were in a better tactical position, but lost a few tanks.  They still had a good crossfire set up, and were in cover, so they regained armor advantage before the end of the game as the Germans advanced in the open.

On the infantry side of things, the barn in the center was the first contentious point as expected.  Mike’s Russians made a mad dash for the building with a heavily damaged squad, right in front of Frank’s German rifle section.  He made it into cover, but the Germans drove him off in close combat shortly after.

With Frank’s other section basically gone, this left Andy’s squad to take the second building.  Mike moved into the house with a Russian tank crew, and then reinforced it with his squad of ninjas who made it almost to the last turn of the game before being spotted.  Andy’s infantry took heavy fire, and at this point it became clear that we had a standoff. 

Although the Russians were in a stronger defensive position, the Germans had advanced past the barn.  Neither side had infantry close enough to their second objective to reach it in the two turns remaining in the scenario.  We could have fought a battle of attrition to the very end, but this was only a small part of a very wide front, so it would’ve been as pointless as most real wars are, and no more fun.  We called it a draw and moved on.

Some gamers who play nothing but DBA like to complain that “other games” take a really long time, and don’t produce any decisive results.  Although this game was a perfect example of that phenomenon, there was no real downside this time since we all get along well.  The main point was to hang out and have fun, and we did.  I call that a win.

Hopefully Mike can make it out to Pittsburgh more often.  I enjoy these games, but I am not likely to put in as much effort as I did more than twice a year, these days.
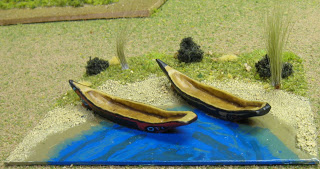
Tlingit Camp

Here’s a picture of the camp I built for my Tlingit army.  Since the Northwest Americans are a Littoral army, they will always have a waterway when they place terrain, so I decided their canoes would make a good camp.  I left room to add a totem pole, but I haven’t been inspired to build it yet.

The canoes are longboats from Museum Miniatures, modified to look a bit more like Tlingit canoes on the front end.  The rear end isn’t right, but it’s the way the canoes  looked when I got them.  The paddlers with the canoes were totally inappropriate for precolumbian North America, so I didn’t use them.

The patterns on the sides of the canoes, barely visible here, are based on images of Tlingit canoes I found via Google image search and in Flickr. 

Panzer III comparison

Here are two 15mm Panzer III models I painted.  The one on the right, “311,” was painted maybe 5 years ago, and it’s a Command Decision model.  It’s probably a Panzer IIIF, but I don’t remember the specific variant.  I painted the one on the left, “312,” a week or so ago for our annual WWII game.  It’s a Peter Pig PzIIIE variant.

It’s hard to tell which differences between these models are due to the different variant they represent, and which are just sculpted differently.  Overall, I much prefer the quality of the Command Decision model.  The Peter Pig castings have a rougher surface and are less detailed.  The drive wheels on 311 are toothed and have properly shaped holes in them (not round) while the PP wheels were obviously just done with a drill bit.  The PP model is larger overall.

In practice, I don’t think these details show very much on the game table, but if I have a choice between Command Decision and Peter Pig for a specific vehicle, I’ll choose the Command Decision.

WWII Russian Vehicles

Here are the Russian WWII vehicles I painted for our recent WWII game.  Since it was a blind game, I withheld these until after the game was finished.

First are four Russian T-26 tanks.  These are Command Decision models and I like them a lot.

When researching appropriate tank markings for these, I found more images of captured T-26’s with German markings, than T-26’s with Russian markings.  Apparently not many of them survived long enough to bother marking them up.  I added a red star to one tank to identify it as a commander, but left the rest blank.

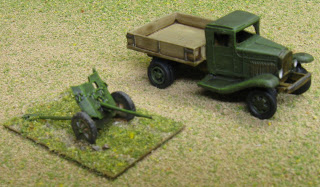
Next is a 45mm antitank gun and a relatively light Gaz truck.  The truck looks straight out of WWI.  These are also Command Decision.

DBA Army I/24: Hittite Empire

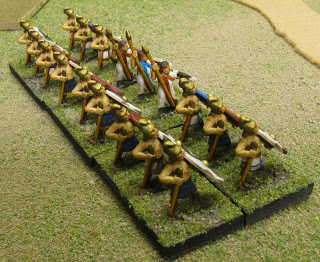
Although I haven’t made a new post in a month, I’ve still been busy.  Here are some pictures of my latest DBA army: I/24, Hittite Empire.

The figures are almost all Essex, but this was a semi-random selection of figures, and not from an army pack.  I bought this as a “not for the squeamish General” deal in the bazaar on the Fanaticus forum, so the figures are not all as appropriate as they should be; however, it’s close enough for me.  I’ll get another copy of the army if I like it enough.

Specific figure selection problems: Most of the spearmen are royal guards, and the rest are charioteers instead of ordinary spearmen.  I got a pack of generic biblical-era hordes for the horde, and got the chariot runners from JM, who also bought one of these semi-random army packs.  All of the figures with beards are somewhat inaccurate unless they’re interpreted as allied forces, since Hittites were apparently known for shaving their faces.

All Hittite chariots used two horses. The heavy chariots had three passengers instead of two.  I modelled all of mine so they can be used either as light chariots in I/24a, or as heavy chariots in I/24b.  The chariot with an archer and no runner would be used as the light chariot in I/24b.

For color selection, I mostly referred to the Osprey Hittite Warrior and Ancient Armies of the Middle East books for inspiration.  They show white robes with red and blue decorations at the edges, and skirts on the guards that use brown and blue stripes.  I also read the appropriate WRG reference, which suggested shields, clothes, and chariots could be colored/painted instead of using natural leather and cloth colors.

I decided on red and blue as the main colors for the army.  Unfortunately this makes them look very similar to my Arab Conquest guys, because it uses “safe” colors I’m comfortable with.  I’m going to have to push myself next time around.

For shading, I primarily flat-painted everything, added detail and some minimal shading, and then applied Army Painter Strong Tone.  It does an adequate job on the white, but it’s certainly not ideal. White is hard however you do it, and I’d rather not spend much effort on it. I pretend it’s just before laundry day: how clean are soldiers going to keep their kit while on campaign, anyway?

I really like the effect Army Painter has on the horses, flesh, and offwhite colors.  It certainly gets adequate results quickly.

Achievement unlocked: You painted a horde element?  Really?