 |
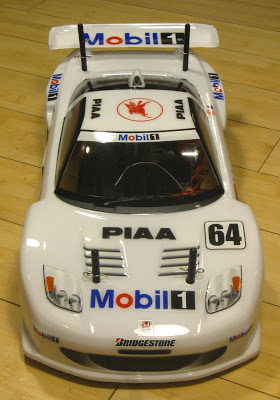
| Sakura Zero S chassis with HPI Honda NSX GT body |
In anticipation of On-Road racing at PT Raceway, I decided to get a second on road car so I could race in two classes instead of just one. I chose the Sakura Zero S chassis from 3Racing because it looks very good for its price, it’s a kit, there are many replacement and hop-up parts available, and it gets good reviews.
The Sakura Zero S is an entry level version of the Sakura Zero chassis. The main differences are that the S version has plastic parts instead of aluminum; fiberglass instead of carbon fiber; gear diffs instead of ball diffs; and it costs about 1/3 as much. It’s a 4 wheel drive touring car chassis with a twin horizontal plate design.
This was a very fun kit to put together. Its plate chassis is very different than the other kits I’ve built recently: the Tamiya M05 and HPI Savage XS. Unfortunately, the Sakura also suffered from Crappy Screw Syndrome, just like… well, apparently this is just like every RC kit everywhere. This time, instead of starting out driving the 3mm screws straight in with a 2mm driver, I threaded every hold with a screw that had a larger 2.5mm head. This destroyed my hands, but I stripped fewer screw heads (unfortunately more than zero). As much as I didn’t like the phillips head screws in the Tamiya kit… at least the heads didn’t strip easily.
 |
| Sakura Zero S chassis with HPI Honda NSX GT body |
The chassis has very adjustable suspension geometry, but the stock dampers don’t allow unlimited adjustment of ride height. I doubt this will be a problem in the short term. It doesn’t look as durable as the M05, but it’s also not a giant block of plastic. I think at the speeds I’ll be running at the track, it won’t matter.
Other than the screw heads, there are a few problems with the kit. The first and most universally well known problem with the Zero S chassis is that the stock motor mount is inconvenient, because you can only access one of the motor screws by sticking your tool through a hole in your spur gear. This is inconvenient with some pinion sizes, and impossible with smaller spurs. There’s a vertical motor mount part available, but this requires you to also use a new top plate and flip your differentials to swap the side each belt runs on… and that causes your belt to run into your battery on the other side. This kit is not ideal if you’re planning on changing pinions often… but it’s still a lot better than changing pinions on the HPI Savage XS.
The other minor problem I have is that the turnbuckles seem to have undersized flats, making them difficult to turn without slipping.
For a body, I was in a hurry and couldn’t find anything I fell in love with, for sale at the same place as the chassis. So, I settled for “acceptable and inexpensive” instead. This is an HPI Racing Honda NSX GT. It retains a bit of the car’s distinct look, especially the air scoop on the rear roof. Hopefully I won’t have any problem with traction roll, because I don’t think the scoop will last long if the car is upside down.
The body fits the chassis perfectly. Figuring out where to drill the body mounting holes is a pain, though. You can’t drop the body onto the car and mark them until the posts are cut to approximately the right height, but you can’t cut the posts until the body is on the car to see where it sits. I ended up measuring the body posts in relation to the center of the wheels, and transferring their locations onto the body using the center of the wheel cutouts as a reference point. It worked, but it felt like there should be an easier way.
Since I’m going to race this instead of admire it on a shelf, I used the external headlight stickers instead of the internal light cans. I think it’d look a lot better with the light cans… until I hit a wall and crack the body, in which case I’d rather have more room to repair it inside instead.
For electronics, I used what I had on hand: a 27T brushed motor and ESC I replaced in the RC10, and a Hobbyking Orange Rx Spektrum receiver. I’ll start out with this slower setup, and once I like how I’m handling it (or once I burn out the motor) I’ll probably upgrade to 17.5T brushless. So far I don’t see hugely different times at the track between the three other cars I drive there (Tamiya M05 with stock 27T brushed; XXX-SCB with 17.5T brushless; RC10 with 17.5T brushless), so I expect the current limitation is my own driving skill more than the technology.
Unfortunately I couldn’t make it to the first on-road race day on December 1, and I won’t be able to make it on the 15th either. Maybe they’ll run on-road on the 22nd, but if not I can make it on the 29th.


