An update, in reverse chronological order:
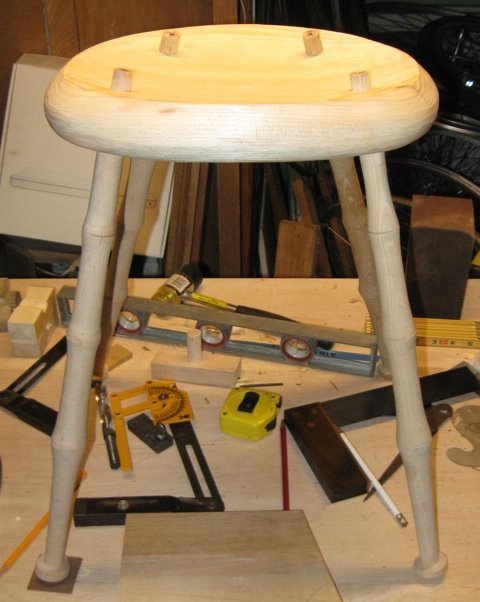 It’s starting to look like a stool!
Stool
I carved the seat top, and reamed the leg holes, allowing the tapered leg tenons to enter the seat. Next is drilling the legs and stretchers, and gluing it up.
It’s very important to do all the steps of constructing the chair in the right order. Fortunately, every chairmaker uses a different “right order.” I could have done a better job on this stool, but it’ll all work out just fine.
The main considerations seem to be:
- Obviously, respect any strict order dependencies during construction: usually you need to make the parts before you can assemble them.
- Make sure that you can always hold the parts you’re working on without damaging them. If you cut too much of the seat too soon, you won’t have any flat surfaces left to clamp.
- If there are any steps where screwing up will permanently ruin a part, try to do those sooner rather than later, so you ruin as little work as possible.
Different people weigh each consideration differently, and sometimes the best choice depends on the shape of the parts for a particular chair.
One of the biggest variables seems to be: when do you drill and ream the leg holes, in relation to how finished the seat is? I’ve seen them drilled and reamed into a flat square board that hasn’t been shaped at all, and in a seat that’s completely carved, top and bottom. Knowing that different people do it differently helps reduce my worry about doing it wrong.
For this stool, I tried to remember the steps we used at Brian Cunfer’s class, but failed. Building a chair outside a class turns out to be challenging in ways I didn’t expect. I made notes about some complicated steps, but the simple things I knew I would remember… I forgot. Peter Galbert’s chairmaking videos have proven invaluable to remind me of small details that I’d otherwise have to figure out again on my own.
Tools
 Earlier this week, we had 2 deliveries on the same day, with the new tools I needed to carve the top of the seat. Here’s my growing collection of chair-specific tools.
On top there’s a tapered tenon cutter (and a bevel gauge that snuck into the picture), and on the left is a tapered reamer. These are used to cut a tapered round mortise and tenon joint between the chair legs and seat. They were hand made by Elia Bizzarri.
In the middle is a Scorp: basically just a large curved metal blade with two handles. This one is made by Ray Iles. It’s used to rough out the top of the seat. For such a simple tool, it’s apparently not easy to design correctly: I previously purchased 2 other inexpensive models whose handles were set at an angle which made it impossible to carve the seat bowl. I’m happy to say that this scorp is superior to the others in every way, and didn’t cost much more than the others, even accounting for the UK exchange rate.
Below the scorp are a compass plane and travisher, which are used to smooth out the seat bowl carving. They are made by Jim White at Crown Planes. The finish quality of the tools is not as good as you’d find on antique tools. However, they work well, they’re far more available than used tools, and the prices are reasonable. In any case, it’s a hell of a lot better job than I’d do if I attempted to make them myself, and I’d still need to purchase the blades (not cheap).
You may notice that I know the names of the people who constructed all of these tools. The market for chairmaking tools is small (but much larger than 10 years ago). All of these tools are hand made in small batches by individuals who make their living constructing and selling woodworking tools. I’m happy to give my money to these people, instead of to companies who can’t figure out how to make a scorp which actually works for the purpose it was designed for.
Loots
Actually, it’s just chair parts, but I needed an anagrammatic section header.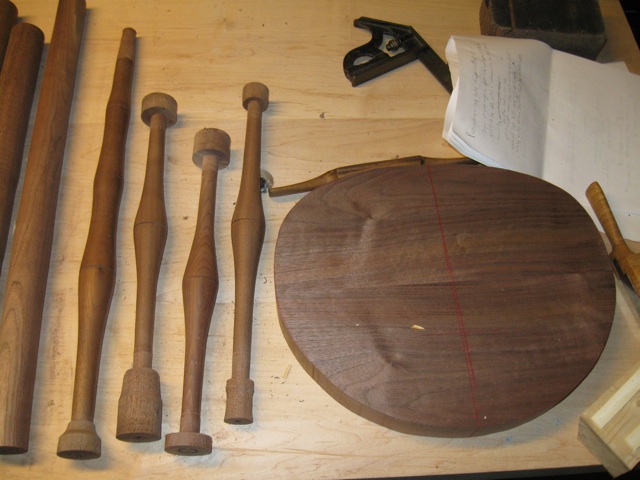
Before my seat carving tools arrived, I did some work on the walnut stool. Hot damn, this is going to be beautiful if I don’t screw it up! I’m still paranoid that the walnut won’t be strong enough, and the legs will break the first time I sit in it.
There’s really only one leg blank I’m really worried about, because it has some wonky grain that crosses the spindle. I should probably just go chop up another beam instead of risking this one, but it seems like such a waste. Maybe I can get 3 legs out of the same piece, and make a walnut perch as well…
Anyway, tomorrow I’m brewing beer, so I probably won’t have time to drill legs as well. We’ll see.