Stool Progress: Step By Step

An update, in reverse chronological order:

It’s starting to look like a stool!

Stool

I carved the seat top, and reamed the leg holes, allowing the tapered leg tenons to enter the seat. Next is drilling the legs and stretchers, and gluing it up.

It’s very important to do all the steps of constructing the chair in the right order. Fortunately, every chairmaker uses a different “right order.” I could have done a better job on this stool, but it’ll all work out just fine.

The main considerations seem to be:

  • Obviously, respect any strict order dependencies during construction: usually you need to make the parts before you can assemble them.
  • Make sure that you can always hold the parts you’re working on without damaging them. If you cut too much of the seat too soon, you won’t have any flat surfaces left to clamp.
  • If there are any steps where screwing up will permanently ruin a part, try to do those sooner rather than later, so you ruin as little work as possible.

Different people weigh each consideration differently, and sometimes the best choice depends on the shape of the parts for a particular chair.

One of the biggest variables seems to be: when do you drill and ream the leg holes, in relation to how finished the seat is? I’ve seen them drilled and reamed into a flat square board that hasn’t been shaped at all, and in a seat that’s completely carved, top and bottom. Knowing that different people do it differently helps reduce my worry about doing it wrong.

For this stool, I tried to remember the steps we used at Brian Cunfer’s class, but failed. Building a chair outside a class turns out to be challenging in ways I didn’t expect. I made notes about some complicated steps, but the simple things I knew I would remember… I forgot. Peter Galbert’s chairmaking videos have proven invaluable to remind me of small details that I’d otherwise have to figure out again on my own.

Tools

Earlier this week, we had 2 deliveries on the same day, with the new tools I needed to carve the top of the seat. Here’s my growing collection of chair-specific tools.

On top there’s a tapered tenon cutter (and a bevel gauge that snuck into the picture), and on the left is a tapered reamer. These are used to cut a tapered round mortise and tenon joint between the chair legs and seat. They were hand made by Elia Bizzarri.

In the middle is a Scorp: basically just a large curved metal blade with two handles. This one is made by Ray Iles. It’s used to rough out the top of the seat. For such a simple tool, it’s apparently not easy to design correctly: I previously purchased 2 other inexpensive models whose handles were set at an angle which made it impossible to carve the seat bowl. I’m happy to say that this scorp is superior to the others in every way, and didn’t cost much more than the others, even accounting for the UK exchange rate.

Below the scorp are a compass plane and travisher, which are used to smooth out the seat bowl carving. They are made by Jim White at Crown Planes. The finish quality of the tools is not as good as you’d find on antique tools. However, they work well, they’re far more available than used tools, and the prices are reasonable. In any case, it’s a hell of a lot better job than I’d do if I attempted to make them myself, and I’d still need to purchase the blades (not cheap).

You may notice that I know the names of the people who constructed all of these tools. The market for chairmaking tools is small (but much larger than 10 years ago). All of these tools are hand made in small batches by individuals who make their living constructing and selling woodworking tools. I’m happy to give my money to these people, instead of to companies who can’t figure out how to make a scorp which actually works for the purpose it was designed for.

Loots

Actually, it’s just chair parts, but I needed an anagrammatic section header.
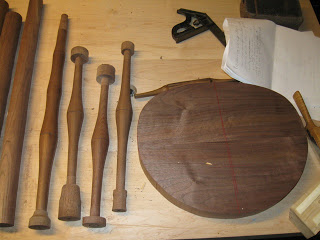
Before my seat carving tools arrived, I did some work on the walnut stool. Hot damn, this is going to be beautiful if I don’t screw it up! I’m still paranoid that the walnut won’t be strong enough, and the legs will break the first time I sit in it.

There’s really only one leg blank I’m really worried about, because it has some wonky grain that crosses the spindle. I should probably just go chop up another beam instead of risking this one, but it seems like such a waste. Maybe I can get 3 legs out of the same piece, and make a walnut perch as well…

Anyway, tomorrow I’m brewing beer, so I probably won’t have time to drill legs as well. We’ll see.

Craft vs. Perfection

When mom was here over the holidays, we got to talking about “The Craft Revolution” and the recent increased popularity or perceived value of hand crafted items. She observed that the New Hand Made crafters aren’t as interested in tradition: they don’t necessarily strive for the appearance of perfection that traditional crafters achieve. As an example, she described sewn objects with large, visible stitches instead of invisible hand stitching.

At the time, I suggested this might just be a rejection of tradition, since the Craft Revolution has largely grown out of counterculture movements such as punk. (Who knew that knitting would become cool?)

Since then, I’ve revised my opinion. I now think Hand Made must distinguish itself, even in ways which might be considered negative, in order to survive and retain its value in our mass produced world.

Mass produced goods are often derided as either cheap knock-offs of finely hand-crafted items, or as ugly, poorly designed, inhuman objects. This is sometimes true, but it’s not the whole story. There are now many products which are well designed solely for the purpose of mass production. And not all mass production is done by machine: sometimes it is achieved through efficient upscaling of “hand made.”

Higher quality mass produced items, and the ability to produce goods with machine-like precision quickly by hand, have changed our perceptions about the quality and value of objects. If something looks perfect and could be mass produced, we now interpret this to mean that it must have been mass produced: otherwise, what would be the point? If a Chinese factory worker can sew 50 blouses perfectly in a 12 hour shift, where’s the value in me sewing one myself?

I’ve seen this in action on several occasions. Whenever Mom sends us hand made baby clothes, we comment that “they look just as good as store bought clothes!” We know they’re better, because we value the fact that they’re hand made by her; but we have the reaction despite our better knowledge. Another time, a patron at a bake sale irritatedly complained, “They can’t sell these, they’re from a bakery!” In fact, Marla baked them. They just looked too good to be home made.

These days, hand made items must distinguish themselves from mass production in order to be valued as being hand crafted. They can’t look like something a machine or fast human could produce. They might be imperfect. They might be perfect, but of a design that does not lend itself to mass production. One-of-a-kind or custom objects might fit the bill, but it has to be obvious that they’re unique.

Perfection becomes dangerous, in a time when well crafted items are misinterpreted as mass produced. But there are still many classes of objects which aren’t produced in large scale. For those who prefer a high degree of precision in their work, it’s probably best to choose a subject or medium which doesn’t lend itself to mass production.

Turning Videos

When I was turning last year, I followed the Peter Galbert’s Chair Notes blog closely, but I have since stopped.

Tonight I started surfing Youtube for some turning videos, and discovered that Peter Galbert has a great set of videos on YouTube. He has a series on constructing a 3-legged perch, which is similar in some ways to the stools I’m constructing. Now that I’ve watched the videos, I’ll have to read the blog.

The turning videos are excellent, and very informative to a primarily self-taught turner like me. He’s completing a leg in under 10 minutes: extremely quickly, from my perspective. Clearly I need to do a lot more spindle turning…

On the other hand, maybe this is like riding a bicycle: do I dislike it so much that I really need to shave a few minutes off my time? If I enjoy it, why bother going quickly?

I guess the real answer for me is: I’m not doing this to pay the bills. Extending the time it takes to complete a chair professionally reduces your hourly pay rate. But for me, extending the time it takes to complete a project decreases the cost per hour of my hobby. That’s not so bad, as long as I have a chair to keep my rear off the floor in the mean time.

So I guess the important part for me is to concentrate on minimizing mistakes, so I don’t waste material or disappoint myself too often.

And, oh yes: Peter’s chairs are beautiful. He’s well versed in the traditional Windsor chair styles, and also builds some very innovative chairs of his own design.

Project Update: Stool(s)


After my chair class in 2007, I decided to build a Windsor-style stool that the teacher, Brian Cunfer, had in his shop. A stool lets me build my tool collection progressively: I wouldn’t need a steam box since the stool has no back. I figured I’d build one as practice and paint it, then build one out of my stash of walnut with a natural finish.

I got as far as turning the legs and stringers, before feeling my lack of a bench. You might notice that the legs and stringers are made of at least 4 different kinds of wood: they were all what I had sitting around in the right size. This hopefully won’t be noticeable under paint.

Now that my bench is usable, I’ve picked up where I left off. Over the past week or so, I pieced up the seat, cut it out, shaped the outside edge, and today I drilled the leg holes. Now, I’m waiting for more tools to carve the seat. The inshave I had was really not the right shape, so another one should be coming in the mail soon.

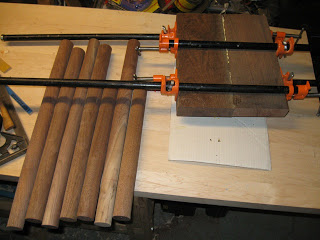
In the mean time, I’ve started cutting up my walnut for the second stool. It has a lot of knots, and the pith is throught middle of some pieces. But I found enough straight, clear wood for the seat, and I rounded enough sticks for the legs and stringers. Tonight I glued up the seat blank. Next, I’ll probably turn the legs and stringers, while I wait for the seat carving tools to arrive.