(Updated below. Discussion of my choices is happening here.)
Steve, JM, and I played BBDBA at Legions on Saturday, before the Miniature Warfare event. Steve brought III/63(b) Ghaznavid, (1002-1186AD), and I played my II/7 Later Achaemenid Persians (420-329BC) again. With almost 1500 years between these armies’ historical dates, this battle is more anachronistic than the Ghaznavids fighting against Rommel’s 7th Panzer Division. Let’s hear it for fantasy gaming!
In my previous BBDBA battle, the C-in-C (me) was demoralized immediately after deployment. This time I wanted to be more prepared, so I thought a bit more about dividing my commands and initial deployment. The Persians’ low aggression means they usually set up terrain and deploy first. My goal was to find a flexible way to divide my commands, and to have a plan for setting up terrain and deploying my first two commands against an army with superior cavalry.
My army composition was the same as last game: 6x2LH, 7x3Cv, 2xLCh, 9x4Sp, 3x3Ax, and 9x2Ps. That time I divided my troops into heavy foot, light foot, and mounted. However, with one huge psiloi backed spear command, I had few deployment options if I wanted to protect its flanks. I could only protect one flank with bad going troops, which either left the other flank open or left the deployment of my third command too obvious.
This time, I used more combined arms in my commands. My high PIP command had 3x4Sp, 3x3Ax, 2x2Ps, 2xLCh (gen), and 6x3Cv. Mid PIP was 6x4Sp (gen), 7x2Ps. Low PIP was 6x2LH (gen), 1x3Cv.
With more light infantry along with the spears, they can anchor one or both flanks in bad going or against another command. The combined arms high PIP command gave a lot more options in one location on the board, and is better at dealing with unpredictable threats. This is important when you deploy first. The low PIP light horse command may seem foolish; in fact the evidence suggests it was foolish since it didn’t live long enough for me to see if it could be effective. But my thought was that this command could act as an independent flanking force or bolster my high PIP cavalry force, whichever I needed most.
For deployment, I wanted a plan that would allow me to avoid what happened last time: the enemy’s superior cavalry in two separate commands ganged up on my single cavalry command and took it apart. I decided that to counter this, I’d use a deployment that led the enemy to believe they could use this tactic easily, but then deny its effectiveness.
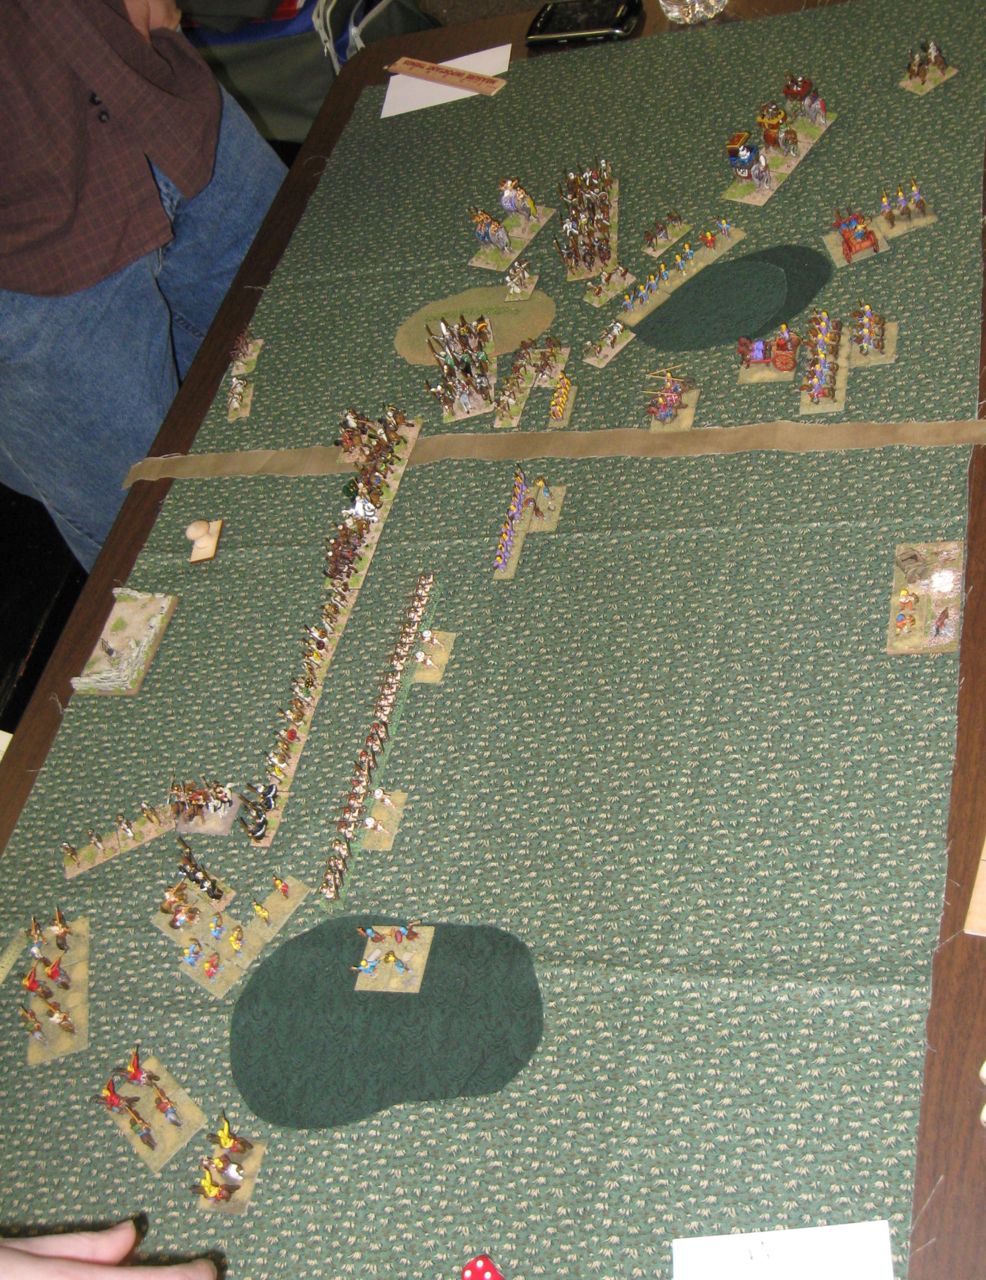
The first image shows our initial deployment. I’m on the bottom of the board. I deployed a steep hill and a wood on one side of the board, to effectively split it in half. On the other side I used a central wood to anchor my flank. The road played no part in the battle or my plan.

I deployed my two rightmost commands first. My psiloi-supported spear line has a block of psiloi on the left flank to take the wood and protect that flank, and three psiloi-supported auxilia on the right. I deployed my cavalry behind, in a position meant to entice a cavalry attack and suggest I might place my third command on that side as well.
If I remember correctly, Steve’s army had 5 elephants, 6 bows, 3 auxilia, 6 spear, 3 light horse and 3 psiloi; that would leave 10 cavalry. Steve and JM’s deployment went mostly according to my plan. They placed the bulk of their cavalry (most importantly their elephants) on the far side of the wall of bad going. This allowed me to more effectively avoid and pester them. Their bows and auxilia were set up to take the steep hill, and their right flank was primarily foot with some linking cavalry.
I placed my light horse command on my far left flank, in position to harrass their relatively unprotected spear line on that flank. My plan was working so far, but it hadn’t survived contact with the enemy yet. I intended to win on the left flank, and not lose on the right flank by denying it. It felt inefficient to “not lose” with my high PIP command, and this might have been a mistake.
As an aside: In many tactical discussions in the Fanaticus forums, it is emphasized that you need a clear plan, simply stated; and that in BBDBA each command should have a clear mission it is capable of achieving. However, my understanding of what such a plan looks like has been elusive. In this battle I formed a clear plan, so as an example I’ll state it:
The Plan: My overall plan was to deny the enemy on my right flank using the terrain to delay and confuse, and to attack on my left flank and turn the enemy’s line. The high PIP command’s mission was to delay the enemy and prevent their passage through the wall of bad going. The mid PIP command’s mission was to advance towards the enemy in good going, secure the woods on the left flank, and attack. The low PIP command’s mission was to turn the enemy’s flank.
My first moves on the right flank were to consolidate my position. I pulled my dangling cavalry back to deny the flank, while advancing my Auxilia into the woods, intending to fill the line with my cavalry from the rear. Here, it turns out I made a mistake: according to a recent thread on the Fanaticus forums, you can’t form a column with elements that are currently in bad going. Oops! But Larry disagrees with that assessment, so I can probably get away with it in Pittsburgh… besides, I think my poor maneuvering in the woods caused me to use more PIPs than I would with single element moves anyway.

In the center I advanced my spear, and I was aggressive on the left flank. I advanced my psiloi to control the woods, and ran my light horse around them.
Unfortunately, my right flank became messy quickly. I was able to avoid the elephants, but my decision to bolster the front line with cavalry turned out to be a bad idea against Steve’s bows. I lost the cavalry in front of my C-in-C, which was also blocking reinforcements from coming in from behind. Luckily Steve was also split into several groups, and had a hard time maneuvering his mounted columns through and between the bad going.
The center was somewhat split up by my spear trying to cover for the lost cavalry, but it was advancing steadily on the left. On my left flank I was doing much better. I got around JM’s flank and forced them to redeploy their psiloi, and put my general into position for a 3-3 quick kill against JM’s spear. Unfortunately, not only did I not kill the spear, I also didn’t recoil! Cue ironic foreshadowing soundtrack. Now you see it…
… and now you don’t. With his one PIP command roll, JM flanked my 2LH (gen) and killed it. Doh! This decisive die roll demoralized my low PIP command. The only part it played for the rest of the game was for the lead 2LH element to ZOC one psiloi and keep it out of trouble for a few turns.
I managed to survive a lot longer than I expected after this, and actually felt like I had a chance for a while, but it ended up being a battle of attrition. I made some progress on the left flank, but it wasn’t killing as fast as my right flank was dying.

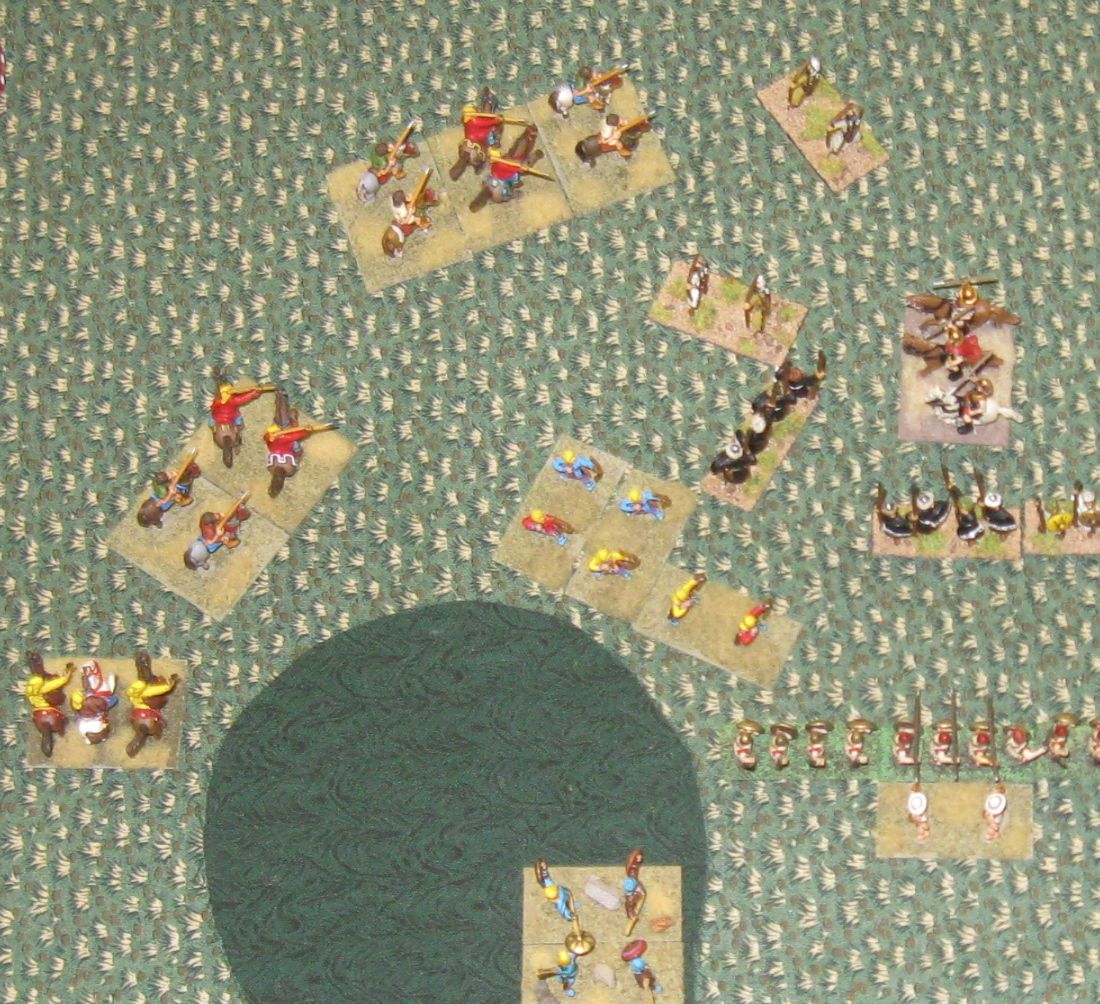
On the right, most of my losses were my light troops in the woods. This allowed some of Steve’s cavalry through the wall, where it helped JM’s cavalry against my spear. He finally got around the southern end of the wood with some of his elephants, but as you can see here he had a real command nightmare: elephants in 4 separate groups, with at least one group of elephants and two groups of cavalry out of command range due to the terrain. Although this is what I hoped would happen, I didn’t plan on spending as many elements to do it.
In the end, my high PIP command broke due to the loss of its sixth element, and the game was over. I had killed 3 elements in their low PIP command (breakpoint 4), 3 in their mid PIP (breakpoint 5), and 3 in their high PIP (breakpoint 5).
Overall I had a lot of fun, it was a tense and tricky game throughout. I consider it a success even though I lost, because:
- I was able to formulate a clear, well defined plan
- My terrain placement and deployment effectively supported the plan
- My feint on the right flank worked, in its basic principle
- I didn’t think I was going to lose immediately after deployment was finished
On the other hand, I made the same mistake several times, and suffered heavily for it: I am not very good at ensuring that I have space to recoil when I make an attack (as evidenced by the Ax and Ps in the woods in the last image: the psiloi was my last element lost, killed by a simple recoil result). I’m good at seeing when other players are poorly positioned, and I know when to take advantage of it… but I can’t seem to protect myself adequately.
I’m more excited to play BBDBA than I was after my previous game, but I clearly need a lot more practice with single DBA tactics as well.
Thanks for the great game!
Update: Some caveats and thoughts after some of Steve’s feedback:
- I had a plan, but I don’t claim it was a good one. I did lose, after all.
- Steve and JM deployed mostly as I hoped they would, but I don’t know what my response would have been if they hadn’t.
- I don’t think my Cavalry deployment was very good. I think my high PIP Ax/Sp line could’ve been done better as well.
- I may be better off with more 4Sp and less 3Ax. I may be better off with one or two SCh instead of 2Ps.