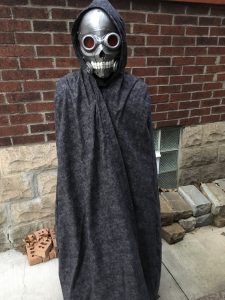
Halloween 2018: Ezra’s Death Gun Costume

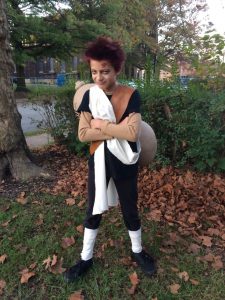
Ezra’s Death Gun costume

Another year, another Halloween costume!  This year Ezra chose the character Death Gun from the Anime series Sword Art Online II.

This one was supposed to be pretty easy: a mask, a cloak; maybe some arm coverings; he wasn’t allowed to bring costume weapons to school anyway.

Nothing is ever as easy as it’s supposed to be, though.
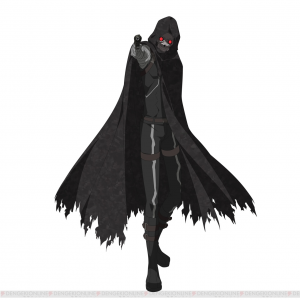
Death Gun reference image downloaded from tvtropes.com

We started with a foam head from the craft store, and a cool material called Sculpt-a-Mold.  This is basically a mix of paper pulp and plaster. After mixing water to form a pasty consistency, you can form arbitrary shapes out of it. Because of the plaster, it dries in only half an hour; but the paper fibers make it much less brittle than plain plaster.

After many iterations of shaping and sanding, we identified a few fatal flaws with the approach.  The mask was relatively heavy, but it was still too brittle to attach straps securely to it.  More importantly, starting with a head-sized base meant that the mask fit too tightly on Ezra’s face, making it impossible to breathe or even open his mouth.
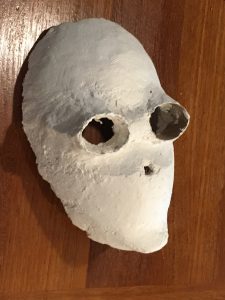
The abandoned Sculpt-a-Mold mask

Solving this problem turned out to be a great excuse to get a 3d printer.  There was a model available on Thingiverse available, so all we needed to do was print, assemble, and paint it.

Even 3d printers that work well are a bit fiddly and require adjustment, experimentation, and maintenance to produce good results. I didn’t start printing this mask until I was confident I’d get good results, and overall, it succeeded. I didn’t have any completely failed prints, but there was a bit of underextrusion in the chin pieces, which led to a piece breaking off on Halloween night.

3d printed Death Gun mask based on a model from Thingiverse

The lenses were thin plastic from packaging material, painted with Testors transparent red paint.  We just glued them in, instead of using the lens holder pieces included in the 3d model. The mask itself was glued together using 5 minute epoxy, primed grey, and painted with craft acrylics.  I didn’t make any effort to smooth the surface prior to painting, and it turned out fine.  The printing layers aren’t really visible, but the polygonal facets of the 3d model can be seen in the finished product.
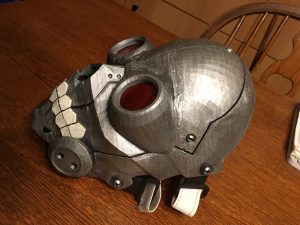
3d printed Death Gun mask

The cloak was made from a pattern and fabric found at Jo-Ann Fabrics. We tried several techniques to get arm wraps like Ezra wanted, but they didn’t work well, so we abandoned that.  Under the cloak, he wore all black, with the black strap chest harness we made for the Gaara costume.

This wasn’t the most satisfying costume project, but it turned out well,
NERF Mod and Repaint: Ezra’s Velocity Mod

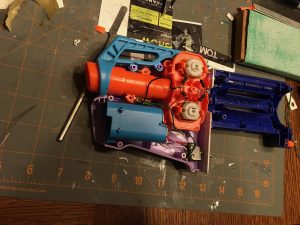
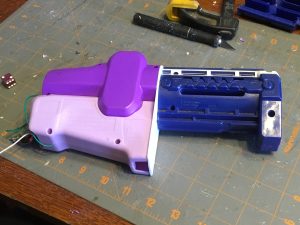
This spring, Ezra had an idea for a NERF blaster mod: graft a battery powered flywheel onto a barrel extension, to accelerate darts shot from a spring-powered blaster.  This is the result.

In-progress shot of the accelerator mod

We cut off the front of a Rebelle flywheel blaster and part of a Modulus barrel extension, and joined them by epoxying them to a plastic bulkhead.  Each half was attached separately, so the whole thing could be disassembled and reassembled easily using the original screws.  The most challenging part was keeping parts aligned when joining to the bulkhead, to maintain a straight path for the dart.  In retrospect, it probably would’ve been easier if we had temporarily installed the internal barrel parts and used a dowel to keep everything in alignment.

Internals, showing the switch placement, battery pack, flywheel, and front barrel segment.
Mod assembled and fit to a blaster, prior to painting

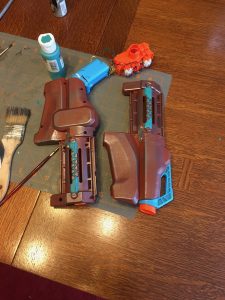
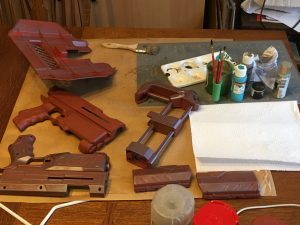
After constructing the mod, Ezra also wanted to repaint it to match, as well as repainting a blaster to match.  He wanted a bit of a “postapocalyptic junk” aesthetic, so we chose a rusty brown and applied metallic highlights. The bright blue and orange parts were maintained for safety reasons.

Repainted barrel accelerator mod, disassembled; flywheel and battery pack visible at top
Repainted blaster, barrel, and shield parts

Now I just need a shot of the finished product!

After the glue joint broke the first time, we added screwed-on metal braces to hold the halves together.  Next he wants a better stock and a spring power mod in the same blaster.


Halloween 2017: Ezra’s Gaara Costume

Woohoo, I’m not an entire year late yet!  Since I have some newer projects I’d like to post, here’s an older one I haven’t gotten to yet.

Gaara costume
Ezra as Gaara
Gaara
Gaara

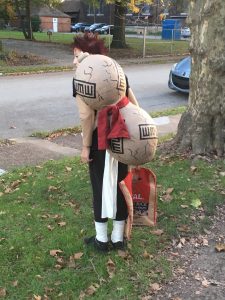
Ezra’s Halloween costume for 2017 was Gaara: a character from the Anime/Manga series Naruto.  The main props we needed to build for this costume were his sand gourd, and the leather bandolier. The clothing portions were all done with street clothing for simplicity.

Here are a few pictures of the finished costume, with a few more showing how it was constructed and made to work.

Gaara costume, backGaara manipulates sand, and so he always carries with him a giant gourd-shaped container made of sand. This prop defines the character, but it’s huge and potentially unwieldy.  Construction was theoretically simple: use paper mache.  However, it wasn’t easy.

As a base, we used punching ball balloons, chosen because they’re larger and thicker than ordinary balloons. For our first few attempts, we taped the balloons together before applying paper mache.  This was a problem when one of the balloons deflated, and the half-finished shell shrank and wrinkled.  Extracting the bad half and replacing it didn’t work well, so we eventually ended up building up the second balloon separately and attaching them with masking tape and then paper mache after the shell was hard.

Gaara's sand gourd prop
Gaara’s sand gourd prop

The cork on top was a natural cork from the craft store, and the lip was formed using Crayola Model Magic, which is basically an air-dried clay with the consistency of foam.  It’s easy to work with, light, and takes paint well.

The whole giant peanut was painted tan, and then the seals were painted on after tracing the outline from a stencil, and cracks were hand-drawn.

Gourd harness
Test fitting the gourd harness. It’s usually worn under his shirt.

After the gourd was completed, it was obvious that the decorative pleather bandolier would not be strong enough to support it without it sliding around and looking horrible.  To solve this problem, I constructed a harness out of leftover nylon straps and buckles.  The picture here shows Ezra trying on the harness for fit. In actual use, the harness went under his black shirt, and the attachment buckle went through a small hole in the shirt.

Gaara costume, side view
The leather bandolier and buckles are slightly clearer here

The buckle was sewn to the red sash around the gourd, and clipped onto the harness.  This made it removable, so he could take it off at school, and supported the weight completely without putting any stress on the leather bandolier.

The leather bandolier was not difficult: I made a pattern out of paper, cut, and sewed it up.  The multiple matching metal buckles came from a snakeskin leather purse from the thrift store, and were hot-glued into place.

The pleather came from one of our many trips to Pittsburgh Center for Creative Reuse, and the white sash and foot wraps were muslin cloth. He rounded it out with red hair dye and Halloween face paint for the eye liner. The forehead tattoo worked better with acrylic paint than cheap Halloween face paint.

Wooden Weapons

The kids aren’t allowed to get wooden weapons at the Renaissance Festival, because then I don’t get to make them.

A wooden hammer (maul) prop I made for Ezra’s Dwarf costume. Wooden curtain rod, pine wood head, craft foam and fake leather on the handle.
Details of the hammer head show the Gunnerkrigg Court symbol carved into the side of the head, just as Ezra requested.
Short swords for Martine’s Ranger costume. Pine board blades, and masonite reinforcement at the hilt. Handles wrapped with pleather.
The props in use.


Fantasy Dwarf Helmet

Before I can post this year’s costume creations, I need to do last year’s.

Here are some in-process photos of a fantasy Dwarf helmet I made for Ezra’s costume last year.

It all started with a baseball batting helmet I found at Pittsburgh Center for Creative Reuse, and some chunks of 2×4 I glued into blocks.
I cut the helmet down and roughed out horns on the blocks.
I carved the horns with a spoke shave, and sanded them. They’re bolted into the helmet using large lag bolts from behind, with hot glue to fill in the gap between horn and helmet.
Details were applied using flexible craft foam attached with hot glue.
I sprayed the entire helmet black, and then painted most of it metallic steel. After spraying a protective varnish, I added fur to the horns.
The finished costume included a “wizard” beard that we braided, scale armor made from aluminum flashing that I had when I was a kid, one of many home made cloaks, and a wooden hammer I’ll show off in another post.

DBA Army III/70b: Georgians

Here is my recently completed Georgian army for DBA 2.2+.

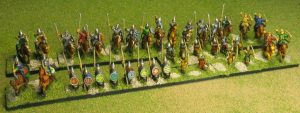
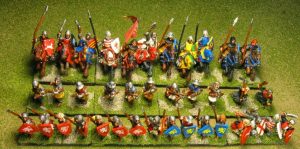
DBA Army III/70b: Georgians. Essex miniatures.
Georgian 3Kn General and 3x3Kn.  Essex Miniatures.

I painted this army for the God Wills It! First Crusade Campaign Theme, which will be run on Saturday night at Fall-In 2013.

The primary factor for me choosing this army was that the slot was still available in the campaign.  However, I also had a number of the figures on hand, as leftovers from other projects.  I chose the rest of the figures based on what Jack Sheriff used in his Georgian army.

Unlike Jack’s figures, most of mine are stock, unmodified Essex miniatures.  The exceptions are four Light Horse models, which were Bulgar archers.  They had large toggles on the front of their coats, which I removed to make them look almost identical to the Essex Kipchak/Cuman figures.

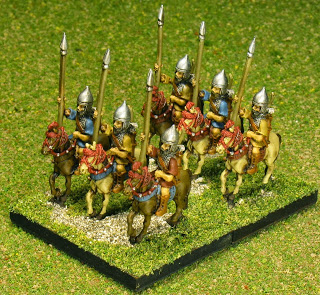
III/70b: 4x2LH. Essex Miniatures.
III/70b: 2x4Sp. Essex Miniatures.

The Knights are a mix of Essex Georgian knights and other similar knights.  The general and his supporting figures are a generic Eastern European command set.

I had a hard time finding any definitive information on colors and shield patterns for this army. I would not use this army as an example of what Georgians are supposed to look like.  I was inspired by a few other painted Georgian armies online, and pictures of

As usual, these are painted primarily with Vallejo acrylics. I use a combination of painted highlights and several colors of ink washes for shading.  Shields are hand painted.

III/70b: 2x3Bw. Essex Miniatures.


III/70b: 2x2Ps. Essex Miniatures.


25mm DBA Army III/62b: Early Polish

DBA army III/62b: Early Polish; 25mm figures.

“Since when do you play 25’s?”
“Why are you playing 25mm?”

I’ve gotten a lot of heckling from my friends, but the explanation is simple: at Fall-In 2013, there is nothing else going on during the 25mm tournament, and I’m not going to use up my whole Saturday without playing anything before the campaign event.  If I did that, I’d only go buy things.

So, I built a 25mm army from figures I had on hand.  I didn’t paint this army, I bought the figures already painted.  I only touched them up, applied some ink, and based them.  They’re brighter than they’d be if I painted them, but I didn’t have to put the effort in, which is fine with me.  I’ll save my limited 25mm painting for HotT armies.

DBA Army I/51: Neo-Assyrian Later Sargonid

In preparation for the Assyrian campaign event at Fall-In 2012, JM and I ordered Neo-Assyrian Later Sargonid armies from Magister Militum.  JM planned to paint his for the campaign event, and I’d paint mine so we could build a BBDBA army out of them.  Yeah, that was a year ago.

DBA army I/51: Neo-Assyrian Later Sargonid; Magister Militum figures
Assyrian Chariots; Magister Militum miniatures.

As with many plans, this one failed to survive contact with the enemy.  JM didn’t go to Fall-In, and I didn’t have an occasion to paint the Assyrians for BBDBA until this year.  I planned to go to Fall-In 2013 with Mike Kaizar (there’s that “plan” thing again), and wanted to play Assyrians in Big Battles. I got as far as painting this army in September before Mike cancelled, and I found another Big Battle partner who already has Assyrians painted.

Assyrian Spearmen; Magister Militum miniatures.

I didn’t do much research for color selections with this army.  Essentially, I had a vague memory of seeing Assyrians in light blue-grey and red, and did that.  The army painted up fairly quickly due to the few number of colors used, and I’m happy with the way they turned out.

Biblical armies are my “dump stat,” so I don’t usually spend much time on them despite tending to enjoy the fast pace of Biblical battles. Luckily it’s often fairly easy to get a good look for them since they typically have simple clothing.

Assyrian Spearmen; Magister Militum miniatures.

I like the Magister Militum figures. I believe these were originally Chariot miniatures before Magister Militum purchased the line.  They’re sculpted well, and have a “toy soldier” feel, with very limited and static poses.  The overall effect is good, though it has a bit of a “retro” feel compared to more modern figures.

The figures they provided for the Horde elements are interesting. They sent an even mix of archers and lightly armed spearmen. I decided to base them up similarly to Pavisers, since it doesn’t make much sense to put the spearmen behind the bows.

Assyrian Auxilia; Magister Militum miniatures.


Assyrian Cavalry; Magister Militum miniatures.


Assyrian Psiloi and Horde; Magister Militum miniature.


HoTT Army: Professor Hans’ Metal Minions

Here is my latest Hordes of the Things army: Professor Hans’ Metal Minions.  I just made that up.  I finished this army before Cold Wars, but didn’t get a chance to post about it yet.

Professor Hans’ Metal Minions
Professor Hans and his Avatar: Magician General.

Professor Hans was afflicted with Polio at a young age.  For years he studied Science, Technology, and the dark arts of Alchemy to try to find a solution to his frustrated confinement. After receiving a small mechanical assistant robot from his uncle, he began experimenting with building ever more complex mechanical bodies.

Eventually he invented a mind-machine interface that allowed him to give his creations the autonomy they deserved. This army is the result of years of experimentation with transplanting insect and animal brains into mechanical bodies.

His work must continue until he feels he can successfully transplant his own brain into a suitable host body.  In the mean time, his army gives him the tools he needs to find human subjects for further experimentation.

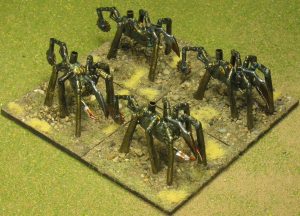
Professor Hans’ Brass Spiders: 4x Beast

This army is built primarily out of Mage Knight figures, but there are a few from other prepainted sets: Dungeons and Dragons and Dreamblade.  I repainted, touched up, and/or converted all of the figures in one way or another.

Professor Hans is a figure called “Gent” from the Dreamblade series of prepainted miniatures.  I repainted him with a brass colored integrated wheelchair.  In his hand he holds the Aetheric Impulse Controller for his Avatar, who can shoot its Aetheric Wave Gun at enemies that Hans has a particularly strong interest in.  Hans’ Avatar is a repainted Mage Knight figure.

Professor Hans’ Camel Backs: 2x Shooter

His brass spiders are early creations that use a spider’s brain to control their steam powered bodies.  They are Mage Knight figures that originally had riders.  I removed the riders, filled in the seats, added smoke stacks, and repainted them all.  These are Beast elements.

The Camel Backs are an early success with Hans’ use of the mammalian brain.  They carry steam boilers on their back and shoot cannons instead of spitting. These are Mage Knight figures repainted silver with brass highlights.  They are Shooter elements.

Professor Hans’ Turtle Men: 4x Blades

The Turtle Men use brass bodies controlled with the brain of a snapping turtle.  They are mixed Mage Knight figures, also repainted in a better brass color with matching color highlights.  They’re Blade elements.

Papa Bear is a giant steel mech controlled with the brain of a bear.  It’s a Dungeons and Dragons prepainted figure. Most of the paint is original, but I changed the highlights from copper colored to brass so they’d match the rest of the army.  This is a Behemoth element.

The Dragonfly combines Hans’ insect brain interface with a flying mech that uses his newer, smaller power sources.  It’s a flyer. This is also a Mage Knight figure that had a seat and a rider. I filled it in and repainted portions of the figure.

Now all I need is a stronghold!

Professor Hans’ Papa Bear: 1x Behemoth


Professor Hans’ Dragonfly: 1x Flyer

DBA Army III/67b: Early Hungarian

Soon after I started playing DBA again in about 2009, I decided that I wanted an Early Hungarian (III/67b) army.  It’s been a long journey since then, but finally my quest is complete!  I finished a double army just before Cold Wars.

Double DBA army III/67b; mixed manufacturers.
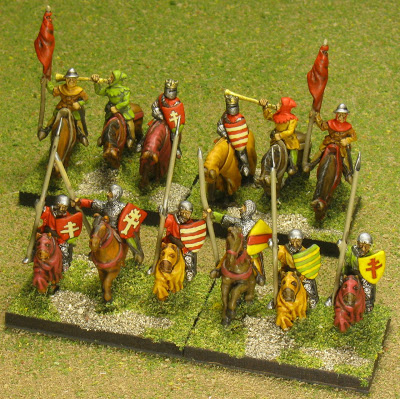
Early Hungarian knights by Essex and Black Hat (Gladiator).

I was attracted to this army for several reasons.  I am 1/4 Hungarian, and identify most closely with that part of my heritage. The composition of the army itself seems almost perfect for my tastes: 2x3Kn, 1x3Cv, 3x2LH, 3xSp, 2x3Ax or 3Bw, 1x2Ps. It’s one of the few Medieval combined arms armies I’ve seen with more than one Auxilia.  It also fits well with other armies I have from the same period: German, Leidang, Polish, Russian, and Mongol Conquest… even though I bought most of those armies only because they were good enemies of the Hungarians I didn’t have yet.

Cuman and Hungarian Light Horse by Black Hat (Gladiator)

My first attempt at building this army was purchasing a “not for the squeamish general” army pack from another gamer on the Fanaticus forums.  It had the proper composition, but as I should have expected, I didn’t like the figure selection very much. It was mixed manufacturers, but chosen based on whatever he had lying around and not based on what he thought the army should look like.  After not painting it for quite some time, I donated it to Mike Kaizar, who is still working on it.

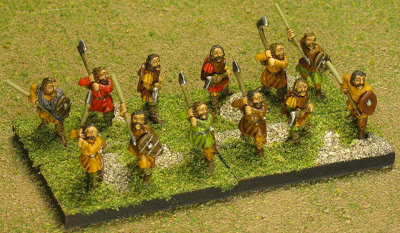
Hungarian spearmen by Black Hat (Gladiator).

My second attempt came when Wargames Minis had a clearance sale on their Essex Miniatures packs. After long research discovered no good solution for Early Hungarians, I settled on buying a bunch of Essex later Hungarian figures that might work. They were so cheap, I bought two armies worth! But when it came time to actually paint them… I hated them. Closer inspection showed me that they were far too late for any part of the Early Hungarian list.

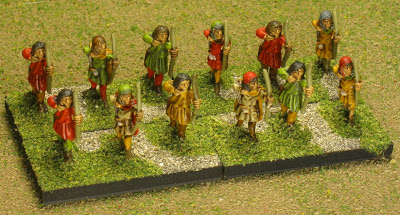
Early Hungarian bowmen by Black Hat (Gladiator)

By this time it was late 2012, and I needed this army for Cold Wars 2013.  After talking to David Kuijt, I settled on the figures shown here.  The General stands and a few of the other knights are Essex figures from my previous order.  The remaining knights, light horse, spears, bows, auxilia and psiloi are all Black Hat figures from their Gladiator range.  The Cavalry are a mix of Essex figures, Black Hat, and a few whose manufacturer I do not know but I happened to have on hand.

Early Hungarian cavalry by Black Hat, Essex, and others (unknown).

The Black Hat figures are not specifically sold as Hungarians, other than the knights with round helms. Many of them are from their general Feudal range, and some are from slightly inappropriate areas, but look good enough that I wanted to paint more of them.

Early Hungarian Psiloi by Black Hat (Gladiator).

I knew the primary heraldry I wanted to use was red and white, but I didn’t want another red and white army since it’s the most common color combination I have.  David told me that repeated heraldry wouldn’t be common in this period, but I am also not a fan of a widely varied, garish palette.  I decided to use a lot more yellow and yellow browns, and rounded out the palette with green. It’s definitely not red and white army I feared it would be.

Hungarian Auxilia by Black Hat (Gladiator).

I’m not sure if I prefer the green and the brighter reds I used here, but otherwise I’m quite happy with the color scheme. For the white on the shields, I used an “extremely off-white.”  It’s closer to beige than white, but in contrast with the surrounding colors it’s bright enough, and doesn’t add too much contrast. Looking at the shields, I’m reminded of Hoplite shield patterns more than garish Medieval heraldry.

I’m very happy with the way this army turned out.  After playing it in BBDBA and the campaign at Cold Wars, I also enjoy the way the army plays.

Now I just need to figure out what to do with all those Later Hungarian figures, since that army has so few spears compared to this one.