Hops, May 2009

Hops like to grow up to 20 feet high or higher, ideally. Normal farm growing techniques recommend running 1-2 strings from each hops plant, with 1-3 bines running up each string.

Installing a pole 20-25′ high is a huge pain in the butt, and catastrophic failure is a lot worse than with shorter trellises, so I’ve decided to try the “width instead of height” strategy. My poles are about 9′ high, but I’ve strung up 8 vertical lines. I have about 10-11 bines trained up the twine.

Last year, I only got 2 sprouts, which is typical for the first year. It seems likely I’ll get a useful amount of hops this year.

Unfortunately, I accidentally broke off the top of the strongest bine, when training it a week or so ago, so that one’s not getting any taller. Last year, when I broke off a bine, two horizontal shoots grew out of it. This year, I doubt I’ll be that lucky. The plant is putting its strength into other bines already.

These are Ultra hops. I hadn’t used this variety before I planted it. It’s a newer hybrid variety, with relatively low alpha acids, but an aroma similar to Hallertauer. I chose it because it’s hardy and produces a high yield. Hopefully I’ll enjoy the way it tastes, as well.

With home grown hops, you don’t know what the alpha acid content is unless you pay to have it measured, or experiment over the course of multiple batches. This makes them less useful for use as bittering hops, but they’re still useful for finishing.

New Bike Lanes in Pittsburgh: Forbes Ave!

They painted bike lane stripes down Forbes between Squirrel Hill and Braddock Ave.

If you had asked me previously, whether that section of road was wide enough for bike lanes, I’d have said no. But I have ridden down Forbes with the lanes full of traffic, and had plenty of room, so I guess I would’ve been wrong.

In any case, the bike lanes are 4-5′ wide on each side, and they leave plenty of room for cars in the car lanes. This is a road where bike lanes will make it safer for cyclists, but even a small shoulder would make this road safer for bicycles.

I happy to have the bike lanes, but even happier that the’ve repaved the potholes.

Update: Here’s an article in the Bike Pittsburgh forums about the new stripes.

New Bike Lanes in Pittsburgh: Wightman and Beacon

Pittsburgh has added a few new short sections of bike lane on Wightman and Beacon in Squirrel Hill. These were no-brainers: the streets are wide, and it’s not clear whether there was one car lane or two. Now, there’s one car lane and one bike lane.

A rumor on the Facebook page of Scott Bricker (Executive Director of Bike Pittsburgh) suggests that the newly repaved section of Forbes Ave between Squirrel Hill and Braddock Ave will get some kind of bicycle-friendly marking as well. I was happy enough not to dive into a pothole every time I rode down Forbes, but sharrows or a bike lane would make it even better.

Bike lanes aren’t really enough to make a street safer. But they do help get more people cycling on the roads where they belong. More cyclists on the road make all cyclists safer, by teaching motorists to watch for cyclists whenever they’re driving.

Hunting for Gollum

If you haven’t seen this yet, it’s definitely worth watching: The Hunt for Gollum.

This is a 40 minute independent film, styled after the Lord of the Rings trilogy. It’s apparently based on one of Tolkein’s appendices, and tells the story of Aragorn’s hunt for Gollum, before he fell into the hands of the enemy and gave up the location of the One Ring.

This was made by fans, not for profit, indepentently, and on a very low budget. To be sure, it’s not the Lord of the Rings; but it’s a lot better than the Lord of the Rings would’be been 10 years earlier.

Keeping Score

I try to subscribe to the philosophy “Don’t Keep Score.” Don’t measure your progress and use the numbers as motivation; instead, be motivated because you enjoy what you’re doing. Depending on the endeavor, this doesn’t work for everyone, or even for me. And sometimes, it’s useful to keep score over the long run, without bothering yourself with the details as you go along.

I don’t use an odometer/speedometer (cyclometer) on my bicycle. I’ve had a number of problems when I tried using them. Sometimes they’d stop working, or measure results incorrectly (as much as I’d like to believe it, I don’t go 65mph down the hill through Schenley golf course). But the bigger problem is, if I have the numbers I do look at them: they motivate me too much. I pay attention to the numbers, instead of to enjoying myself.

I’m a very competitive person, but I am not very good at most sports (generally speaking, the ones with teams or dynamic movements). Combining these factors means that in a team or competition environment involving sports (and generally, keeping score), I often try to compete, but fail. Actually, I often hurt myself or make a fool of myself in the process. So, I generally avoid those situations.

This is one reason I don’t prefer organized group bike rides. I already have a hard time pacing myself, but when there’s someone going faster than me, I almost always feel compelled to try to catch up. (Of course the other reason I don’t prefer group rides is the whole “people” issue, but I’ll save that for another day.)

Although I don’t like numbers while I’m on the bike, I do generally like to get an idea of how far I’m riding in the long term. Some people mount their cyclometer in an inconvenient spot: it allows them to track their mileage, without letting them obsess over their current speed, maximum speed, average speed, cadence, heart rate, and/or power output (to name a few). Other folks prefer the good old fashioned Huret mechanical odometer to track their mileage (approximately) but not their speed.

But I don’t even go as far as tracking my annual mileage. At this point, my goal isn’t to increase my bicycle miles, but to decrease my car miles, and a cyclometer won’t help with that. I do have a general idea: at around 70 miles of commuting per week and additional recreational/errand rides on weekends, that gets me into the 3500-4000 mile per year range. I like to think it’s closer to 4000, but it doesn’t really matter. It’s a lot more miles than I drive, and enough that I need to consider regular bike maintenance; but not enough to get rid of my beer belly.

At work, we’re keeping store in a different interesting way: we’re participating in the “10,000 step challenge.” Employees wear pedometers to track their steps throughout the day for a period of 12 weeks, with the ultimate goal of increasing their steps to 10,000 per day (around 5 miles of walking) by the end of the 12 weeks. We’re split into teams, and the team with the most steps will win a massage and a free lunch or something like that.

For cyclists, they let us count steps with the pedometer while we’re on the bike. I seem to get around 500 steps or so per mile on the bike, compared to 2000 for walking. I’ve found a relatively good setup for this, but on occasion I get complete failure: if the pedometer opens itself up or shifts into the wrong place, it stops working. So more often than not, if I’m checking my steps, it’s to make sure the darn thing is working, not to motivate myself. (My current average is around 11,000, up from maybe 8000 the first week. The biggest variable is my weekend step count.)

Last year, for my longer bike rides, I started using a handheld GPS device mounted on the handlebars. I can upload complete topographic/road maps for the area I’m riding in, as well as my planned route. Or, I can just ride wherever I want, and when I’m finished, download the route onto the computer. I’ve found this to be really useful for long rides in unfamiliar territory. It’s a lot better than a map or a cue sheet and cyclometer for finding my way. But it does suffer from the “too much information” syndrome you get with cyclometers, so I tend not to use it regularly.

One of my favorite techniques for tracking shorter rides is to use Bikely. This web site provides a Google Maps based interface for exploring and editing cycling routes. You can draw a route manualy on the map, upload a GPS file, or even download someone else’s route and put it on your GPS to follow it. It can also show elevation maps for all routes, and generate cue sheets if the route maker provides turn information.

Often after taking an unplanned recreational route, I draw my route on Bikely when I get home. This lets me see how far I’ve gone, without keeping score while I’m on the road. For example, Sunday we had beautiful weather, so I rode a 30 mile or so loop around Pittsburgh. Although there were a few nice roads, overall the road choices weren’t that great: I should probably spend more time investigating the hills in Fox Chapel and Sewickley instead.

I think cyclometers can be very useful to motivate cyclists to “keep at it” early on, but it is easy to get sucked in and become a slave to the numbers if you aren’t careful. At some point, everybody’s numbers will stop going up, and you’d better hope you’ve stopped looking at them by then: if increasing numbers work as a motivator, then decreasing numbers may be a demotivator. In this case, it’s better to rely on your enjoyment of the activity as motivation, instead of the numbers.

Pittsburgh Flea Markets

I stopped going to flea markets for a while, and in that time the Pittsburgh flea market scene has changed significantly. Here’s an update from what I’ve learned so far this year.

The biggest, best flea market around is still in Rogers Ohio, Fridays only (year round). This one takes extra effort since it’s on a week day, relatively distant, and takes all day to get through the whole thing, so I usually only go once a year.

My previous favorite local flea market was Wildwood Peddler’s Fair, but that closed a year or so ago. I think they never really recovered from the flooding of Hurricane Ivan.

Trader Jack’s in Bridgeville is one of the older markets which is still going strong, but unfortunately I don’t like it any more than I used to.

My newest discovery is Rossi’s Pop-Up Market, which is less than 7 miles away in an ex-Loew’s theater. It’s indoor-outdoor, all year round, Saturday and Sunday. This is a much nicer, cleaner place than Jack’s, though I still haven’t found anyone selling good old tools.

I also haven’t found anyone I recognized form Wildwood. Maybe they went out of business, or maybe I just haven’t found the right market yet?

Beer Batch #25: Crippled Kriek

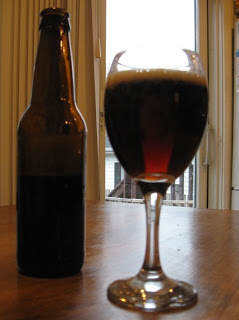
I wanted to brew a cherry beer, but I didn’t find a specific recipe I liked the look of. Crippled Kriek is a first attempt at getting what I want.

I called it “crippled” because I expected a cherry beer that didn’t taste like a proper Kriekbier, but instead, I got a beer that didn’t taste much like cherry. The rest of the flavor came out as I intended, and it’s a good beer; it just doesn’t taste like cherry.

Crippled Kriek

Brew date: March 29, 2009

Ingredients for a 5 gallon batch:

  • 1/2 lb Crystal Malt
  • 1/2 lb Chocolate Malt
  • 1/4 lb Roasted Barley
  • 6 lb LD Carlson Light Golden DME
  • 1oz Hallertau hops, 8.6AA for 60 min
  • 1oz Hallertau hops, 8.6AA for 10 min
  • 1tsp Irish Moss
  • 49oz Cherry Puree (3.3lb canned)
  • 1/4 gallon yeast starter, using WLP500 abbey ale yeast and WLP810 SF Lager

Same process as usual: Steep the grains, add the DME, and then boil for an hour. I added the cherry puree directly into the primary fermenter, after measuring the original gravity.

For the yeast starter, I used some 2nd generation Abbey Ale yeast, in hopes of getting some of its taste profile, and some 2nd generation San Francisco Lager yeast, because I knew it would ferment in my chilly house temperatures. In the end, I think the ale yeast failed and the lager yeast succeeded.

Original Gravity: 1.062

Notes:

  • Started yeast on March 26 using 1c DME in 4c water, and boiling for 30 min
  • Pitched yeast at 70F
  • April 8, 2009: Gravity = 1.014
  • April 9, 2009: Gravity = 1.014; rack to secondary
  • April 21, 2009: Gravity = 1.014; rack to the keg

The taste is a lot more clean than I had hoped for. I’d prefer the more interesting flavor which the Abbey Ale yeast would impart, but instead I think this is just the lager yeast.

For the recipe, I started with my gruit recipe (but without the herbs) and added the Roasted Barley to give it a bit more of a chocolatey/smoky flavor and a darker head. This part of the flavor turned out just as I had hoped.

In retrospect, I should have paid attention to the recipes which called for 10lbs of cherries. Another possibility would be to add the cherries in the secondary fermenter, instead of the primary.

As usual, it’s a good, drinkable beer. It just didn’t come out how I wanted it to.

Rodback: Finished

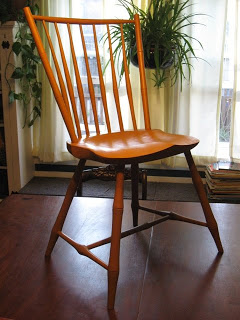
I finished the rodback chair. I used mustard Real Milk Paint with the anti-foaming agent, and I’m still very happy with the results. I didn’t use an under coat of the Butternut Squash, as I did on the perch, but this chair surprisingly turned out a bit more orange than the perch.

This is a really comfortable chair. I really like the feel of the deeply carved seat. Overall I’m very happy with the way it turned out, despite the mishaps.

I used epoxy to fill the crack in the seat as well as I could. Unfortunately it didn’t fill completely, but I’m confident it’ll be strong enough. The sawdust-filled epoxy seems to hold paint well enough, but it expands and contracts differently than the surrounding wood, so it does stand out a bit.

There was another unforseeable circumstance that set things back slightly. I used two different woods when making spindles, and one of the spindles I chose for this seat was made from the yellow/green wood I haven’t identified. When the first coat of paint dried, that spindle stuck out like a sore thumb: it turned dark brown, almost black!

So that spindle has several more coats of paint than the others, just to turn it yellow. It’s not a perfect match for the rest, but it’s close enough. I have a bunch more of this wood, and it seems to be turning brown on the outer surface as it ages. Probably something in the milk paint just accelerated that process. Now I’m not sure what I want to do: I’d like to use the spindles, but I’d rather not have to add 5 coats of paint to all of them. Maybe I should use a darker color, but then I wouldn’t have matching chairs.

On all of the pine seats I’ve painted recently, there are tiny surface cracks in the paint. I think this may be related to tiny pockets of pine pitch in the wood. I think it looks basically fine, the paint hasn’t chipped on any of them. Peter Galbert heats his seats and washes them with naptha to avoid problems with pitch.

This one is marked “Alan Ferrency 2009 4” on the bottom of the seat. I must say, I didn’t expect to make 4 chairs, even stools, in the same year! And there may be more to come.

Clear Your Beer

I feel inspired to write about home brewing tips and techniques I’ve found useful. I am by no means a master brewer; my skills are squarely in the “Jack” category. However, I also don’t consider myself a beginner.

If no one finds this valuable, then hopefully at least someone will find it interesting or entertaining. If you’d rather read the words of a Master, pick up a copy of “The Complete Joy of Homebrewing.” It is an extremely useful book.

For a long time, crystal clear transparent beer simply didn’t matter. And then one day, someone invented glass drinking vessels. Once people were able to see what they were drinking, appearance became more important. Brewers invented new techniques, even new styles of beer, when presented with the prospect of drinking out of glasses.

So, just go get yourself some “It Comes In Pints” mugs. Relax, don’t worry, and have a homebrew.

Although most beers are best when they are “crystal clear,” some styles are not considered correct unless they are cloudy. For example, a Belgian witbier (wheat beer with coriander and bitter orange) such as Hoegaarden must be cloudy.

I’m an extract brewer, and I’m not as concerned with correctness as with making beer that tastes good to me. But if you drink your beer in a glass, it can be unappetizing to look at a murky, cloudy pint, possibly with bits of floating debris. The human mind is not easily fooled: even if you don’t need a blindfold or a ceramic mug to make that beer taste as good as it really is, your Significant Other probably does.

I haven’t read a lot about home brewing in many years, so I’ll concentrate on the “how” more than the “why.” There are a few factors which contribute to cloudy beer. I’ll describe the processes I’ve settled on which eliminate these sources of cloudiness enough to satisfy me.

Cloudy beer is caused both by materials which are suspended in the water in the beer, and by solids left in the beer which are mixed back into the liquid when it is dispensed. To make your beer less cloudy, you first want to remove unwanted materials from suspension, and then remove the precipitated solids from the beer.

The first step towards clearing your beer happens in the boil pot. Near the end of the boil, you can add ingredients which help take unwanted proteins out of suspension, so they can precipitate and be removed from the beer. My preferred “fining agent” is Irish Moss, which is readily available in home brew stores. I’ve bought it in a powdered form, and also in a slightly more granular form which looks and smells like bits of dried seaweed. I add about 1tsp, 15 minutes before the end of the boil for a 5 gallon batch (2.5-3 gallons in the boil pot).

Looking back at my old beer notes, it seems that sometimes I rehydrated the Irish Moss in water before adding it to the boil. I haven’t done that lately; maybe I don’t know what I’m missing? Then again, maybe it doesn’t matter.

Another fining agent I’ve used is Knox Gelatine, but I don’t remember exactly how it is used. Looking at my notes, it seems that the gelatine is added to the secondary fermenter and not during the boil. Lately, I’ve had no problems with just tossing the dry Irish Moss into the boil along with the later addition of hops, so I’m going to stick with that.

After you’ve removed as much material from suspension as you’re going to, you need to remove the precipitated solids from the beer. Professional brewers use filter systems to do this, but home brewers generally don’t have this luxury. Instead, the general process is to allow time for the solids to precipitate, and then leave them behind when you transfer the beer into a new vessel. Yeast also lives in suspension for much of its life, but luckily the techniques used for removing solids from your beer will also encourage yeast to leave.

Many of these points are probably very obvious to most brewers, but someone might say “Oh, I didn’t think of that.” So I’ll restate the obvious.

  1. If you’re steeping any grains before the boil, use a grain bag to contain them. This lets you remove as much of the excess grain as possible before you start the boil, and reduces the amount of solids in the wort.
  2. When you dump the wort into your primary fermenter, use a strainer. If you use loose-leaf or plug hops, they will act as a filter to catch even more solids before they enter the fermenter.
  3. After the beer has stopped obvious activity in the primary fermenter (no more than 2 weeks), transfer it to a secondary fermenter for another few weeks before bottling or kegging it. You don’t want the beer sitting on dead yeast for longer than 2 weeks, but you do want to give it more time for the yeast to flocculate and solids to precipitate.
  4. Use a siphon instead of pouring, when you transfer your beer. Move the vessels around carefully without shaking them, let things settle for a while before starting the siphon, and don’t move the siphon around once it has started. A racking cane is indispensible. Don’t introduce oxygen into the beer after primary fermentation has started; it’ll confuse your yeast.
  5. This is the hard part. When you siphon, resist the temptation to move every last bit of liquid into the secondary. Instead, leave the murky bottom layer of goo behind, and dump it: it’s good for your plumbing. You might be throwing a pint of beer away, but you end up with less goo in the rest of it.
  6. If you’re bottling, siphon the beer into a bottling bucket, and again skip the muck at the bottom of the secondary fermenter. You need to mix the priming sugar thoroughly with the fermented beer, but you don’t want to mix any remaining solids into the beer at the same time.
  7. Make sure you don’t add too much priming sugar. More sugar grows more yeast in your bottles.
  8. When pouring beer from bottles, let the bottles sit still, pour gently, and don’t pour the yeast off the bottom of the bottle. This applies to purchased bottle-conditioned beer as well.
  9. Instead of bottling, keg your beer and use bottled CO2 for carbonation. I was surprised to discover recently that around here, used soda kegs cost less than $4o. Kegs are a lot easier to use than bottles, and require a lot less cleaning and sanitization. They provide an economical way to store and dispense your beer, and you’ll generally end up with less cloudiness than with bottles. Because you store the beer under carbonation and without oxygen, it stays fresh for quite a while (possibly months).
  10. Don’t move your kegs around or shake them, if possible.

As I said before, most of this is likely to be obvious to a brewer, and uninteresting to everyone else. Sorry about that. If you had a homebrew when I told you to before, you probably wouldn’t mind so much.

Backing Up

Assembling the bottom half of a Windsor chair is generally called “legging up.” So, I figure, assembling the back must be “backing up,” right? I hadn’t assembled a square backed chair before, so I had to figure out how to do it, with this one. Prepare to be bored (no pun intended): this is what I did.

Unlike most other windsor chairs, even other square backs (including many rodbacks), this chair’s two joints at the sides are at a significantly different angle (but not quite “perpendicular”) compared to the joints at the tops of the spindles. I decided this required assembling the rod and posts first, and treating it as a single unit when assembling the rest of the back. This turned out to work quite well.

I first tapered the post holes, and set the posts in place. Then I clamped the rod to the posts, in the correct orientation and at the right height. In this chair, the rod should be parallel to the floor. I set a bevel to the angle between the post and rod, and confirmed it was the same angle on the other side. I used that bevel to drill the angled holes in the posts.

After removing the clamped rod, I measured the distance between the top of the posts, so I could trim the rod tenons just far enough for the posts to be lined up properly. The posts can rotate on the rod to any angle, but I wasn’t sure how this would work in practice. It turns out that the distance between the bottom ends of the posts changes significantly with very small rotations at the post-rod joint. I measured the distance between the posts at the seat of the chair to make sure the post-rod angles were also correct.

It’s possible for the top and bottom post distances to be correct while the posts aren’t in the same plane (the whole back is twisted), so I eyeballed it while dry fitting it into the seat. Once I aligned the posts and rod correctly and dry fit them into the seat, I marked the orientation of rods and posts so I could reproduce it quickly in the presence of glue. I then sawed kerfs in the rod for the wedges, applied glue to the rod and posts, assembled everything, and wedged the tenons.

While the rod and post joints dried, I installed the spindles in the seat (“crack!”). In cases where my spindles hole angles weren’t quite right, I oriented spindles that weren’t quite straight, to compensate. I marked the spindle hole locations in the rod, and bored the holes by eye, sighting down the spindles. This was the weak spot: I’m not enitirely happy with the results of these holes, but I don’t have a better solution at the moment.

From here on out, it was pretty much the same as the other chair backs I’ve done. I dry fit the back, and marked the spindles at the bottom of the bow, to saw wedge kerfs to the proper depth. Then, I hurriedly applied plain old Elmer’s white glue to all 9 holes and 9 tenons, and fiddled with things until it I got it all in one piece.

Finally, I applied glue to the wedges and hammered them into place. I’m unhappy with my wedges: they’ve been cracking fairly regularly. I think I should probably use something other than maple. I think we used oak on my previous chairs.

Anyway, I warned you it’d be boring; there weren’t even any pictures. But I would’ve appreciated finding this blog post via google, a few weeks ago.