Beer Batch #25: Crippled Kriek

I wanted to brew a cherry beer, but I didn’t find a specific recipe I liked the look of. Crippled Kriek is a first attempt at getting what I want.

I called it “crippled” because I expected a cherry beer that didn’t taste like a proper Kriekbier, but instead, I got a beer that didn’t taste much like cherry. The rest of the flavor came out as I intended, and it’s a good beer; it just doesn’t taste like cherry.

Crippled Kriek

Brew date: March 29, 2009

Ingredients for a 5 gallon batch:

  • 1/2 lb Crystal Malt
  • 1/2 lb Chocolate Malt
  • 1/4 lb Roasted Barley
  • 6 lb LD Carlson Light Golden DME
  • 1oz Hallertau hops, 8.6AA for 60 min
  • 1oz Hallertau hops, 8.6AA for 10 min
  • 1tsp Irish Moss
  • 49oz Cherry Puree (3.3lb canned)
  • 1/4 gallon yeast starter, using WLP500 abbey ale yeast and WLP810 SF Lager

Same process as usual: Steep the grains, add the DME, and then boil for an hour. I added the cherry puree directly into the primary fermenter, after measuring the original gravity.

For the yeast starter, I used some 2nd generation Abbey Ale yeast, in hopes of getting some of its taste profile, and some 2nd generation San Francisco Lager yeast, because I knew it would ferment in my chilly house temperatures. In the end, I think the ale yeast failed and the lager yeast succeeded.

Original Gravity: 1.062

Notes:

  • Started yeast on March 26 using 1c DME in 4c water, and boiling for 30 min
  • Pitched yeast at 70F
  • April 8, 2009: Gravity = 1.014
  • April 9, 2009: Gravity = 1.014; rack to secondary
  • April 21, 2009: Gravity = 1.014; rack to the keg

The taste is a lot more clean than I had hoped for. I’d prefer the more interesting flavor which the Abbey Ale yeast would impart, but instead I think this is just the lager yeast.

For the recipe, I started with my gruit recipe (but without the herbs) and added the Roasted Barley to give it a bit more of a chocolatey/smoky flavor and a darker head. This part of the flavor turned out just as I had hoped.

In retrospect, I should have paid attention to the recipes which called for 10lbs of cherries. Another possibility would be to add the cherries in the secondary fermenter, instead of the primary.

As usual, it’s a good, drinkable beer. It just didn’t come out how I wanted it to.

Rodback: Finished

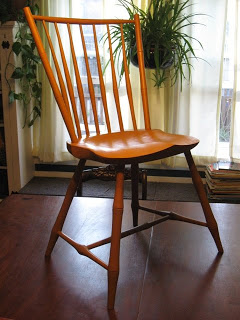
I finished the rodback chair. I used mustard Real Milk Paint with the anti-foaming agent, and I’m still very happy with the results. I didn’t use an under coat of the Butternut Squash, as I did on the perch, but this chair surprisingly turned out a bit more orange than the perch.

This is a really comfortable chair. I really like the feel of the deeply carved seat. Overall I’m very happy with the way it turned out, despite the mishaps.

I used epoxy to fill the crack in the seat as well as I could. Unfortunately it didn’t fill completely, but I’m confident it’ll be strong enough. The sawdust-filled epoxy seems to hold paint well enough, but it expands and contracts differently than the surrounding wood, so it does stand out a bit.

There was another unforseeable circumstance that set things back slightly. I used two different woods when making spindles, and one of the spindles I chose for this seat was made from the yellow/green wood I haven’t identified. When the first coat of paint dried, that spindle stuck out like a sore thumb: it turned dark brown, almost black!

So that spindle has several more coats of paint than the others, just to turn it yellow. It’s not a perfect match for the rest, but it’s close enough. I have a bunch more of this wood, and it seems to be turning brown on the outer surface as it ages. Probably something in the milk paint just accelerated that process. Now I’m not sure what I want to do: I’d like to use the spindles, but I’d rather not have to add 5 coats of paint to all of them. Maybe I should use a darker color, but then I wouldn’t have matching chairs.

On all of the pine seats I’ve painted recently, there are tiny surface cracks in the paint. I think this may be related to tiny pockets of pine pitch in the wood. I think it looks basically fine, the paint hasn’t chipped on any of them. Peter Galbert heats his seats and washes them with naptha to avoid problems with pitch.

This one is marked “Alan Ferrency 2009 4” on the bottom of the seat. I must say, I didn’t expect to make 4 chairs, even stools, in the same year! And there may be more to come.

Clear Your Beer

I feel inspired to write about home brewing tips and techniques I’ve found useful. I am by no means a master brewer; my skills are squarely in the “Jack” category. However, I also don’t consider myself a beginner.

If no one finds this valuable, then hopefully at least someone will find it interesting or entertaining. If you’d rather read the words of a Master, pick up a copy of “The Complete Joy of Homebrewing.” It is an extremely useful book.
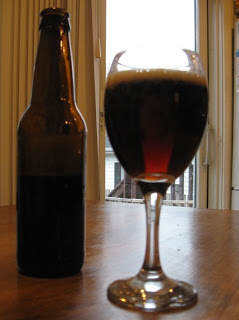
For a long time, crystal clear transparent beer simply didn’t matter. And then one day, someone invented glass drinking vessels. Once people were able to see what they were drinking, appearance became more important. Brewers invented new techniques, even new styles of beer, when presented with the prospect of drinking out of glasses.

So, just go get yourself some “It Comes In Pints” mugs. Relax, don’t worry, and have a homebrew.

Although most beers are best when they are “crystal clear,” some styles are not considered correct unless they are cloudy. For example, a Belgian witbier (wheat beer with coriander and bitter orange) such as Hoegaarden must be cloudy.

I’m an extract brewer, and I’m not as concerned with correctness as with making beer that tastes good to me. But if you drink your beer in a glass, it can be unappetizing to look at a murky, cloudy pint, possibly with bits of floating debris. The human mind is not easily fooled: even if you don’t need a blindfold or a ceramic mug to make that beer taste as good as it really is, your Significant Other probably does.

I haven’t read a lot about home brewing in many years, so I’ll concentrate on the “how” more than the “why.” There are a few factors which contribute to cloudy beer. I’ll describe the processes I’ve settled on which eliminate these sources of cloudiness enough to satisfy me.

Cloudy beer is caused both by materials which are suspended in the water in the beer, and by solids left in the beer which are mixed back into the liquid when it is dispensed. To make your beer less cloudy, you first want to remove unwanted materials from suspension, and then remove the precipitated solids from the beer.

The first step towards clearing your beer happens in the boil pot. Near the end of the boil, you can add ingredients which help take unwanted proteins out of suspension, so they can precipitate and be removed from the beer. My preferred “fining agent” is Irish Moss, which is readily available in home brew stores. I’ve bought it in a powdered form, and also in a slightly more granular form which looks and smells like bits of dried seaweed. I add about 1tsp, 15 minutes before the end of the boil for a 5 gallon batch (2.5-3 gallons in the boil pot).

Looking back at my old beer notes, it seems that sometimes I rehydrated the Irish Moss in water before adding it to the boil. I haven’t done that lately; maybe I don’t know what I’m missing? Then again, maybe it doesn’t matter.

Another fining agent I’ve used is Knox Gelatine, but I don’t remember exactly how it is used. Looking at my notes, it seems that the gelatine is added to the secondary fermenter and not during the boil. Lately, I’ve had no problems with just tossing the dry Irish Moss into the boil along with the later addition of hops, so I’m going to stick with that.

After you’ve removed as much material from suspension as you’re going to, you need to remove the precipitated solids from the beer. Professional brewers use filter systems to do this, but home brewers generally don’t have this luxury. Instead, the general process is to allow time for the solids to precipitate, and then leave them behind when you transfer the beer into a new vessel. Yeast also lives in suspension for much of its life, but luckily the techniques used for removing solids from your beer will also encourage yeast to leave.

Many of these points are probably very obvious to most brewers, but someone might say “Oh, I didn’t think of that.” So I’ll restate the obvious.

  1. If you’re steeping any grains before the boil, use a grain bag to contain them. This lets you remove as much of the excess grain as possible before you start the boil, and reduces the amount of solids in the wort.
  2. When you dump the wort into your primary fermenter, use a strainer. If you use loose-leaf or plug hops, they will act as a filter to catch even more solids before they enter the fermenter.
  3. After the beer has stopped obvious activity in the primary fermenter (no more than 2 weeks), transfer it to a secondary fermenter for another few weeks before bottling or kegging it. You don’t want the beer sitting on dead yeast for longer than 2 weeks, but you do want to give it more time for the yeast to flocculate and solids to precipitate.
  4. Use a siphon instead of pouring, when you transfer your beer. Move the vessels around carefully without shaking them, let things settle for a while before starting the siphon, and don’t move the siphon around once it has started. A racking cane is indispensible. Don’t introduce oxygen into the beer after primary fermentation has started; it’ll confuse your yeast.
  5. This is the hard part. When you siphon, resist the temptation to move every last bit of liquid into the secondary. Instead, leave the murky bottom layer of goo behind, and dump it: it’s good for your plumbing. You might be throwing a pint of beer away, but you end up with less goo in the rest of it.
  6. If you’re bottling, siphon the beer into a bottling bucket, and again skip the muck at the bottom of the secondary fermenter. You need to mix the priming sugar thoroughly with the fermented beer, but you don’t want to mix any remaining solids into the beer at the same time.
  7. Make sure you don’t add too much priming sugar. More sugar grows more yeast in your bottles.
  8. When pouring beer from bottles, let the bottles sit still, pour gently, and don’t pour the yeast off the bottom of the bottle. This applies to purchased bottle-conditioned beer as well.
  9. Instead of bottling, keg your beer and use bottled CO2 for carbonation. I was surprised to discover recently that around here, used soda kegs cost less than $4o. Kegs are a lot easier to use than bottles, and require a lot less cleaning and sanitization. They provide an economical way to store and dispense your beer, and you’ll generally end up with less cloudiness than with bottles. Because you store the beer under carbonation and without oxygen, it stays fresh for quite a while (possibly months).
  10. Don’t move your kegs around or shake them, if possible.

As I said before, most of this is likely to be obvious to a brewer, and uninteresting to everyone else. Sorry about that. If you had a homebrew when I told you to before, you probably wouldn’t mind so much.
Backing Up

Assembling the bottom half of a Windsor chair is generally called “legging up.” So, I figure, assembling the back must be “backing up,” right? I hadn’t assembled a square backed chair before, so I had to figure out how to do it, with this one. Prepare to be bored (no pun intended): this is what I did.

Unlike most other windsor chairs, even other square backs (including many rodbacks), this chair’s two joints at the sides are at a significantly different angle (but not quite “perpendicular”) compared to the joints at the tops of the spindles. I decided this required assembling the rod and posts first, and treating it as a single unit when assembling the rest of the back. This turned out to work quite well.

I first tapered the post holes, and set the posts in place. Then I clamped the rod to the posts, in the correct orientation and at the right height. In this chair, the rod should be parallel to the floor. I set a bevel to the angle between the post and rod, and confirmed it was the same angle on the other side. I used that bevel to drill the angled holes in the posts.

After removing the clamped rod, I measured the distance between the top of the posts, so I could trim the rod tenons just far enough for the posts to be lined up properly. The posts can rotate on the rod to any angle, but I wasn’t sure how this would work in practice. It turns out that the distance between the bottom ends of the posts changes significantly with very small rotations at the post-rod joint. I measured the distance between the posts at the seat of the chair to make sure the post-rod angles were also correct.

It’s possible for the top and bottom post distances to be correct while the posts aren’t in the same plane (the whole back is twisted), so I eyeballed it while dry fitting it into the seat. Once I aligned the posts and rod correctly and dry fit them into the seat, I marked the orientation of rods and posts so I could reproduce it quickly in the presence of glue. I then sawed kerfs in the rod for the wedges, applied glue to the rod and posts, assembled everything, and wedged the tenons.

While the rod and post joints dried, I installed the spindles in the seat (“crack!”). In cases where my spindles hole angles weren’t quite right, I oriented spindles that weren’t quite straight, to compensate. I marked the spindle hole locations in the rod, and bored the holes by eye, sighting down the spindles. This was the weak spot: I’m not enitirely happy with the results of these holes, but I don’t have a better solution at the moment.

From here on out, it was pretty much the same as the other chair backs I’ve done. I dry fit the back, and marked the spindles at the bottom of the bow, to saw wedge kerfs to the proper depth. Then, I hurriedly applied plain old Elmer’s white glue to all 9 holes and 9 tenons, and fiddled with things until it I got it all in one piece.

Finally, I applied glue to the wedges and hammered them into place. I’m unhappy with my wedges: they’ve been cracking fairly regularly. I think I should probably use something other than maple. I think we used oak on my previous chairs.

Anyway, I warned you it’d be boring; there weren’t even any pictures. But I would’ve appreciated finding this blog post via google, a few weeks ago.

That Looks Just About Right…

This is a sketch of the rodback chair. I made it before I started working on the chair using tracing paper over a photograph of the chair I was inspired by. I changed things where necessary to show the chair I planned to build.

Rod Back chairs are a later (1800-1820) “degenerate” style windsor. They typically have much straighter legs and less deeply carved seats than earlier styles and most of them used a square stretcher pattern instead of the “H” stretchers here.

I like the more comfortable deeply carved seats of earlier chairs, but I prefer the turnings used on later chairs. So, I paired the seat shape and leg angles of an earlier Comb Back chair with the turnings and square back of the rodback. Compared to the photograph I traced, this seat is carved more deeply, the swell in the spindles is higher, the posts are different, and the leg angles are different.

I took a photo of my chair-in-progress, from approximately the same angle as the photo I traced. It looks pretty close!

I like the much slimmer look of my chair, compared to the sketch. I think the angles are a bit exaggerated in my chair because I was very close to it when I took the picture.

Since the chair isn’t finished yet, I’ll take this opportunity to be critical. The front legs of the chair are splayed a bit more than the plan called for; I’ll have to see whether I built it incorrectly or planned it incorrectly. It may be only because the front of the seat is higher than the chair I planned from. That’s the main thing that looks a bit odd with it, when I look at one portion of the chair critically, instead of standing back and admiring it.

It’s quite comfortable, but I haven’t spent a lot of time sitting in it yet since I haven’t epoxied the seat back together yet.

Today I trimmed the spindles. If it weren’t for the unfortunate crack, it would be basically ready for a quick sanding and a few coats of paint.

There are a few other things that didn’t work as well as I would have preferred, but worked out in the end. I didn’t orient the seat blanks properly. When carving the wood along the join, in some places I needed to carve in one direction on one side of the line and the opposite direction on the other side, which made things tricky. It’s easier to glue up seat blanks when both halves come from the same board.

I used wedged through tenons on the post-rod joint. This worked well enough, and it’ll be strong, but I had problems with drilling a through hole without breaking the grain out on the other side of the post. I think I need to replace my crappy 1/2″ bit, as I did with my 5/8″ bit. Although these bits from Highland Hardware got good reviews in Fine Woodworking, they’ve been horrible in my experience.

I’m also not completely happy with the wedged joints between the spindles and rod. They’re a bit loose. I may dab a bit of epoxy in, while I’m patching the cracked seat. In general, I need more practice carving spindles. That’s understandable, since I’ve been working on stools lately, and I’ve been using suboptimal spindle wood.

I’m in the home stretch now. I’ve been wondering whether I have enough stamina for another chair, but Marla tells me I can’t stop making chairs (or at least parts) until I’m done clearing the wood off the porch. I guess I’ll have to at least rough out a bunch of spindles, rods, and legs.

Nearly a Chair

My rodback chair is almost fully assembled. One more night to glue things up, and then it’s down to trimming and finishing.

In fact, pretty soon I’ll probably have two chairs! Well, two halves of one chair, anyway.

When inserting one of the spindles, the seat cracked. A few of the spindle ends might have been a bit too fat, but in this case the main problem was that this hole ended up directly over a crack on the bottom of the seat. Here, the crack goes all the way through the seat. I should’ve made this spindle loose rather than risk splitting the seat, if I had realized it might be a problem.

I expect I can salvage it, though I’m not sure which glue would be best to use here. Super glue might keep the crack from spreading, but it won’t fill the space to hold the cracked parts together. Maybe urethane (gorilla) glue would work better for that, but I’m not sure how to get it in the crack and keep it there; and I wouldn’t want it to push the seat apart even more.

Maybe I’ll use both. Start by applying super glue to the edges, and letting it dry. Then, clamp the seat lightly so it can’t expand any further, push some urethane glue into the crack, and apply tape on top to keep it in place while it dries.

The worst part will be finishing it. The crack will definitely be noticeable, and milk paint doesn’t stick to super glue. I’m not sure about the urethane glue, though.

I think the rest of my seat plank is not checked on the surface the way this one is. Both of my pine seated stools have check-cracks on the bottom, which are not a problem. The difference in this case is the spindles. With 9 holes across the back, I would have had to plan a lot farther ahead to avoid putting this crack in the middle of one of them.

Use Your Signals

When bicycling, I generally use hand signals to tell drivers when I’m going to turn. For the most part, this is pretty boring and not worth writing about. However, legally required hand signals are not the only useful way to use your body to communicate with drivers while cycling.

But first… I guess I do have a few things to say about hand signals.

  1. Movement is more visible than a static pose. When starting hand signals, I tend to use exaggerated arm movements, sort of a “throwing” motion, to make myself more visible.
  2. The form of your signal can convey additional meaning. When merging into a left lane, I generally point at the ground with my finger, to say “I’m going there.” Seeing someone point naturally draws your eye towards where they’re pointing. My hope is that pointing where I’m going to go will cause drivers to look where I’m going, and thus be more likely to see me. On the other hand, when I am slowing down to turn left, I strech my left arm out with my open palm facing back, to say “slow down” to drivers behind me.

I’ve learned a few other techniques which can be helpful when navigating in traffic. The basic concept is to manage drivers’ perception of your attention. Drivers can’t see your eyes, but they do pay attention to the movement of your head to figure out what you see, and what you intend to do.

I don’t use a mirror, but in normal traffic I can usually hear cars approaching from behind. When I’m being followed by someone who could pass me safely, but who isn’t passing me, usually they decide it’s safe to pass if I turn around and glance backwards at them. Turning my head tells them that I know they’re there. Usually I move into the middle of a lane if it’s not safe to pass me, but a quick glance backwards is often enough to encourage hesitant drivers to pass if I want them to.

Recently I discovered another technique, but it’s a bit trickier to use effectively. In this case, the problem is that when I am stopped at an intersection and traffic crossing my path has the right of way, sometimes drivers stop and wave me across the intersection. Although they mean well, this is dangerous and they should not do it. It’s unsafe for them to stop when other drivers expect them to be moving, and it is unsafe for me to move into the intersection when there may be other drivers who expect me to be stopped.

If you stare expectantly at drivers while waiting to cross traffic, they are more likely to stop for you, thinking you’re a pedestrian. The key to managing this situation safely is to make sure they don’t perceive you as expecting them to stop for you to cross. First, you have to make it obvious that you’re stopped, and won’t be moving into traffic without looking. Put your foot down, maybe even let go of the handlebars. Then, make it obvious you aren’t paying attention to them. A glance at oncoming traffic when it’s farther away may tell them that you see them, but then turn your head away and make it obvious you’re paying attention to something else. Tell them that by stopping, they will only waste their time.

Unfortunately, I recently had another occasion to manage a driver’s perception of my attention. In this case, a big white SUV was behind me on a slow, narrow side street, as I rode in the middle of the lane to prevent unsafe passing. I choose this route because it’s slower than the main street, but occasionally cars use it as a short cut. She gunned her motor, intending to pass me unsafely on the left. By turning around and staring at her, letting her know I was watching her do this, I convinced her to stop.

That may seem dangerous, but I don’t believe it was. Although it’s not illegal to insult people, and might not be illegal to threaten them with physical harm, it is still definitely illegal to run someone over; even a self-righteous cyclist riding in the lane they’re legally entitled to ride in (see also: self righteous, self-referential).

The greatest dangers a cyclist must contend with are not being seen by drivers, and not seeing dangerous situations they may ride into. It’s important to use signals to tell other drivers what you’re doing, but it’s also important to learn drivers’ signals.

For example, when a driver honks their horn at you, it means “I see you, so I won’t hit you.” If they gun their motor, they might pass you, so don’t pull out in front of them; but it is also an indication that they see you, and will make an effort not to hit you. If someone yells “Get off the road” or something else (generally unintelligible) as they pass you, it means they see you. They may try to scare you, but they most likely won’t hit you.

These drivers may be annoying, but they aren’t the drivers you need to worry about, so try not to let them bother you. Of greater concern are the drivers who don’t see you or who drive unsafely and unpredictably.

Chairlike

I’m making progress on the Rodback chair.

The turnings other than the stretchers are done. This maple is wonderful to turn, and it seems very stable when it’s drying. Now that I have the legs tapered, I can measure the stretcher lengths and turn them as well.

The spindles and rod are roughed out, but they’re still oversize. The drying rack worked very well, after I put a rack on it to keep the pieces from falling down whenever I bumped it.

I’ve also drilled and cut the seat. After tapering the leg and post holes, I set this picture up so I could see what the chair will look like when it’s done. I think the shape of the post turnings will be fine.

I’ve started carving the seat, but I need to sharpen one of my spokeshaves and it’s giving me trouble. Once that’s taken care of, I’ll finish the seat and “leg up:” finish the stool half of the chair.

After that, I’ll finish the rod and assemble the two posts and the rod to each other. Then I’ll finish the spindles, drill the rod, and put the rest of the back together.

Dress for Cycling: the 40’s

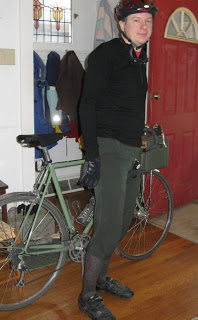
If you’re male and you wear clothes designed for bicycling, you’re pretty much going to look like a freak to the non-cyclist population. Exactly what kind of freak is up to you.

Here’s an example of how I might dress for a ride to work when it’s in the 40’s. That’s degrees farenheit, not the decade.

It was about 48-50F in the morning when I left dressed as you see here. On bottom, I have wool knickers and long socks that cover my knees. I wear the knickers all summer, but generally not when it’s below the 40F. On top, I wear a cotton T-shirt and wool jersey. I use a helmet with a visor, long fingered gloves, and goggles to keep the wind off my eyes in cold weather.

Women have it easy: capri pants, leggings, and tight fitting shirts are all well within the range of accepted “normal” clothing. Not so much, for boys.

As is usual, layering is the order of the day. The temperature dropped down to around 39F by the time I left work, and I was prepared with an ear warmer head band thing, and a wind proof shell for my top. Everything else was the same. I wear the same windproof shell and wool jersey down to about 20F without problems, but I need more extensive head covering at lower temperatures.

Wool is an excellent fabric for use when bicycling, anywhere from cool and dry weather, to light drizzly rain. It’s warm even when wet, it breathes well, and there’s almost nothing you can do which will make it stop smelling like a sheep. Although all my wool clothes claim they require dry cleaning, we just wash them in the normal washer using Kookaburra Wool Wash, and let them dry in the air instead of the drier. They require washing only very infrequently, even with constant use in sweaty conditions.

It’s best for everyone to discover for themselves what they need to wear at various temperatures on the routes they usually take. Factors such as how windy it is, and how much effort you make when cycling also make a big difference. For example, when it’s colder out than I expect on my way home from work, I’ll often take the “mostly uphill” route home, where I require more effort (and heat myself up more) to go more slowly (with less wind to cool me off).

Hop, hop, hop…

…hop, hop, hop, etc.

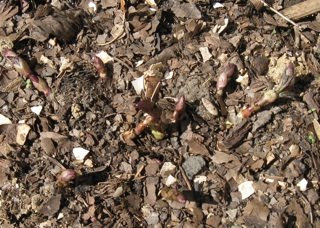
My hops bines sprouted. The first signs of hops this year came before I even planted the rhizome last year. At last count, 11 buds had sprouted, compared with a total of 2 for all of last year.

Luckily hops are resistant to frost. April Showers aren’t supposed to be frozen!