Stool Progress: Step By Step

An update, in reverse chronological order:

It’s starting to look like a stool!

Stool

I carved the seat top, and reamed the leg holes, allowing the tapered leg tenons to enter the seat. Next is drilling the legs and stretchers, and gluing it up.

It’s very important to do all the steps of constructing the chair in the right order. Fortunately, every chairmaker uses a different “right order.” I could have done a better job on this stool, but it’ll all work out just fine.

The main considerations seem to be:

  • Obviously, respect any strict order dependencies during construction: usually you need to make the parts before you can assemble them.
  • Make sure that you can always hold the parts you’re working on without damaging them. If you cut too much of the seat too soon, you won’t have any flat surfaces left to clamp.
  • If there are any steps where screwing up will permanently ruin a part, try to do those sooner rather than later, so you ruin as little work as possible.

Different people weigh each consideration differently, and sometimes the best choice depends on the shape of the parts for a particular chair.

One of the biggest variables seems to be: when do you drill and ream the leg holes, in relation to how finished the seat is? I’ve seen them drilled and reamed into a flat square board that hasn’t been shaped at all, and in a seat that’s completely carved, top and bottom. Knowing that different people do it differently helps reduce my worry about doing it wrong.

For this stool, I tried to remember the steps we used at Brian Cunfer’s class, but failed. Building a chair outside a class turns out to be challenging in ways I didn’t expect. I made notes about some complicated steps, but the simple things I knew I would remember… I forgot. Peter Galbert’s chairmaking videos have proven invaluable to remind me of small details that I’d otherwise have to figure out again on my own.

Tools

Earlier this week, we had 2 deliveries on the same day, with the new tools I needed to carve the top of the seat. Here’s my growing collection of chair-specific tools.

On top there’s a tapered tenon cutter (and a bevel gauge that snuck into the picture), and on the left is a tapered reamer. These are used to cut a tapered round mortise and tenon joint between the chair legs and seat. They were hand made by Elia Bizzarri.

In the middle is a Scorp: basically just a large curved metal blade with two handles. This one is made by Ray Iles. It’s used to rough out the top of the seat. For such a simple tool, it’s apparently not easy to design correctly: I previously purchased 2 other inexpensive models whose handles were set at an angle which made it impossible to carve the seat bowl. I’m happy to say that this scorp is superior to the others in every way, and didn’t cost much more than the others, even accounting for the UK exchange rate.

Below the scorp are a compass plane and travisher, which are used to smooth out the seat bowl carving. They are made by Jim White at Crown Planes. The finish quality of the tools is not as good as you’d find on antique tools. However, they work well, they’re far more available than used tools, and the prices are reasonable. In any case, it’s a hell of a lot better job than I’d do if I attempted to make them myself, and I’d still need to purchase the blades (not cheap).

You may notice that I know the names of the people who constructed all of these tools. The market for chairmaking tools is small (but much larger than 10 years ago). All of these tools are hand made in small batches by individuals who make their living constructing and selling woodworking tools. I’m happy to give my money to these people, instead of to companies who can’t figure out how to make a scorp which actually works for the purpose it was designed for.

Loots

Actually, it’s just chair parts, but I needed an anagrammatic section header.
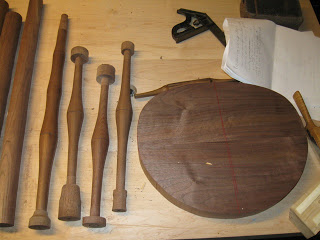
Before my seat carving tools arrived, I did some work on the walnut stool. Hot damn, this is going to be beautiful if I don’t screw it up! I’m still paranoid that the walnut won’t be strong enough, and the legs will break the first time I sit in it.

There’s really only one leg blank I’m really worried about, because it has some wonky grain that crosses the spindle. I should probably just go chop up another beam instead of risking this one, but it seems like such a waste. Maybe I can get 3 legs out of the same piece, and make a walnut perch as well…

Anyway, tomorrow I’m brewing beer, so I probably won’t have time to drill legs as well. We’ll see.

Project Update: Stool(s)


After my chair class in 2007, I decided to build a Windsor-style stool that the teacher, Brian Cunfer, had in his shop. A stool lets me build my tool collection progressively: I wouldn’t need a steam box since the stool has no back. I figured I’d build one as practice and paint it, then build one out of my stash of walnut with a natural finish.

I got as far as turning the legs and stringers, before feeling my lack of a bench. You might notice that the legs and stringers are made of at least 4 different kinds of wood: they were all what I had sitting around in the right size. This hopefully won’t be noticeable under paint.

Now that my bench is usable, I’ve picked up where I left off. Over the past week or so, I pieced up the seat, cut it out, shaped the outside edge, and today I drilled the leg holes. Now, I’m waiting for more tools to carve the seat. The inshave I had was really not the right shape, so another one should be coming in the mail soon.

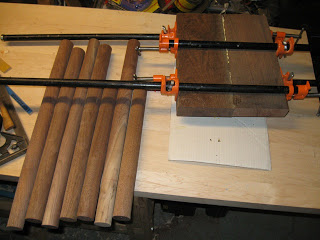
In the mean time, I’ve started cutting up my walnut for the second stool. It has a lot of knots, and the pith is throught middle of some pieces. But I found enough straight, clear wood for the seat, and I rounded enough sticks for the legs and stringers. Tonight I glued up the seat blank. Next, I’ll probably turn the legs and stringers, while I wait for the seat carving tools to arrive.

Epic Bench


In case you haven’t figured it out yet, “Epic” refers to a project which went on far longer than it should have, and/or is not finished yet.

Around 1998, when we moved into our house, I started building a woodworking bench. I built the base in the tiny workshop in Marla’s mother’s house, using mortise and tenon joints on some dimensional 4×4′ lumber. I was inspired around this time, from attending Michael Dunbar’s Windsor Institute and building a Windsor chair in October 1998.

Some time after that, I bought some hard maple for the bench top; a few years later, I pieced the top together. Unfortunately, due to some miscalulation and/or overzealous jointing, I ended up with the top about an inch too narrow for the base. Around this time, I also received a very nice Record woodworking vise for Christmas, before Record went out of business. (Thanks, Dad!) I cleaned the glue joints and trimmed the ends, but with inspiration from the chair class waning, I didn’t make any further progress.

Since it was a vaguely horizontal surface, it was fine for most of my general handyman tasks, even though it was inadequate for woodworking. It served this purpose well for many years, while I worked on a variety of non-woodworking projects.

Then, in 2007, I attended another Windsor chair making class, this time taught by Brian Cunfer near Lancaster, PA. I built a side chair, including turning the legs (which we didn’t do at Dunbar’s class).

With my newfound inspiration, I decided to continue work on my bench so I could build a windsor style stool. I flattened the top, fit it to the base, and bought a lathe to turn some legs and stretchers. After turning the spindles, I started turning wooden boxes. But woodturning doesn’t require much of a bench, and certainly doesn’t require a vise. And the top was still too narrow for the base…

Soon the newly flattened bench top was covered with spindles, broken boxes, box blanks, and other various bits of turned wood. After giving away a few dozen wooden boxes for Christmas, woodworking and turning once again ceased to be my primary hobby.

When my parents decided to visit after Christmas in 2008, Dad asked “What projects do you have?” I added “finish the bench” to the top of the list.

When he was here, we made some great progress. He brought some hard maple to widen the top enough to fit the base. We widened the top, trimmed the ends, re-flattened the top, and added a spacer block to mount the vise. Finally, after a few bolts to hold the top down, and wooden vise jaws, it’s starting to really look like a bench.

It’s now finished enough to use for woodworking, so I can build the stool seat and assemble it. Thanks!

The remaining tasks include smoothing the top and ends a bit more, and applying a finish. I’ll wait for the warmer months before finishing it, so I can ventilate the basement while the finish dries.

Anyone who has seen many woodworking benches will probably notice that this bench is fairly sparse, and that the base and top are attached in a somewhat odd position. I’ll provide an explanation, but no excuses. There’s no way I could’ve made a substantially better bench, without any bench to work with. The odd proportions are purely due to a series of changed plans combined with no desire to redo any work already done.

On the bench, you can see I’ve started the stool seat. I’ll post more about that as it progresses.

Beer Batch #19: Epic Gruit

I’ve decided to write blog entries for particularly interesting batches of beer I’ve brewed, including recipes and notes. This entry documents my 19th batch of homebrew since 1995 when I first started brewing.

After a long “off” period, I started brewing again in early 2008. I quickly learned that I was in the midst of a global hops shortage. To compensate for the high price and low availability of hops, I became interested in gruit, a traditional style of beer which uses various dried herbs for bittering and preservation, instead of hops.

Gruit is essentially obsolete, and not a lot of useful information is available regarding specific recipes for use by homebrewers. The typical recommendation is to just experiment, and see what happens. That’s all well and good, but what do you do with 5 gallons of failed experiment?

I gave it a try anyway. This is what I came up with.

Epic Gruit

Brew date: April 13, 2008

Ingredients for a 5 gallon batch:

  • 1/2 lb Crystal malt, 120L
  • 1/2 lb Chocolate malt, 338L
  • 8.5 lb M+F Light dry malt extract
  • 1 oz dried Yarrow
  • 1 oz dried Mugwort
  • 1/2 oz dried Licorice root
  • 2g dried Sweet Gale
  • 1 tsp Irish Moss (for clarity)
  • Wyeast 3787 Trappist Ale Yeast

Process:

  1. Steep grains in 2.5-3 gallons of water, 155F for 30 min.
  2. Add malt extract
  3. Boil for 60 minutes total
    • add herbs at 30 minutes
    • add irish moss at 45 minutes
    • add wort chiller at 45 minutes
  4. Chill wort, targetting 78-80F for the wort
  5. Add to water in fermentation bucket, to reach 5 gallons
  6. Pitch yeast starter

Original Gravity: 1.063

Notes:

  • I started the Wyeast several days earlier, and it started just fine.
  • After 24 hours, there was no activity in the fermenter, so I dumped in a vial of 2nd generation White Labs European Ale Yeast (without a starter)
  • Very active after 48 hours
  • April 25: Gravity = 1.021, racked to secondary. Tastes herbal, somewhat sour, with an odd bitter aftertaste. If it wasn’t supposed to be weird, I’d call it bad.
  • May 10: Gravity = 1.021, tastes bad still.
  • May 24: Gravity = 1.020/21. Sour, odd bitterness, but somewhat less foul tasting. Racked off.
  • June 29: Gravity = 1.020. Sour, but not as much odd herbal bitterness. Not entirely drinkable.
  • August 4: Gravity = 1.019. Better yet, less sour. Still oddly herbal, this isn’t likely to change.
  • September 13: Gravity = 1.012
  • November 22: Bottled.
  • Jan 13, 2009: This is starting to taste good. Maybe I finally tasted it enough times, but it’s drinkable and interesting. I had no hope for a drinkable batch of beer until recently. It might be an experiment worth repeating, but I might want to try something slightly different.

Taste Summary

This beer has some of the interesting flavor that I’d expect from a sour Belgian beer, but also an odd herbal flavor. No one other than me likes it very much, but I’d be satisfied drinking the whole batch. One commentor compared it to the soda Moxie, which is also known for a serious herbal aftertaste.

I usually keg my beer, but I was confident I wouldn’t drink this batch fast enough to bother kegging it. I lost all hope for quite a while, and wondered why I was even bothering to spend the effort putting it into bottles. But now, I enjoy it and I’m glad I saved it.

They generally say that cellaring beer for more than a few months is not useful unless you have a cold cellar or it’s high gravity. But this beer definitely improved with age. I would not be surprised if some of the character of the beer came from some bugs other than the yeast getting into it, but it seems they weren’t bad bugs in the long run.