Games in Space: Starcraft, Race for the Galaxy

Tonight’s game night started early because Marla and the kids were out of the house, so the three of us played two space games. Starcraft is a prime example of a good but typical Ameritrash title, and Race for the Galaxy is an excellent Eurogame.

Starcraft is a board game based on the excellent late 90’s video game. Last time we started this one (our first play), we set it up expecting it to take forever, and it did. Tonight we started over, and managed to finish in under 4 hours. We tend to think too much in our games, or maybe too little. The game lasted 4 turns, which was fairly short, but it would most likely have lasted only one more turn with the same winner (me) if we hadn’t drawn the “end of game” cards so quickly.

Starcraft has lots of satisfying shiny parts: two sets each of plastic Space Marines, Zergs (bugs) and Protoss (space elves? Humanoid aliens with advanced tech.) The general setup takes a long time, especially the first time around, and the bits are quite overwhelming. You need a huge table: we could only fit 4 of us on my 4’x6′ table in the attic.

The gameplay options tend to follow what was available in the video game: collect resources with your workers and use it to build workers, transports, combat units, and improvements for your buildings so you can build better troops. The mechanics change when translated to a board game, but the overall feel is what you’d expect, and it’s satisfying for those who have played the video game.

The board is tightly packed, with only two planets per player, and the combat odds tend to stack in favor of the attacker. This is very unlike most combat games, but fits the model of combat tactics proposed in the Ender’s Game trilogy (or so). The overall effect is to reward combat and prevent a stalemate due to “turtling.” Combat is resolved using selected cards from a hand of combat cards, so it’s generally not susceptible to giant failure due to bad die rolls.

The main complaint I might continue to have with future plays is the dreaded “Event Card Effect.” After a long game with lots of fun decisions, someone draws a random event card and the game ends with an upset victory. This is no fun for the one who should’ve won but didn’t, or for the one who won unexpectedly via one random card draw. You might as well just play War or Rock, Paper, Scissors, Lizard, Spock.

There have been many reasonable games ruined by a deck of overpowered event cards. Hmm, come to think of it, there’s another space game that fits this description: Smugglers of the Galaxy.

Overall, Starcraft is a relatively long game, but it’s not so complicated that it’s unapproachable. If you’re familiar with the video game, it will match your expectations faithfully enough to be satisfying. The effort put into playing the game is rewarded adequately, unlike many long, slow wargames which simply aren’t worth the work of learning the rules.

After Starcraft, we had so much time left over that we had time for two games of Race for the Galaxy. This is a really excellent card game which we’ve played many times, and enjoy every time (even when we’re losing).

Race for the Galaxy is a rethemed version of San Juan, which is a card game remake of Puerto Rico. In all of these games the basic mechanic is the same, and gameplay is very straightforward. Each round, players simultaneously and secretly choose one role or action. All of the players perform each selected action in a certain order, and the players who chose each action get a bonus for choosing that action. Then the next round begins.

In Race for the Galaxy the actions are Explore (draw cards), Develop (play development cards), Settle (play planet cards), Consume (sell goods from your planets), and Produce (produce goods on some planets). The development cards and planets give you bonuses or additional action possibilities in each action phase. The key to winning is finding a strategy which lets you combine the best effects of the cards you happen to draw.

This is an excellent game, and matches many of our preferences. It has very straightforward rules and gameplay, and only takes about 30 minutes to finish a game. It requires plenty of choice by all players, but it’s not prone to overthinking. There is no player downtime: almost all actions are performed simultaneously. There is very little direct player interaction: you can’t act offensively against another player or directly foil their plans, but successfully anticipating other players’ action choices can make or break your game. There are many different strategies which can lead to victory, which provides a different game each time you play due to different card draws.

The major downside is the game’s rulebook. It is very daunting and wordy, and not very easy to follow. It caused me to put down the game instead of playing it many times, before we finally found the time to sit down and read. For first time players, there are sample starting hands which can make the game a lot easier, since the first thing you do in the game is choose which 4 out of 6 cards you want to keep: an impossible task if you don’t know what the heck you’re looking at. Definitely keep the card and turn summaries handy, they’re very useful until you familiarize yourself with the rules.

I highly recommend Race for the Galaxy for almost anyone who enjoys euro games. It plays well (but differently) with only 2 players, and can handle up to 4 (or 5?).

Garlic

After our recent storms, almost all of our garlic tops were broken off at the ground, so we picked them all today. We have some huge cloves, but most of the bulbs have exactly 4 cloves (less than we’re used to).

Now that we’ve picked them, what’s the best way to store them for planting next year?

For now they’re in paper bags halfway down the basement.

Hops: late June 2009

My hops are still going strong.

They’ve grown to the top of their lines,
and are starting to send out their horizontal runners. The two lines on the far left were a lawn mower casualty, but they weren’t growing very strong anyway. The strongest center bine, which broke off near the top, did start growing side runners soon after it was lopped off, and those continued up the line where the main bine stopped. The overall size of the plant is bigger than last year, but it still feels like it’s a bit crowded on this short trellis.

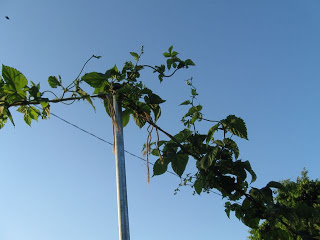
The hop cones themselves tend to grow on the side runners and not on the main bines. In this newer picture of the topmost section of the plant, you might be able to see several small hops “burrs,” which are the immature hop cones.

Regarding the twine used for training the hops up the trellis: I’m happy with the way it worked this year. The vertical strings make almost no difference once the hop plant gets to the top, because the hop bines themselves are much thicker and stronger than the twine. I used 3 pieces of twine across the top, with knots at 1′ intervals to keep them from untwisting. This has proven strong enough through our recent very large storms and winds (tornado on the South Side??) The gaspipe vertical poles have also worked fine.

We’ll see how much yield I get this year, but I’m considering a taller vertical pole for next year, because the “wide instead of high” theory doesn’t seem to be working as well as I had hoped.

Tour Des Sharps: 2009

On Sunday, five friends and I made our most ambitious attempt yet at the Tour des Sharps. This long bike ride visits all four Sharp Edge locations before returning home. Of course, you can’t stop at Sharp Edge without having a beer, so it’s a bit of an epic “pub crawl.” We planned the ride for Father’s day: the longest day of the year, and a good day for us all to get the “day off.”

Disclaimer: despite any appearances, this wasn’t a group ride, and I didn’t organize it. Because I don’t organize events when I’m not being paid, and I don’t go on group rides.

Our plan was to leave in time to reach the Peters Township location when it opened: noon, so we couldn’t really start before 10am. From there, the route would take us to the Creek House in Crafton, the Bistro in Sewickley, and the Beer Emporium in Friendship. We’d meet all our families in Friendship, have dinner, and then make the short 5 mile ride home. Our route planning on bikely.com suggested it would be around 65 miles. There should be plenty of time to fit that in daylight hours, along with a few meals and beers. Right?

The first wrench in our works came in the form of a scheduling conflict: YAPC scheduled its arrival dinner for the exact time and location of our last planned stop: Sharp Edge beer emporium, at 6pm. Although me and one other rider were attending this conference, neither of us wanted to attend the arrival dinner. And, they booked the entire back dining room, which wouldn’t leave enough room for our party of 15 in the front. So, we reluctantly made alternate plans which didn’t include the Friendship Sharp Edge location.

The rest of our wrenches came in the form of Reality, which has a tendency to foil best-laid plans (let alone the rest of them).

We met and finally left at about 10:30am from Regent Square. The first leg of about 22 miles to the Peters Township location was not that difficult, but it did include a few long, if not steep, climbs. That’s pretty much par for the course in Pittsburgh, though.

Mom can skip this paragraph: Close to our first destination on a corner into a parking lot, I hit a patch of gravel, slid and fell down. Luckily I had gloves on, and wasn’t going very fast: it could’ve been much worse. I bumped my left shoulder, hip, leg, and hand, and somehow scratched my right arm, but there was no blood. I had to tweak my rear fender back into position, but there was otherwise no damage to my bike. It made the impending stop very timely.

I had a Grimbergen, a somewhat lower alcohol content Belgian beer (6.5%) because they were out of De Koninck on tap (closer to 5%). When I’m at the Sharp Edge, I usually only get Belgian beers on tap, since none of the locations have fewer than 20 different Belgian varieties on tap. I always remember liking Grimbergen, but unfortuantely I forget that when I actually taste it, it’s a lot plainer and less complex than I expect. It has a very clean, unsurprising taste, which is not often what I’m looking for.

This stop signalled an unfortunate trend for the day: although the bar had almost no customers, it was excruciatingly slow because they had no incentive to kick us out of our seats. It took far too long to be served and settle our bill.

The next leg to Crafton was shorter, maybe 13-15 miles? The pace of all riders was fairly well matched, but one of us was riding a single speed. With one gear they could keep pace on the hills, but “spun out” on the flats and couldn’t keep up with the geared riders… not that there were many flats anyway. None of our riding so far was particularly scenic: it was mostly suburban. I quickly decided I prefer urban riding over suburban, though rural is even better. We hoped to get some back road riding in when we left Sewickley up into the hills.

At the creek house, I had a De Koninck. My experience with this beer is the opposite of how I feel about Grimbergen: it is always better than I expect it to be. I’m not sure what gave me my long-standing idea that I don’t like it very much. Soon we noticed it was 4pm: this is when we expected to arrive at Sewickley, but we were far behind schedule. I called Marla and we tentatively rescheduled our family dinner, though it was seeming like we might not make it before the kids’ bedtime at all.

After a seemingly interminable wait we left for Sewickley, another 13-15 miles. But Wait: does anyone know the address? No? I thought you had it. A call to Marla and a GPS consultation got us back on the right track.

The day had really warmed up on the last leg, and this slowed us down a lot. We hit some long but not horribly steep hills, and the group really started to stretch out: some riders were starting to run out of steam.

We got to Sewickley at the 50 mile mark. None of us had been to this location before. Unfortunately, this hoity-toity “bistro” met all of my expectations: they really didn’t want a group of smelly cyclists in there. Having been to 2 other Sharp Edge locations that day made it really obvious that the prices for identical items were higher, the menu was smaller, and the beer selection more limited. The space was cleaner, but lacked the character of the older locations in Crafton and Friendship. We were all unimpressed by the bartenders/servers, and overall I wasn’t that interested in returning.

It was already almost 6pm. One of us decided to bail and call for a sag wagon, and the rest of us thought it would be best to eat dinner here. So, we cancelled the family dinner plans, and decided we’d tentatively stop at the Friendship location on the way home, since we could probably fit 5 of us at the bar even with the crowds.

Since I was also having food, I splurged and had a Karmeliet Triple, which I always really enjoy. It’s fairly sweet, but has a nice complex flavor. After that I tried Zotten, a “Belgian style pale ale” by Weyerbacher in Easton PA, and on tap exclusively at Sharp Edge. It was fairly good for an Amerian craft brewed Belgian style beer, but it’d be hard to mistake it for a true Belgian. It was sweet, but had “too much high end.” (I tend to use sound-related terms to describe the flavors or spices in food and drink: in my mind a good audio mix is comparable to well balanced flavors in a dish or beer. Sometimes I wonder if this is what synaesthesia feels like?)

By the time the remaining 5 riders set off, it was already a bit after 7pm! It was almost 9 hours since we started, and according to our plans we still had over 20 miles of riding and one more stop.

At this point, we started cutting corners. We decided to go back across the river and take Rt 51 back to town, instead of finding our way through Sewickley’s hills to the North. None of us were familiar with the back roads, and we weren’t that interested in getting lost up there with limited daylight left.

We could’ve gone across Neville Island for a flatter, straighter route home, but it was only after we failed to do this that we remembered 51 didn’t stay next to the river. More hills! We all managed to get up the hills in a fairly close group: we were keeping a good pace. What goes up must come down, so we had some really excellent descents. On one hill my GPS caught a maximum speed of 42mph as we pulled away from the cars which were following us. That record was soon bested by 43.8mph on a subsequent hill. If I were more familiar with the roads I would’ve known I didn’t need to brake for those curves, but unfortuantely that hindsight will likely go wasted.

The next corner to be cut was any illusion of making another stop. Even without a stop, we’d be pushing the limits of daylight, and the fathers in the group thought it prudent to try to see their kids before bedtime. So we took the most direct route back to our starting poing. When we got close to town, we entered the Station Square parking lot, met up with the South Side trail (smooth, flat) and headed towards South Side Works. Two of the riders left there, sore and badly in need of beer, after 66.7 miles of riding.

The rest of the ride was easy: basically my daily commute home. The last two riders other than me got to Regent Square at 73 miles, and I made it home at 74.4 miles and almost exactly 9pm.

According to my GPS, our meaningless numbers for this trip were:

  • 74.4 miles travelled, my second highest mileage day ever
  • 5823 ft of elevation gain
  • moving time of 6:02 hours
  • average moving speed of 12.3mph
  • max speed 43.8mph (maybe that’s the part Mom shouldn’t read?)

Overall, I have mixed feelings, and a few lessons learned.

Make no mistake: I really enjoyed the ride!

But it didn’t go according to plan, and it’s unfortunate we couldn’t all finish. I’m glad we had no mechanical problems, and that we all ended up riding well together though we hadn’t all ridden with each other before.

We were out for ten and a half hours, but my GPS said we were only riding for 6. I planned for our 6 hour riding time, but for only 2 hours of stops before reaching the family dinner. What the heck? Since we didn’t originally plan to eat at Sewickley, it only would’ve taken about an hour less waiting to get to the family dinner on time and complete the trip as planned.

A lesson learned: Sunday is Slow Day. The roads are empty, traffic is wonderful, and you’ll get a table with no waiting at almost any place you care to go. But since no one is in line behind you, and since they don’t pay high-end staff for low-end days, you wait. A lot.

For me, this was about a week’s worth of riding in a day. But we got a lot more than an average week’s worth of jerky drivers on the trip, especially considering the low traffic density. I expect it’s because there were 6 of us. The most common exclamation heard from seemingly friendly people is “Lance!” so I’m sure the jerks also found us indistinguishable from the average pack of racer-wannabes, despite the motley, unconventional appearance any “roadie” would see from a mile away.

The only other minor complaint I have for the Tour des Sharps in general, is that the most direct routes possible are also pretty bad. They mostly stay in the suburbs, riding on what would ordinarily be busy commercial streets. If I could choose any 75 mile loop starting from my house, this route would definitely not be it.

A day after the ride, I basically don’t feel any soreness as long as I’m sitting still, and I had no problem riding to and from YAPC today. It’s only when I try to be active that my muscles quietly say “please don’t do that.”

At this point, I’m still interested in doing at least one or two more 60-100 mile rides this year. However, it’ll probably be at least next year before another Tour des Sharps is in the cards. Beer and cycling are both very enjoyable, but I think I enjoy them more separately rather than simultaneously.

Absinthe

I saw a bottle of absinthe at the PA state liquor store, and thought… That can’t be real absinthe; absinthe isn’t legal. I did just enough research to discover I was wrong: in 2007, the US laws which prohibited sale and/or distribution of Absinthe were relaxed. When we were in Ohio, I found a much prettier bottle of Absinthe than they had in the PA store, so I thought “I’m on vacation, why not?” and bought it. (See? Marketing works.)

You all know about Absinthe. It’s green. This “green fairy” causes hallucinations, general depravity, and drives men crazy. If you drink it you’ll start painting like Van Gogh or Picasso, and writing like Poe or Hemingway. The oil of wormwood is poisonous and will liquify your kidney in short order. It’s evil, and they made it illegal for good reason.

It turns out that in reality, most Absinthe is green, but not all of it is. Everything else is pretty much bad PR. Absinthe is no more toxic than any other alcohol in the 100-140 proof range. The levels of wormwood are regulated, and low enough not to be poisonous. The drink is not hallucinogenic, whether you like it or not. Drinking absinthe doesn’t make you crazy, but I expect most people who taste it would say that only a crazy person would drink it.

But what does it taste like?

I wasn’t familiar with the traditional technique for preparing absinthe, so I followed the alternate instructions on the bottle: “serve it on ice.” My first reaction to Mata Hari Absinthe Bohemian was that it tasted similar to Jäegermeister or Zwack, but it was far more alcoholic and not at all sweet. It had a very strong anise smell, and an herbal taste.

Then I read the bottle, which described it as being comparatively light in the Anise department. After sitting in my glass for a while, I noticed the drink changed from a bright transparent green color, to a cloudy greenish-white. That’s odd. Eventually, I started reading about Absinthe in general, and learned some very interesting things.

Absinthe is a spirit, not a liquor: it has no sugar added after it is distilled. It’s one of the only spirits which is typically watered down before drinking. The traditional method of preparation is to hold a sugar cube with a slotted spoon over your portion of absinthe, and drip cold water over it until the sugar dissolves into the drink. The addition of cold water causes herbal oils to precipitate out of the absinthe, turning it cloudy (as I had observed). This cloudiness is called “the louche” and the addition of water is called “louching.”

Drinking absinthe became associated with artists, bohemians, and other ne’er-do-wells, and eventually got a bad reputation. Of course, those who drank it were fine being associated with this reputation, which only made it worse. In the early 20th century, absinthe was made illegal to make, to own, or to sell, depending on what country you were in at the time.

I’m glad that in the end, “we” came to our senses and viewed absinthe objectively instead of through the cultural filters of the time period when it was made illegal, and finally recognized the relative harmlessness of this particular flavor of alcohol. One can only hope that this good sense and good policy is eventually extended to other equally vilified, but less toxic substances which are currently illegal in this and other countries.

I enjoy experiencing interesting beverages, and I’m glad to have tasted absinthe. However, it’s expensive enough that I’m unlikely to buy it regularly.

Oh yeah, also it isn’t hallucinogenic 🙂

Air and Space and Bicycles

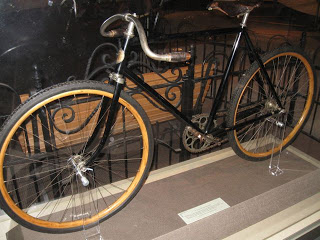
It’s pretty well known that Orville and Wilbur Wright built bicycles before they built airplanes. The Smithsonian Air and Space museum has one of the five Wright bicycles currently known to still exist. It’s eleventy-one this year (111, built in 1898) and still wouldn’t look all that out of place if someone rode it down the street today.

It has wooden rims, which were standard issue at the time. Wooden rims were replaced by steel, and then aluminum. Now, carbon fiber rims are not uncommon for “weight weenies” who aren’t afraid of a little wheel explosion once in a while.

Interestingly, carbon fiber rims have some of the same problems as wooden rims: they aren’t a good surface for brake pads, and they tend to shatter when they break instead of failing gracefully. Wooden rims are still available, I wonder if they’ll make a comeback?

Leather saddles like the one on this bike are still available. In fact, Brooks had already been building saddles for a decade when that bicycle was built.

This bike has a single speed hub with a coaster brake, and a skip link chain (or maybe a block chain?) These chains and sprockets seem to be the only part on the bike which I don’t think is made anymore. (The handlebar shape would look a lot more common if you turned it upside down. Or right-side up?)

Brew Day

Since Ezra was sick and no one showed up for “brew day” today, I took some pictures.

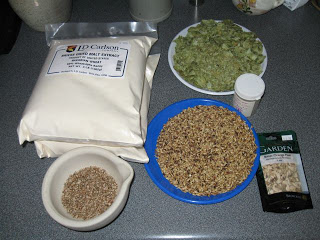
I generally write down my final recipe just before I start brewing, to refamiliarize myself with the ingredients and process. I also collect my measured ingredients in one place, a practice I picked up while cooking. Here are:

  • 6 lb Wheat/Barley Dry Malt Extract
  • 2 oz Hallertau hops
  • 1/4 lb Crystal Malt
  • 1 oz Bitter Orange peel
  • 1/2 oz Coriander seeds, crushed
  • Irish moss

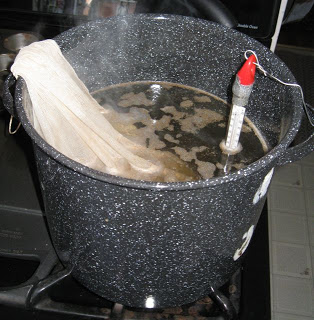
First I heat about 3-4 gallons of water up to 160ºF, put the grains (only crystal malt, in this case) in a grain bag, and steep them for half an hour. This is the chimpanzee second cousin of the grain mashing process used to extract sugar from malted grains in a full-mash brew, but it’s fine for the small amount of grain used in extract brewing.

I use the thermometer at a few important points during the brewing process, but most of the time the temperature doesn’t matter or is known (boiling water):

  • Measure the temperature for grain steeping
  • Make sure you know when the wort’s about to boil, so it doesn’t boil over
  • Keep it in the boil to sanitize it
  • Measure the temperature of the water and the wort I’ll be mixing in the fermenter, to pitch the yeast at the right temperature

Aftter the grains have steeped, I remove the bag and squeeze it out. Before turning the heat back on, I add all of the dry malt extract, and stir until it’s dissolved. Then, stir constantly while bringing the pot to a boil. Watch out: it is very easy for the pot to boil over when it gets to the boiling point, as well as smelly and annoying to clean up.

Once it’s boiling, I add the bittering hops (all of them in this case), and start timing. At this point I’m boiling the “wort” or unfermented beer. I boil for an hour total. The bittering hops boil for an hour. If I had any finishing hops, they’d be in for 10-15 minutes. In this batch, I boiled the bitter orange and irish moss for 15 minutes, and the coriander for 10 minutes.

After everything is boiled, the wort needs to be cooled to fermentation temperature as quickly as possible, so no bad bugs start growing in it. With a partial boil as I do, where I don’t boil the full volume of wort, it’s a bit easier: I have to add several gallons of cold water, which cools things down quickly.

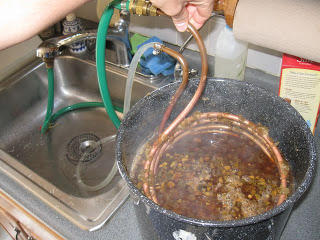
But first, I cool the wort to a low enough temperature that it won’t require any more cooling once it’s mixed with water. For that, I use a wort chiller. This is just a coil of copper pipe, which I pipe cold water through. I put the chiller in the pot while it’s still boiling to sanitize it. After the boil I just pump water through the chiller and shake it, while keeping an eye on the temperature, until it’s down to about 110ºF.

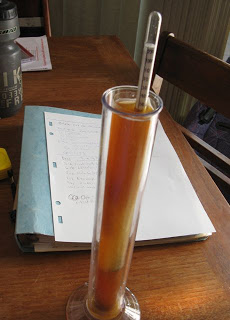
After dumping everything in the femernter bucket, I stir thoroughly and try to introduce air, which helps the yeast get a good footing early on. Before adding yeast, I take a sample and measure the specific gravity. This original gravity measurement can be used to approximate the potential alcohol content of the beer. Further gravity readings show how far along fermentation has progressed.

Next I pitch the yeast. These days I use liquid yeast cultures. I create a “yeast starter” a few days ahead of time to increase the amount of yeast I’ll pitch. I also take samples of yeast from past batches of beer and propagate those, so I end up buying yeast less often.

I always make complete notes of what I do on brew day, and update them throughout the process. Sometimes I even remember to take notes on how the beer tastes.

Finally, and most importantly, clean everything up.

Washington DC vs. Pittsburgh

Going back to Washington DC reminded me that Pittsburgh is a small city. That’s one of the reasons I like it here. I really enjoyed some aspects of DC and wish we had them here, but Pittsburgh is also better in some ways.

Here’s a bit of a comparison.

Public Transportation: DC Wins

The Metro just kicks butt. It’s convenient, goes “everywhere” (it seems), it runs regularly and tells you when to expect trains to come, and it’s very clean compared to most subways I’ve been on. There are also buses to get you where the train doesn’t.

Pittsburgh’s mass transit, on the other hand, is primarily bus-based. The buses are slow, usually late but always unpredictable, they drive poorly, and they almost never go where I want to go without transferring in downtown first. Believe it or not, we do have a few actual subway stops downtown, but most of the light rail is above ground and used for a few distant routes, instead of covering a wider area within the city. I won’t even get into the funding issues and periodic strikes.

Museums: DC Wins

DC wins primarily because all of the Smithsonian institute museums are free. It’s difficult to compare different collections of unique items, so for the most part I won’t try. But having the ability to walk into any museum any time is quite nice.

Pittsburgh has great museums with great collections, but apparently Andrew Carnegie was more interested in letting everyone into libraries for free, than museums.

Dinosaurs: Pittsburgh Wins

I said for the most part I wouldn’t compare museum collections, but in some areas there is a difference worth noting. DC has a much better collection of spacecraft and aircraft, for example. But the National Museum of Natural History’s collection of dinosaur fossils isn’t as large or well presented as the collection at Carnegie Museum of Natural History. DC has more mammal and non-dino fossils, but Pittsburgh wins in the dinosaur category.

We just opened a brand new dinosaur wing within the last few years, with some really nice, large displays. It’s a lot better than I remember from 15 or so years ago. We have at least 3 T-Rex’s, including one juvenile, and several huge plant eaters. The dinosaurs are displayed in appropriate chronology, not predators eating prey that’s been extinct for 10 million years. There’s also a large window into the actual fossil lab in the museum, where you can watch the technicians accidentally destroy irreplaceable specimens.

Sports:

Ha, just kidding! Same with newspapers.

Beer bars: Pittsburgh wins

See also my review of the Brickskeller. Maybe I just didn’t find the right place to buy beer in Washington DC, in which case I’d definitely accept a rematch. However, Sharp Edge is world class when it comes to Belgian beers on tap: I haven’t found anywhere else in any city with as many different good Belgians on tap.

Zoos: DC wins

The National Zoo is also free! You can walk in off the sidewalk like you’re entering Frick Park. Frick Park with Pandas, that is. People go to the zoo to jog or just generally hang out as you might do in any public park, it’s not just a trip destination. This would be a lot more convenient than the Pittsburgh Zoo, where you have to spend the whole day there just to make it worth the price of admission.

I generally don’t like zoos, but both the National Zoo and Pittsburgh Zoo are a lot better now than I remember zoos being when I was a kid. From outside appearances, at least, the old school “stark concrete enclosure” look is gone. Now they’re all “well-landscaped concrete enclosures.”

Transportation Bicycling: DC wins?

I seemed to see a lot more bicycles ridden and parked on the streets in DC, than I generally see in Pittsburgh. This seems to suggest more people in DC are riding for utility/transportation purposes instead of just recreationally. However, I really didn’t see enough to be sure, and I’m not sure how their cycling infrastructure (lanes, signage, driver awareness etc) is. They seemed to have a bike sharing/rental type program there, but I didn’t get any info on it.

Recreational Bicycling: Pittsburgh wins?

Okay, so maybe I wasn’t kidding about the sports.

Pittsburgh might win in the recreational department, for the same reason that DC might win in the Transportation department: Pittsburgh has more hills and is a smaller city. It’s a lot easier to get around in DC, but I’d expect it to be harder to find a long scenic route (meaning “all trees, no buildings”) in DC than in Pittsburgh. I’m not even sure where to start looking for a winding, hilly road in DC.

Both Pittsburgh and DC seem to have a lot of rail-trails down by the rivers. I’m not sure how DC’s in-city mountain biking opportunities are. We’re each on one end of the Great Allegheny Passage trail, but I’d guess DC wins for trail access due to our sections of missing trail before the Boston Bridge. DC also seems to have a larger, more visible tourist bike rental trade as well.

I’d really like to spend more time cycling around DC, because I think I’d get a much better idea of the place. We were only there on a weekend, but the traffic didn’t look that bad (except at the circles) and the streets seemed pretty wide.

Build a Wheel

Building a bicycle wheel is one of those endeavors which seems complicated to the uninitiated. It looks difficult, and seems like it would be dangerous if you screw up. It’s actually pretty easy to build a wheel, if you can follow step-by-step instructions. There are hundreds of machines in Taiwan doing that very thing, as you read this.

Building a good wheel may be slightly more difficult. I’m a Jack, not a Master, so it may be the case that I’ve never actually built a good wheel. But it’s easy to tell when you have an unridable wheel, and any wheel which is ridable probably passes quality control for a machine-built wheel. So if you’re satisfied riding on machine built wheels, then no worries: build a wheel! It’s fun!

Sheldon Brown has very good instructions on how to build a wheel, so I won’t try to bore you with the step-by-step. Instead, I’ll provide the background thought-track I used while I was building a wheel tonight.

The reason I’m building this wheel is because I bought a Sturmey-Archer 3-speed hub: just like the ones on the bikes of our parents’ generation (or: your generation, mom and dad) when they were young, a decade or so before the big bike boom of the early 1970’s. In fact, this hub was built in 1966: not the best year, but it should have a lot of life left.

The hub came with spokes and nipples, so I only had to supply the rim. I chose a Sun CR-18, which is a nice, strong, inexpensive rim which supports wide tires and looks nice on “retrogrouch” bikes. I also have Sun CR-18’s on a few of my other bikes, so I can swap wheels without mismatching anything. (I’m sure it’s not worth pointing out that I didn’t describe the rim as “light” or “aerodynamic.” At least it isn’t chromed steel.)

Lacing the wheel comes first. This seems like it should be the hard part, but it’s not!

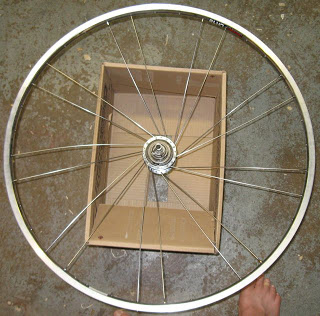
Oops. I’m sure it’s impossible to tell, but all of the spokes in this picture are off by 2 spoke holes on the rim. If you put them in the wrong place, the valve stem will be obstructed by spokes and it’ll be hard to pump up your tire. The fewer spokes you have in your wheel, the more wrong places you have left to put them. Just like when weaving baskets, the key is to find your mistakes and fix them as soon as possible, to avoid taking apart anything you don’t absolutely need to.

I vaguely remember the first time I built a wheel. When I was a kid, I built a set of wheels for my BMX bike, with Dad’s help. I’m guessing I was around 13 years old? I’d guess we bought all the parts at Bike Nashbar, back in the days when it was an interesting enough store to sell things like frame building lugs, instead of just being a discount/clearance outlet. If I remember correctly I bought some kind of plastic rims? What the heck was I thinking?

I don’t know why I remember this, but I’m pretty sure we laced the wheel incorrectly. I think I interlaced the spokes over each other too many times. It was pretty tight, working on a small 20″ wheel. In any case: it didn’t matter. I wasn’t the hardest BMX/freestyle rider around, but I did certainly beat up those wheels; but I never had any broken spokes (though it may have gone out of true, I really don’t remember).

Eventually, I traded the wheels with a friend who had some solid-spoke “mag” wheels (they were plastic, not magnesium, but that’s what we called them all) which I put on my freestyle bike. (No more BMX for me!) It was a 1984 Haro Freestyler frame and fork, which I got cheap because it was a year or so out of date.

I rode that bike basically everywhere, at least until I got a driver’s license. When I was on an internship in Richland Washington after college, I had my parents mail it out there so I could ride with the other 13 year olds, because there was literally nothing better for a 23 year old to do in that gods-forsaken desert (so say we all). I left the bike there when I left; hopefully the neighborhood kids appreciated it, or at least made some money on ebay. (The family I stayed with lived in a type A converted to single-family use.)

When the wheel looks done, the fun has just begun!

Putting the spokes in properly is necessary, but not sufficient, to build a proper wheel. The next phase, which can be a lot trickier, is making sure the wheel is “true” and that the spokes have enough tension. The rim can’t wobble back and forth, and must be round without any any “bumps” in it. It also must be centered left-to-right with respect to the hub.

At this point, you’re basically debugging: identify the place where the wheel is the most out of spec, and correct it (preferrably without affecting any other adjustment in the process). Repeat
until you’re finished. (How close to perfect is “finished,” anyway? Sheldon doesn’t say.)

Wheel building machines are really good at making wheels perfectly straight and true when they come off the machine. The problem is, the wheels are often undertensioned: without enough tension in the spokes, wheels go out of true, and spokes fail prematurely.

Bicycle wheels work in a counterintuitive way. To most people, it seems that when riding a bike, the hub must “hang” from the spokes between the hub and the upper part of the rim. If that were the case, then when weight was added to the bicycle, those spokes would increase in tension. In fact, that’s not what happens at all for properly built wheels. Instead, the spokes between the hub and the ground decrease in tension: a bicycle wheel works as if it had thick spokes under compression, and the weight is borne by the lower spokes. This is why high tension is so important in bicycle spokes- weight on the bike reduces the tension in the spokes, it doesn’t increase the tension.

Improperly built wheels with tension that is too low do work as if the hub was hanging from the rim. In those wheels, the spokes fatigue and break much more quickly than in a properly tensioned wheel.

Machine built wheels also generally don’t stay true for very long, because machines can’t tell the difference between twisting a spoke, and turning the nipple on the end of the spoke. If a spoke is twisted without the nipple turning, eventually that stress will relieve itself, and the wheel will go out of true. You can reduce that effect by lowering spoke tension, but then you’ll have an undertensioned wheel: choose your poison.

I haven’t built many wheels from scratch, but I have rebuilt, repaired, and retrued many more machine built wheels. Machine built wheels are really inexepensive: cheaper than buying the parts reqiured to build the identical wheel, and far less expensive than a hand-built wheel. So, why not just buy a machine-built wheel, and finish it by hand? In fact, this is what a good bike shop should do for every new bike they send out the front door. Not many shops actually do this, unfortunately.

I think it’s a great deal to buy a machine-built wheel, then retension it myself. I’ve had much better luck with wheels I’ve finished this way, than with wheels I’ve ridden straight out of the box.

“Department store bikes” are ridden, on average, less than 20 miles over their entire lifetime. Yes, I ride more in 2 days than the average Wal-mart bike is ridden ever! The bikes are built with this in mind: most of them can’t ever be adjusted properly, or won’t stay in adjustment. Mike had a Wal-mart road bike. I built him a replacement, a 25 year old Schwinn with a handful of parts I had lying around the basement, and it worked better and he enjoyed it more than his brand new Wal-mart bike.

(Mike, are you still riding that World Sport? Do you still like it? Daniel has another World Sport from the same year, and he seems to be enjoying it as well. I think they must have been on sale that year.)

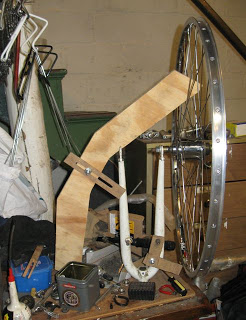
This is my truing stand and dish stick. I don’t have a multi-hundred-dollar Park Tools professional truing stand. I have a fork stuck into a hole in an ugly coffee table. It works just fine, and it was free. The truing stand is used to identify high and low spots on the rim, and locations where it is untrue from side to side. I used a few scraps of masonite and a nut and bolt attached to the fork’s cantilever post, as a feeler gauge. Although this is a completely adequate substitute for a proper truing stand, it requires understanding how a truing stand should be used, before you can build and use it effectively.

I also built my own “dish stick” out of plywood and masonite instead of paying for the real thing. A dish stick, or “wheel alignment gauge,” is used to make sure that the lock nuts on the hub axle and the sides of the rim are centered in relation to each other. If they aren’t centered, you’ll need to misalign your brakes to compensate for the crooked wheel.

At this point, my new wheel is “almost done” and only requires a bit of fine tuning before I put it on a bike and try it out. It took me about an hour and a half to get to that point on the wheel, and slightly longer to write about it (or, to write about what I was thinking while I was building it).

Washington DC vs. Fallout 3

When I was in college, I played a lot of Doom. For those of you not familiar with Doom, it was an early 3d first person perspective video game, and used very basic textures (graphical patterns) on the walls. One night after a long session of Doom, I walked out into the academically inspiring hallway of Wean Hall and turned quickly to face the wall, where I thought I saw a secret door… before realizing I had been playing games for a really long time.

This weekend I had similarly odd experiences almost everywhere I went in Washington DC. You see, I played maybe about 70 hours of Fallout 3, which is set in a “postapocalyptic radioactive wasteland” version of Washington DC and its environs. I already knew they did a really good job of copying the look and feel of Washington DC: so good that Metro passengers complained about the graphic depictions of a post-holocaust DC in advertisements. But going to DC, and having Deja Vu from in-game events really drove the point home.

So I thought I’d take a few minutes to provide a bit of a comparison.

DC has done a pretty good job of cleaning up the Mall. They filled in all the trenches, though not all the grass has grown back yet. There was only one fallen tree, and the only Super Mutants left were caused more by overeating than radioactive mutations.

The Washington Monument was patched up really well, you can hardly see the cracks. They’re getting a lot more radio station coverage all over the city, so I expect they must’ve put in an even bigger antenna up there.

The metro stations haven’t really changed since the game. The trains are back on the track and running again, and they took most of the sleeping shelters out. They also removed all the vending machines and Nuka-Cola machines. But other than a little cleanup and replacing the Protectrons with humans, there’s not much of a difference: there’s only so much you can do with bare cement.

They removed all of the Pulowski Preservation Shelters, but apparently they’ve learned from the past: there are “Evacuation Route” signs posted prominently along major routes next to the street signs.

The air and space museum was bigger than it was in Fallout 3, but not as interesting. They mostly only had space ships and airplanes which actually existed in real life. The only other museum we went to was the Natural History museum: I’m not sure if it was represented at all in Fallout, but if it was I never went there.

Overall, I’m inspired to go back and play Fallout 3 some more. I’d like to see a few of the locations I don’t remember seeing in game, such as Dupont Circle. Maybe I can remember the location of one of the vaults in case I get bored on our next road trip.