Free Wood

Last week, we had a wind storm with wind bursts up to 90mph. Since then, I’ve been looking for downed trees that people have thoughtfully cut up into portable pieces. Yesterday, we found some logs.

This isn’t a useful way to get boards for building “flat and square” furniture, but most of the wooden boxes I turned in 2007 were made from found logs and Marla’s mom’s firewood pile.

Turning green wood is very fun even if you don’t end up making anything, and it’s a heck of a lot cheaper than buying turning blanks. In the worst case scenario, I’ll make firewood and/or bags of shavings for Ross and Brigid’s chickens.

These logs were fairly long for “side of the road, but still portable:” almost 3′. They looked like they had some knots, but also some straight sections. The first order of business after finding logs is to split them, before they split themselves as they dry out. These already had checking (the start of a split) in the ends, and they were cut less than a week ago.

Unfortunately, sometimes 90mph winds aren’t the only reason a tree falls down. In this case, the largest log looked perfectly fine from the outside, but encased an old insect home of some sort. A big pile of black dirt fell out, but no live bugs or even carcasses were there. This log was big enough that there may be some useful wood for spindles around the rotten interior.

After a bit more splitting, I found a place which looked like it had a perfectly round hole drilled into it, either by a person or an insect. Appartently, the insects got in here, but eventually the tree grew wood over the hole, including bark on the inside of the hole, and blocked it off.

I’m not sure what kind of tree this is. It’s a fairly fast growing open-grained wood, with very light sapwood and yellowish heart wood. It doesn’t have any prominent rays. The bark is fairly thin and smooth.

Nothing is straight enough to make spindles: that would be almost impossible to find on the side of the road. I might be able to find a few places straight enough for legs and stretchers, but it’s a lot better to make those from a harder closed-grain wood like maple.

For now I’ll let these dry outside, while we find time to make room in the basement for them.

What is a Windsor Chair, Anyway?

I realized that most likely, not everyone who reads this knows what a Windsor Chair is.

In broad strokes, a Windsor Chair is a chair which uses a solid plank for a seat, with sticks sticking out of the bottom for legs, and sticks sticking out the top to form the back and/or arms. In contrast, other chairs tend to use a frame of some sort instead of a plank seat, and often combine the upper back posts with the rear legs.

Of course, one could apply any number of statements of the form, “It’s not a Real Windsor Chair unless …,” and many people do. Those people are usually chairmakers (or teachers of chairmaking) who are describing the chairs they make (or teach you to make), in an attempt to sell you something.

There are many different traditional styles of Windsor Chair. Their names usually describe the construction of the upper part of the chair: “fan back,” “bow back”, “sack back,” “continuous arm,” and “bird cage” are some examples. Other names describe the overall form, such as “writing arm chair” and “settee.”

The height of American Windsor Chair design and construction was from the mid 1700’s through early 1800’s. They were produced by hand in mass quantities, and were ubiquitous in American homes. As the Industrial Revolution began, designs degenerated for the sake of ease of production.

Ready for Finish

My first stool is complete, and ready for finish. I didn’t even have to add any more mistakes to my list.

Windsor chairs are traditionally painted furniture: most often, green paint. When they were first built in the 1700’s and 1800’s, they were never stained or simply varnished over wood. The chairs were designed around the fact that they would be painted, and they were always painted. At that time, they used lead paint. These days, chairmakers generally use milk paint, which ends up looking similar to lead paint.

I found an interesting article about the traditional green color used on these chairs. For a long time, it was thought the chairs were painted dark green originally, and then repainted in the 1800’s or so, using black or dark grey. Recent paint analysis has found that actually the chairs were bright green, but the pigments used in the paint darken over time. When they were repainted, the color was chosen to match what the original bright green had become: dark, dank, nearly black/grey green.

My stool will be red, to match the other chairs in our house, primarily because I already have red milk paint and I don’t want to buy any more quite yet. Applying a milk paint finish requires a bit of a leap of faith: it looks horrible, before it starts looking good.

Brian Cunfer starts by dying his chairs brown, to provide a dark base under the paint. Then when the paint chips or wears through, which it does, it will have a uniform color under the paint everywhere on the chair, and won’t provide as much contrast with the darker paint on top. So, the first step in finishing is to dye the chair Horrifyingly Bad Brown. Other manufacturers call this color Middle School Woodshop Brown or Antique Mall Refinishing Brown. It’s especially hideous on woods such as pine.

Next, I’ll be applying probably 2 coats of red milk paint. The first coat will look splotchy, completely flat, and basically horrible. The second coat will look dead flat and mostly bad. After rubbing it down with a scotchbrite pad, I’ll apply some wipe-on poly finish, and it will begin to stop sucking. I’m not sure why I describe this now: probably to reassure myself that I didn’t just ruin the stool. But most likely, I’ll post more pictures of the process as I go.

Well built Windsors use different woods for different parts of the chair, depending on their function, and paint covers the differences in the wood. Hard, strong wood such as Maple is used for the legs and stretchers. Soft wood like Pine or Poplar is used for the seat, so it’s easy to carve and holds onto the legs well. The top parts of chairs are made of wood that is easy to shave and bend, such as Oak.

My next stool, made entirely from walnut, will technically speaking not be a well-built Windsor. I also won’t be painting it. I really don’t care, despite what some people might say about it: they aren’t allowed to sit in it anyway. I think it’ll look quite good as long as I don’t need to patch any mistakes.

A Catalog of Mistakes

When this first stool is finished, I expect it will look basically fine, and will not betray the troubles which presented themselves during the construction process. Mistakes are easier to hide under a painted surface. Some mistakes required me to build new parts, so you’d have to look in my scrap bin for the evidence. Nonetheless, I’d rather not repeat these errors.

I’m going to write a list of all of the problems I would have rather avoided. I’m also going to try to describe why they happened, and find ways to avoid repeating them. I don’t necessarily think the results of this exercise will be useful to anyone but me, but maybe the example of the process I used will be. I intend to update this list as I go along until the stool is finished.

In both chair classes I took, I made relatively few mistakes. In retrospect, although I avoided mistakes at the time, I’m not sure I remember how I avoided them; and because I avoided mistakes, I didn’t learn how to fix them. As I expected, I wouldn’t really know how to make a chair (or even a stool, the easy half of a chair) until I did it by myself.

I’m sure this will bore you, unless you want to make fun of me. But I’ll probably refer to it again in the future, and “future me” is as much of a part of my target audience as you are.

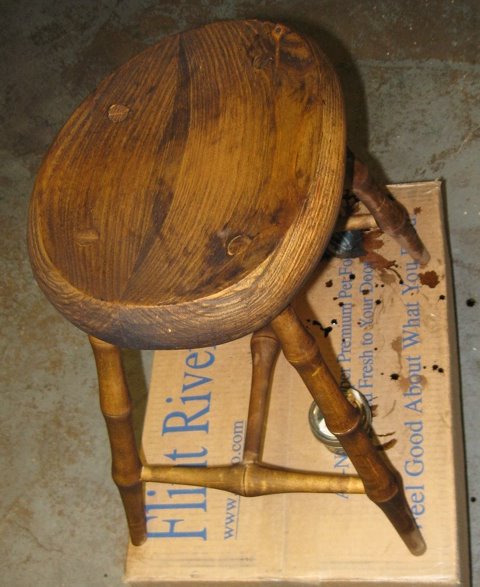
Problem: Seat holes were drilled at the wrong angle. This required major adjustment during reaming, and left gaps around the legs in the seat top (which were luckily filled when I wedged them).
Cause: Although I used a bevel gauge to site the leg angle, I didn’t also use a square to make sure I was square to the sight line.
Solution: Use a square.

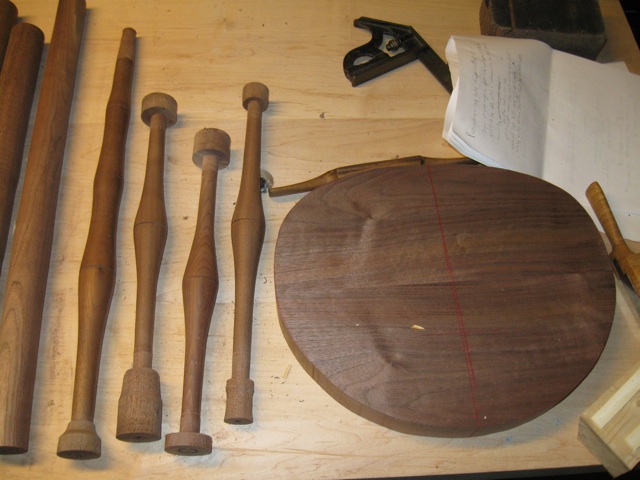
Problem: 2 side stretchers were cut too short and I needed to turn replacements.
Cause: I didn’t know how long my folding rule segment was.
Solution: Remember the rule is 7″ long.

Problem: While drilling a leg hole, the leg rotated in the V-blocks, ruining the hole and requiring a new leg.
Cause: Insufficient clamping strenth.
Solution: Use better clamps.

Problem: All 5/8″ holes took too long to drill and/or were burnished; bit required constant sharpening.
Cause: Dull drill bit. It seems to really suck.
Solution: Get a new bit, or try a new grind on the old bit.

Problem: A leg split during stretcher assembly, requiring building a new leg. Two side stretchers had minor cracks during stretcher assembly.
Cause: Tenons were cut too large, or with a taper; inappropriate wood used to turn the leg.
Solution: Learn the proper size to cut the tenons, and how to achieve consistent results. Don’t use open-grained wood for legs, it splits too easily.

Problem: A stretcher tenon was too small. I fixed it by gluing cloth around it to increase the diameter where it was inserted into the leg.
Cause: Tenon cut too small.
Solution: Learn the proper size to cut the tenons, and how to achieve consistent results.

Problem: Tapered leg tenons have a shoulder where the depth reference mark is, making it hard to seat them properly.
Cause: The tapered tenon cutter’s major diameter is smaller than the depth reference diameter on the stool’s plan.
Solution: Use a smaller depth reference diameter, or stop using the taper cutter (use the lathe instead).

Problem: Leg wedges didn’t drive very far into the seat.
Cause: Wedge angle too great.
Solution: Cut thinner wedges at a lower angle.

Problem: Leg wedges were hard to start in the tops of the legs.
Cause: Leg slot was squeezed shut by the seat.
Solution: File a v-notch in the wedge slot before inserting legs into the seat.

Problem: When wedging the legs, the cookies leftover from turning the legs broke off the bottom, and chipped the bottom of the legs.
Cause: I didn’t trim the cookies off after turning the legs.
Solution: Trim the cookies.

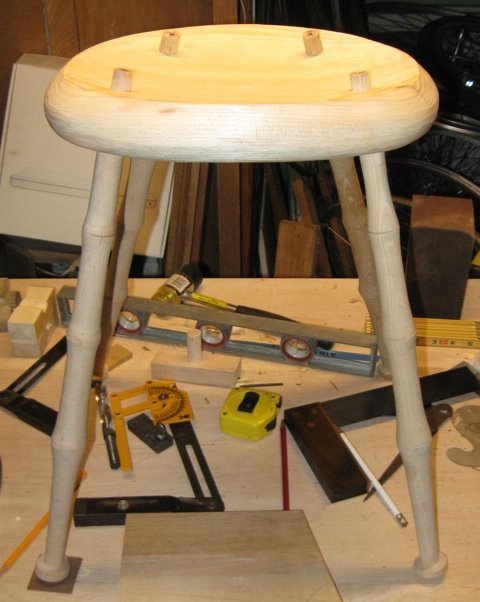
Problem: Stool wasn’t levelled properly: it rocks slightly on some surfaces.
Cause: My bench isn’t perfectly flat.
Solution: Move my bench around on the floor until it’s flat, or wedge one of the legs.

Things which were harder than they should have been, or took longer than they should have, even if they weren’t necessarily mistkaes :

  • Cutting wedges for the legs
  • Drilling 5/8″ holes
  • Trying to trim oversized stretcher tenons to the perfect size, off the lathe

Creative solutions to problems I’d prefer to avoid (Yes, I know you likely have no clue what I’m talking about, but I have to take notes somewhere and it might as well be here):

  • Glue one or more layers of cloth to a round tenon to increase the size of tenons if you trim the tenons too small or ream the leg holes too large. I learned this in Brian Cunfer’s class.
  • When I split a leg, but already had the undercarriage partially assembled, it was impossible to insert the leg in the undercarriage enough to measure a drilling angle for it. Instead, I mounted my broken leg in the v-blocks to set its reference line parallel to the table, and then replaced it with the good leg before drilling using my reference angle. Since the legs are both straight, and differing leg diameters only move it horizontally, the angle came out correct.

There’s certainly no danger of perfection in my craft. But my willingness to screw up, and to say “good enough” when it’s good enough helps me get something done, and allows me to enjoy myself overall, even if the process isn’t going as perfectly as I might prefer. I can’t get better without doing it, but in order to do it at all I need to make some mistakes.
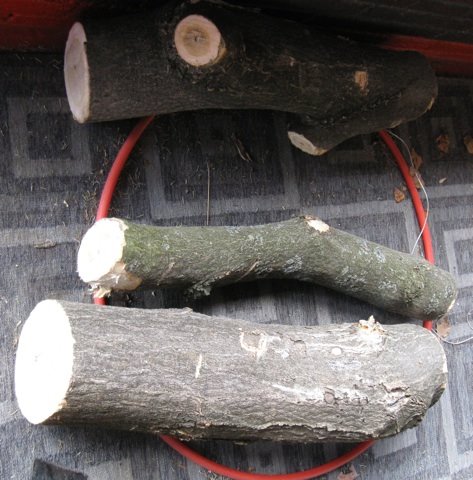
And So It Begins…

… To Go Wrong.

It was bound to happen eventually, but I started making some fatal mistakes on the stool.

When I started drilling my first stretcher hole in one of the legs, apparently the clamps on the V-block weren’t strong enough: the leg rotated, and my hole ended up completely wrong. I also learned that my 5/8″ brad point bit is far too dull for how infrequently I’ve used it.

I got better clamps, drilled a successful practice hole in the ruined leg, and turned a replacement leg.

I managed to drill the four legs successfully, so I moved on to the stretchers. I originally turned them out of green wood, and after a year of sitting around they’re really wobbly. I did an adequate job cutting the tenons to size, using a sharpened box-end wrench; unfortunately this left them a bit oversized, so I probably won’t do that again.

Then, I cut the stretchers to length. Of course,when I say “to length” I mean to the wrong length, otherwise this wouldn’t be worth writing home about.

It turns out that the depth gauge on my folding rule makes a really excellent tool for measuring the inside distance between the legs. Brian Cunfer had a special shop-made tool for this, but I bet he could be using his folding rule instead.

However, it also turns out that the fixed-length segments on the folding rule aren’t 6″ long, they’re 7″ long. So my side stretchers are an inch too short.

Next: turning new stretchers, drilling them, and then gluing it up. I’m still “almost there” despite the setbacks.

Stool Progress: Step By Step

An update, in reverse chronological order:

It’s starting to look like a stool!

Stool

I carved the seat top, and reamed the leg holes, allowing the tapered leg tenons to enter the seat. Next is drilling the legs and stretchers, and gluing it up.

It’s very important to do all the steps of constructing the chair in the right order. Fortunately, every chairmaker uses a different “right order.” I could have done a better job on this stool, but it’ll all work out just fine.

The main considerations seem to be:

  • Obviously, respect any strict order dependencies during construction: usually you need to make the parts before you can assemble them.
  • Make sure that you can always hold the parts you’re working on without damaging them. If you cut too much of the seat too soon, you won’t have any flat surfaces left to clamp.
  • If there are any steps where screwing up will permanently ruin a part, try to do those sooner rather than later, so you ruin as little work as possible.

Different people weigh each consideration differently, and sometimes the best choice depends on the shape of the parts for a particular chair.

One of the biggest variables seems to be: when do you drill and ream the leg holes, in relation to how finished the seat is? I’ve seen them drilled and reamed into a flat square board that hasn’t been shaped at all, and in a seat that’s completely carved, top and bottom. Knowing that different people do it differently helps reduce my worry about doing it wrong.

For this stool, I tried to remember the steps we used at Brian Cunfer’s class, but failed. Building a chair outside a class turns out to be challenging in ways I didn’t expect. I made notes about some complicated steps, but the simple things I knew I would remember… I forgot. Peter Galbert’s chairmaking videos have proven invaluable to remind me of small details that I’d otherwise have to figure out again on my own.

Tools

Earlier this week, we had 2 deliveries on the same day, with the new tools I needed to carve the top of the seat. Here’s my growing collection of chair-specific tools.

On top there’s a tapered tenon cutter (and a bevel gauge that snuck into the picture), and on the left is a tapered reamer. These are used to cut a tapered round mortise and tenon joint between the chair legs and seat. They were hand made by Elia Bizzarri.

In the middle is a Scorp: basically just a large curved metal blade with two handles. This one is made by Ray Iles. It’s used to rough out the top of the seat. For such a simple tool, it’s apparently not easy to design correctly: I previously purchased 2 other inexpensive models whose handles were set at an angle which made it impossible to carve the seat bowl. I’m happy to say that this scorp is superior to the others in every way, and didn’t cost much more than the others, even accounting for the UK exchange rate.

Below the scorp are a compass plane and travisher, which are used to smooth out the seat bowl carving. They are made by Jim White at Crown Planes. The finish quality of the tools is not as good as you’d find on antique tools. However, they work well, they’re far more available than used tools, and the prices are reasonable. In any case, it’s a hell of a lot better job than I’d do if I attempted to make them myself, and I’d still need to purchase the blades (not cheap).

You may notice that I know the names of the people who constructed all of these tools. The market for chairmaking tools is small (but much larger than 10 years ago). All of these tools are hand made in small batches by individuals who make their living constructing and selling woodworking tools. I’m happy to give my money to these people, instead of to companies who can’t figure out how to make a scorp which actually works for the purpose it was designed for.

Loots

Actually, it’s just chair parts, but I needed an anagrammatic section header.

Before my seat carving tools arrived, I did some work on the walnut stool. Hot damn, this is going to be beautiful if I don’t screw it up! I’m still paranoid that the walnut won’t be strong enough, and the legs will break the first time I sit in it.

There’s really only one leg blank I’m really worried about, because it has some wonky grain that crosses the spindle. I should probably just go chop up another beam instead of risking this one, but it seems like such a waste. Maybe I can get 3 legs out of the same piece, and make a walnut perch as well…

Anyway, tomorrow I’m brewing beer, so I probably won’t have time to drill legs as well. We’ll see.

Craft vs. Perfection

When mom was here over the holidays, we got to talking about “The Craft Revolution” and the recent increased popularity or perceived value of hand crafted items. She observed that the New Hand Made crafters aren’t as interested in tradition: they don’t necessarily strive for the appearance of perfection that traditional crafters achieve. As an example, she described sewn objects with large, visible stitches instead of invisible hand stitching.

At the time, I suggested this might just be a rejection of tradition, since the Craft Revolution has largely grown out of counterculture movements such as punk. (Who knew that knitting would become cool?)

Since then, I’ve revised my opinion. I now think Hand Made must distinguish itself, even in ways which might be considered negative, in order to survive and retain its value in our mass produced world.

Mass produced goods are often derided as either cheap knock-offs of finely hand-crafted items, or as ugly, poorly designed, inhuman objects. This is sometimes true, but it’s not the whole story. There are now many products which are well designed solely for the purpose of mass production. And not all mass production is done by machine: sometimes it is achieved through efficient upscaling of “hand made.”

Higher quality mass produced items, and the ability to produce goods with machine-like precision quickly by hand, have changed our perceptions about the quality and value of objects. If something looks perfect and could be mass produced, we now interpret this to mean that it must have been mass produced: otherwise, what would be the point? If a Chinese factory worker can sew 50 blouses perfectly in a 12 hour shift, where’s the value in me sewing one myself?

I’ve seen this in action on several occasions. Whenever Mom sends us hand made baby clothes, we comment that “they look just as good as store bought clothes!” We know they’re better, because we value the fact that they’re hand made by her; but we have the reaction despite our better knowledge. Another time, a patron at a bake sale irritatedly complained, “They can’t sell these, they’re from a bakery!” In fact, Marla baked them. They just looked too good to be home made.

These days, hand made items must distinguish themselves from mass production in order to be valued as being hand crafted. They can’t look like something a machine or fast human could produce. They might be imperfect. They might be perfect, but of a design that does not lend itself to mass production. One-of-a-kind or custom objects might fit the bill, but it has to be obvious that they’re unique.

Perfection becomes dangerous, in a time when well crafted items are misinterpreted as mass produced. But there are still many classes of objects which aren’t produced in large scale. For those who prefer a high degree of precision in their work, it’s probably best to choose a subject or medium which doesn’t lend itself to mass production.

Turning Videos

When I was turning last year, I followed the Peter Galbert’s Chair Notes blog closely, but I have since stopped.

Tonight I started surfing Youtube for some turning videos, and discovered that Peter Galbert has a great set of videos on YouTube. He has a series on constructing a 3-legged perch, which is similar in some ways to the stools I’m constructing. Now that I’ve watched the videos, I’ll have to read the blog.

The turning videos are excellent, and very informative to a primarily self-taught turner like me. He’s completing a leg in under 10 minutes: extremely quickly, from my perspective. Clearly I need to do a lot more spindle turning…

On the other hand, maybe this is like riding a bicycle: do I dislike it so much that I really need to shave a few minutes off my time? If I enjoy it, why bother going quickly?

I guess the real answer for me is: I’m not doing this to pay the bills. Extending the time it takes to complete a chair professionally reduces your hourly pay rate. But for me, extending the time it takes to complete a project decreases the cost per hour of my hobby. That’s not so bad, as long as I have a chair to keep my rear off the floor in the mean time.

So I guess the important part for me is to concentrate on minimizing mistakes, so I don’t waste material or disappoint myself too often.

And, oh yes: Peter’s chairs are beautiful. He’s well versed in the traditional Windsor chair styles, and also builds some very innovative chairs of his own design.

Project Update: Stool(s)


After my chair class in 2007, I decided to build a Windsor-style stool that the teacher, Brian Cunfer, had in his shop. A stool lets me build my tool collection progressively: I wouldn’t need a steam box since the stool has no back. I figured I’d build one as practice and paint it, then build one out of my stash of walnut with a natural finish.

I got as far as turning the legs and stringers, before feeling my lack of a bench. You might notice that the legs and stringers are made of at least 4 different kinds of wood: they were all what I had sitting around in the right size. This hopefully won’t be noticeable under paint.

Now that my bench is usable, I’ve picked up where I left off. Over the past week or so, I pieced up the seat, cut it out, shaped the outside edge, and today I drilled the leg holes. Now, I’m waiting for more tools to carve the seat. The inshave I had was really not the right shape, so another one should be coming in the mail soon.

In the mean time, I’ve started cutting up my walnut for the second stool. It has a lot of knots, and the pith is throught middle of some pieces. But I found enough straight, clear wood for the seat, and I rounded enough sticks for the legs and stringers. Tonight I glued up the seat blank. Next, I’ll probably turn the legs and stringers, while I wait for the seat carving tools to arrive.