DBA Army III/40d: Leidang

Here is my latest DBA army: III/40d, Norse Viking and Leidang.   JM and I specified the 15mm figures for two Leidang armies (one for each of us) from a mix of manufacturers: Khurasan, Legio Heroica, and Black Hat.  Although I don’t think the figure/pose selection is perfect for the period, it’s close enough for us and I am very happy with the resulting army. We didn’t buy all army options, only those we’re most likely to use.

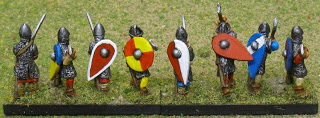
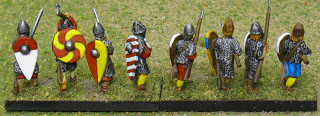
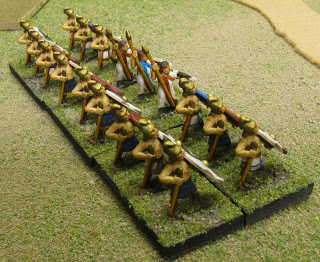
The army arrayed: Valdemar II and his followers

This obviously does not look like an ordinary Viking army, because it isn’t.  We chose figures for the mid to late portion of the (d) army list, so the 12-13th century. The selection was based on a few sources: Osprey’s The Scandinavian Baltic Crusades and Medieval Scandinavian Armies (1), as well as WRG’s Armies of Feudal Europe 1066-1300.  Scandinavians in this period looked basically like Southern Europeans of a few hundred years earlier, except possibly hairier, more warmly dressed, and with fewer horses.  I’m a bit dubious about the hair; personally, I’d start shaving if I needed to wear mail armor regularly.

I’ll go over the individual manufacturers with the pictures below.

The full army list is: 1x3Kn (Gen), 8x4Bd or 3Ax, 2x2Ps or 3Bw, 1x4Sp or 7Hd.  I painted only 7x4Bd, 3x3Ax, and no Horde.
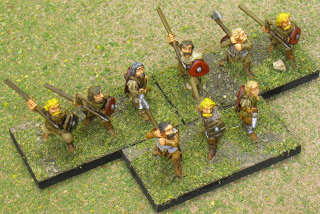
3x3Ax: Black Hat Lithuanian/Prussian axemen and spearmen

According to the DBM army lists, the auxilia and psiloi represent Finnish levy troops.  Although these aren’t Finns, we liked the figures enough to call them “close enough.”  These are Black Hat Lithuanian/Prussian axemen, spearmen, and archers.  These and the bowmen below are probably the best sclupted 15mm figures I’ve ever had the pleasure of painting.  I highly recommend them. A+!

2x2Ps: Black Hat Lithuanian/Prussian archers

The detail of the sculpts is astounding, including belt buckles, gaiter laces, and woodgrain on the axe handles and shields.  The heads are a bit meatier than I’d prefer, but the face sculpts more than make up for this. Unlike many detailed figures, these are not carrying around a waist full of pouches, bags, bedrolls, and other junk that is a pain to paint and would’ve been left at camp during battle anyway.  There are a lot more poses available than I saw at first glance: the same pose is often dressed in different combinations of furs and cloaks. 

These figures worked well with washes.  I used a variety of natural tones on their clothes, and a wash of Devlan Mud tied them all together well.  The faces were shaded with Ogryn Flesh wash, and I painted highlights on the hair.

3Kn(gen): Legio Heroica feudal cavalry command

The Knight General is a command pack from Legio Heroica’s fine line of Feudal cavalry.  A better figure choice would have made these guys look a bit more knightly, with kettle helms or closed helms and probably some horse armor.  These are solid figures with nice horses, and the riders even fit on the horses properly.  The main downside is the quality of the face sculpting, though it’s mostly hidden. A-

This is the first army I’ve painted with substantial shield designs, and one of the last shields I painted was the general’s.  I decided this army would represent the Danish, in the era of Valdemar II “The Conqueror.”  The coat of arms he used is still part of the Danish coat of arms: three blue lions on a gold shield, with 9 red hearts. 

Dannebrog was a total square in the 14th c.

The only other connection I attempted to make with Valdemar II is in the flag.  Denmark’s flag, Dannebrog, has its probably fictitious origin story under the reign of Valdemar II.  It is said that a red flag with a white cross dropped from the heavens and inspired the disheartened Danes to win the Battle of Lyndanisse in Estonia in 1219.  This flag is the approximate shape and proportion of Dannebrog as depicted in the 14th century Gelre Armorial, which is quite different than today’s Danish flag.

2x3Bw: Khurasan Frankish crossbowmen

The two optional 3Bw elements are represented here as crossbowmen.  Crossbows were used more and more through this army’s time period, so we decided crossbowmen would be more appropriate than archers.  These figures are Khurasan Frankish crossbowmen.  We probably should’ve chosen some hairier guys, or maybe a few kettle helms. They’re very nice sculpts except for the faces, which are rather featureless.  A/A-
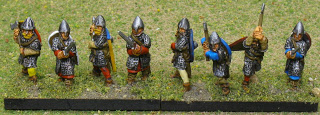

The remaining figures are the multitudes of blades, and one element of spearmen.  For these, we chose Khurasan’s Saxon Huscarls (with axes), German Milites (with swords), and Saxon Select Fyrd (with spears).  Most of the shields are kite/almond shaped, which is expected for an army this late, but we tossed in some round shields which would still be in limited use.
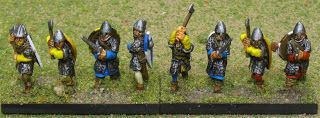
The only complaint I have about any of these sculpts is with the faces on the German Milites and Saxon Fyrd.  The clean shaven faces under nasal helms have almost no facial features. I admit they’re almost totally covered, and it’s only a minor problem, but the Huscarl faces are so much better that it’s a noticeable contrast.  A/A-
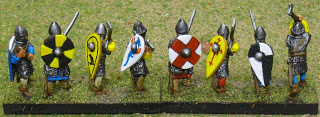
It was only as I was cleaning and assembling these figures that I realized a flaw in our figure selection: all of the figures except the spearmen were using two handed weapons with their sheilds on their backs.  Oops!  The upside is that during battle I get to see all my shield painting, instead of a bunch of Danish mail armor.
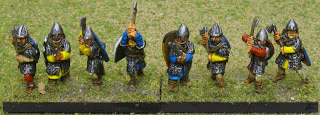

The other thing we could’ve chosen a bit better is the helmet selection.  There would be more kettle helms in use during this period, and a few more closed-face helms as well.  The figures we chose were purposefully limited to two mail order transactions, which is an unfortunate compromise to make, but I’m not sure my entertainment level would increase enough to warrant paying for shipping a third time.  I will look for some additional suitable figures at Cold Wars, however.
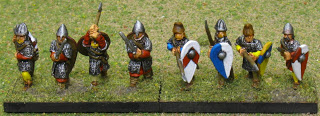


For the shield color and pattern selection, I used the same sources cite above, along with some other Internet research.  I found one interesting site intended for use by SCA participants attempting to register Viking heraldry even though it didn’t actually exist.  Along with speculation about how to fit Vikings into the rules, it has an interesting description of Scandinavian heraldry and a survey of the colors most commonly used.


Some of the shield patterns are directly from Osprey books, but most are simple divisions of the field in the common Scandinavian colors.  Unfortunately the sheild bosses don’t leave much room for symbols on the shields.  Apparently Scandinavian heraldry didn’t change as much over time as other heraldry, though, so I wouldn’t expect the complex patters that emerged in the rest of Europe.

As with everything, it’s all a matter of how picky you want to be and how much research you want to do.  I did as much research as I wanted to do, and came up with something “close enough” in my own mind.  I spent as much time painting them as I could while enjoying it.  Now it’s just time to learn how not to lose with them.

Bike Shelf

After seeing the hand made bike shelves available at Knife and Saw, Marla and I were inspired to find a better bike storage solution than a hook in the ceiling.  Unfortunately I ride enough that the convenience of storing the bike right inside the front door outweighs the ugly factor.

So, Dad and I designed and built this shelf.  Thanks for your help! It’s more pragmatic than pretty.  I like the shape and proportions better than the Knife and Saw shelf, but we used practical high quality plywood instead of pretty hardwood.  I’ll put a better finish on it once the weather is warm enough to do this outdoors.

Terrainguy Brown-Green Mats

In response to a recent question from a Fanaticus forum reader, here’s my take on the Terrainguy brown-green gaming mats.  I’ve included photographs from a few recent blog posts that show m brown-green mats in action. 

Close-up of Terrainguy brown-green mat.
For comparison, the bases are flocked with
Woodland Scenics Fine Turf and sand.

A view of a 4’x6′ green-brown mat.

These mats are available in a variety of colors and sizes.  I have a 4’x6′ mat and a 30″ DBA mat in brown-green, and I’m very happy with both of them.

This is the best looking flocked gaming mat I’ve seen so far, but I know of a few I haven’t seen in person.  The flocking material is not static grass, it’s more like the Woodland Scenics “fine turf,” made of very fine ground foam. The mat itself is made of canvas with a rubberized material on the surface that holds the flock in place.  Mine aren’t old enough or well-travelled enough to know how well the flock holds up to heavy use, but I haven’t had any problems so far.

For storage and travel, I roll the mat.  I would not recommend folding it, I would expect it to get permanent creases.  They’re flexible and roll easily.  They hold a slight curl when you unroll them, but they’re easy to flatten out.

Overall I’m happy with these for the price I paid, and I’d definitely buy another one if I need any more mats.  The larger mats often go on sale, but the DBA mats seem to always be full price.  The DBA mats are in a different section of the web site, making them harder to find in the color you want, but all of the colors are available for DBA sized mats as well as the larger mats.

2010 Mike Daddy Memorial WWII Miniatures Game

“Hey, I remember when we used to play WWII games with Mike.”  So, when he’s in town over the holidays, I make an effort to do it again.

For the most part when we play WWII, we play skirmish scale games: individually based infantry and about a platoon on each side.  We also play infrequently, so we seem to have settled on the Disposable Heroes ruleset.  It’s easy to relearn for only one game per year, and it lacks most of the quirks we found in rules like BAPS.

For WWII, I prefer to play scenario games instead of point-based pickup games, so I’ve invested in a bunch of the Skirmish Campaigns scenario books.  They provide a lot of balanced scenarios with different sized forces and boards, with a credible but not overwhelming amount of research in support.

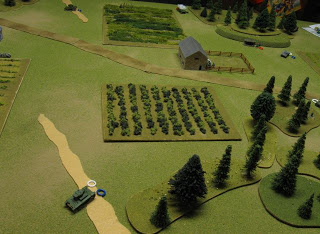
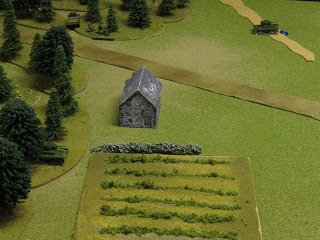
Russian tanks threaten the barn as Germans advance
from the right

This year we played Counter-Attack at Bereza, a scenario from Russia ’41 – Drive on Minsk.  Mike played the Russian force, and Frank and Andy were German.  I ran this as a single-blind game.  Both sides moved their forces on a map, and I made spotting checks. When units were visible, they were placed on the board for all to see.  This slows down the game significantly, but adds a lot: when you don’t know where the enemy is or what their objective is, you have to expect the unexpected.  It’s dangerous to move around not knowing where the enemy is, but you need to be aggressive in order to take your objectives.

In this case, both sides had the same objective: to take and hold the two buildings on the map.  Germans started off board and approached from one side, and the Russians started on the other end of the map but on the board. No one held the buildings initially, but they were closer to the Russian side.  However, the Germans didn’t know where the Russians started, so they didn’t know whether they’d need to assault the building or just walk in unopposed.

Russians hold the house and threaten the German advance

Both sides had only 2 squads of infantry to take and hold the buildings, and 5 tanks or antitank guns.  The tanks were all comparable: early war lightly armed and armored.  There seemed to be two main forces at play here.  The infantry had no anti-tank capability, but they were valuable to help spot the tanks before they were placed on the board.  Tanks also have a hard time shooting infantry in this game, but they can be deadly if they can acquire a target.  Achieving armor superiority was important to save the limited infantry for the buildings.

In the first half of the game, the Russians were in a better tactical position, but lost a few tanks.  They still had a good crossfire set up, and were in cover, so they regained armor advantage before the end of the game as the Germans advanced in the open.

On the infantry side of things, the barn in the center was the first contentious point as expected.  Mike’s Russians made a mad dash for the building with a heavily damaged squad, right in front of Frank’s German rifle section.  He made it into cover, but the Germans drove him off in close combat shortly after.

With Frank’s other section basically gone, this left Andy’s squad to take the second building.  Mike moved into the house with a Russian tank crew, and then reinforced it with his squad of ninjas who made it almost to the last turn of the game before being spotted.  Andy’s infantry took heavy fire, and at this point it became clear that we had a standoff. 

Although the Russians were in a stronger defensive position, the Germans had advanced past the barn.  Neither side had infantry close enough to their second objective to reach it in the two turns remaining in the scenario.  We could have fought a battle of attrition to the very end, but this was only a small part of a very wide front, so it would’ve been as pointless as most real wars are, and no more fun.  We called it a draw and moved on.

Some gamers who play nothing but DBA like to complain that “other games” take a really long time, and don’t produce any decisive results.  Although this game was a perfect example of that phenomenon, there was no real downside this time since we all get along well.  The main point was to hang out and have fun, and we did.  I call that a win.

Hopefully Mike can make it out to Pittsburgh more often.  I enjoy these games, but I am not likely to put in as much effort as I did more than twice a year, these days.

Tlingit Camp

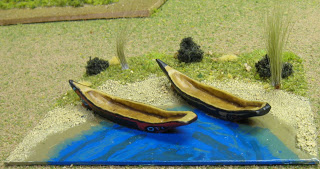
Here’s a picture of the camp I built for my Tlingit army.  Since the Northwest Americans are a Littoral army, they will always have a waterway when they place terrain, so I decided their canoes would make a good camp.  I left room to add a totem pole, but I haven’t been inspired to build it yet.

The canoes are longboats from Museum Miniatures, modified to look a bit more like Tlingit canoes on the front end.  The rear end isn’t right, but it’s the way the canoes  looked when I got them.  The paddlers with the canoes were totally inappropriate for precolumbian North America, so I didn’t use them.

The patterns on the sides of the canoes, barely visible here, are based on images of Tlingit canoes I found via Google image search and in Flickr. 

Panzer III comparison

Here are two 15mm Panzer III models I painted.  The one on the right, “311,” was painted maybe 5 years ago, and it’s a Command Decision model.  It’s probably a Panzer IIIF, but I don’t remember the specific variant.  I painted the one on the left, “312,” a week or so ago for our annual WWII game.  It’s a Peter Pig PzIIIE variant.

It’s hard to tell which differences between these models are due to the different variant they represent, and which are just sculpted differently.  Overall, I much prefer the quality of the Command Decision model.  The Peter Pig castings have a rougher surface and are less detailed.  The drive wheels on 311 are toothed and have properly shaped holes in them (not round) while the PP wheels were obviously just done with a drill bit.  The PP model is larger overall.

In practice, I don’t think these details show very much on the game table, but if I have a choice between Command Decision and Peter Pig for a specific vehicle, I’ll choose the Command Decision.

WWII Russian Vehicles

Here are the Russian WWII vehicles I painted for our recent WWII game.  Since it was a blind game, I withheld these until after the game was finished.

First are four Russian T-26 tanks.  These are Command Decision models and I like them a lot.

When researching appropriate tank markings for these, I found more images of captured T-26’s with German markings, than T-26’s with Russian markings.  Apparently not many of them survived long enough to bother marking them up.  I added a red star to one tank to identify it as a commander, but left the rest blank.

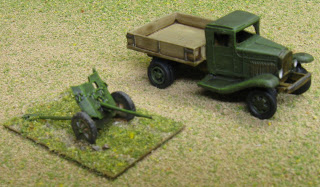
Next is a 45mm antitank gun and a relatively light Gaz truck.  The truck looks straight out of WWI.  These are also Command Decision.

DBA Army I/24: Hittite Empire

Although I haven’t made a new post in a month, I’ve still been busy.  Here are some pictures of my latest DBA army: I/24, Hittite Empire.

The figures are almost all Essex, but this was a semi-random selection of figures, and not from an army pack.  I bought this as a “not for the squeamish General” deal in the bazaar on the Fanaticus forum, so the figures are not all as appropriate as they should be; however, it’s close enough for me.  I’ll get another copy of the army if I like it enough.

Specific figure selection problems: Most of the spearmen are royal guards, and the rest are charioteers instead of ordinary spearmen.  I got a pack of generic biblical-era hordes for the horde, and got the chariot runners from JM, who also bought one of these semi-random army packs.  All of the figures with beards are somewhat inaccurate unless they’re interpreted as allied forces, since Hittites were apparently known for shaving their faces.

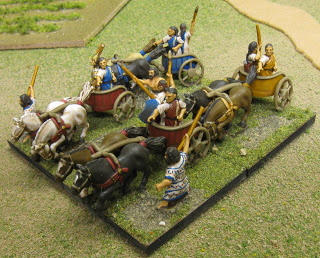
All Hittite chariots used two horses. The heavy chariots had three passengers instead of two.  I modelled all of mine so they can be used either as light chariots in I/24a, or as heavy chariots in I/24b.  The chariot with an archer and no runner would be used as the light chariot in I/24b.

For color selection, I mostly referred to the Osprey Hittite Warrior and Ancient Armies of the Middle East books for inspiration.  They show white robes with red and blue decorations at the edges, and skirts on the guards that use brown and blue stripes.  I also read the appropriate WRG reference, which suggested shields, clothes, and chariots could be colored/painted instead of using natural leather and cloth colors.

I decided on red and blue as the main colors for the army.  Unfortunately this makes them look very similar to my Arab Conquest guys, because it uses “safe” colors I’m comfortable with.  I’m going to have to push myself next time around.

For shading, I primarily flat-painted everything, added detail and some minimal shading, and then applied Army Painter Strong Tone.  It does an adequate job on the white, but it’s certainly not ideal. White is hard however you do it, and I’d rather not spend much effort on it. I pretend it’s just before laundry day: how clean are soldiers going to keep their kit while on campaign, anyway?

I really like the effect Army Painter has on the horses, flesh, and offwhite colors.  It certainly gets adequate results quickly.

Achievement unlocked: You painted a horde element?  Really?

Comparison: GW vs. Army Painter

Unfortunately the focus is slightly off in this image, but it gets the point across.  This is a comparison of the difference between GW’s Devlan Mud wash on the left, and Army Painter’s Strong Tone dip on the right.

Both figures were painted with the same base coat colors in the same areas, and both were sprayed with Army Painter dull varnish after they were dry.

Overall, for these colors I prefer the Army Painter dip.  It darkened the colors a bit less, and stayed in the cracks a bit better.  The black on boots and gun were affected less by the Army Painter dip than the wash.  I also don’t like how it deadened the green helmet.

I really like Devlan Mud, and I will still use it in cases when I don’t want to wash the entire figure.  But Army Painter works really well.  It’s almost depressing how good a job it does, compared to making an effort.

The colors, for reference, are all Vallejo except the black which is a craft paint.  They were selected based on the Flames of War painting guide for Russian infantry:

  • Russian Green helmet (894)
  • Khaki Grey uniform (880)
  • German Camo Beige for the straps and gear (821)

Unfortunately you can hardly tell the difference between the two khakis used for uniform and belts.

WWII Russian Infantry

Here are some of the Russian Infantry I painted for this year’s Mike’s Memorial WWII Miniautes Game.  (“I remember back when I played games with Mike… let’s do it again.”)

These are 15mm figures I picked up at the flea market at Fall-In.  As far as I know they’re Quality Castings, but no guarantees.  They seem small, but it may only be compared to the Ancients I usually paint. 

I got them done quickly: 50 infantry in 2 nights of painting; and another 6 LMG’s in about an hour.  I used simple flat base coats of Vallejo paint and then applied a GW wash or Army Painter dip.  They came out good enough, which is just what I’m looking for.

After playtesting BAPS with Frank last night, we decided we won’t be using BAPS for this game.  Instead we’ll probably fall back on Disposable Heroes again.