Tour Des Sharps: 2009

On Sunday, five friends and I made our most ambitious attempt yet at the Tour des Sharps. This long bike ride visits all four Sharp Edge locations before returning home. Of course, you can’t stop at Sharp Edge without having a beer, so it’s a bit of an epic “pub crawl.” We planned the ride for Father’s day: the longest day of the year, and a good day for us all to get the “day off.”

Disclaimer: despite any appearances, this wasn’t a group ride, and I didn’t organize it. Because I don’t organize events when I’m not being paid, and I don’t go on group rides.

Our plan was to leave in time to reach the Peters Township location when it opened: noon, so we couldn’t really start before 10am. From there, the route would take us to the Creek House in Crafton, the Bistro in Sewickley, and the Beer Emporium in Friendship. We’d meet all our families in Friendship, have dinner, and then make the short 5 mile ride home. Our route planning on bikely.com suggested it would be around 65 miles. There should be plenty of time to fit that in daylight hours, along with a few meals and beers. Right?

The first wrench in our works came in the form of a scheduling conflict: YAPC scheduled its arrival dinner for the exact time and location of our last planned stop: Sharp Edge beer emporium, at 6pm. Although me and one other rider were attending this conference, neither of us wanted to attend the arrival dinner. And, they booked the entire back dining room, which wouldn’t leave enough room for our party of 15 in the front. So, we reluctantly made alternate plans which didn’t include the Friendship Sharp Edge location.

The rest of our wrenches came in the form of Reality, which has a tendency to foil best-laid plans (let alone the rest of them).

We met and finally left at about 10:30am from Regent Square. The first leg of about 22 miles to the Peters Township location was not that difficult, but it did include a few long, if not steep, climbs. That’s pretty much par for the course in Pittsburgh, though.

Mom can skip this paragraph: Close to our first destination on a corner into a parking lot, I hit a patch of gravel, slid and fell down. Luckily I had gloves on, and wasn’t going very fast: it could’ve been much worse. I bumped my left shoulder, hip, leg, and hand, and somehow scratched my right arm, but there was no blood. I had to tweak my rear fender back into position, but there was otherwise no damage to my bike. It made the impending stop very timely.

I had a Grimbergen, a somewhat lower alcohol content Belgian beer (6.5%) because they were out of De Koninck on tap (closer to 5%). When I’m at the Sharp Edge, I usually only get Belgian beers on tap, since none of the locations have fewer than 20 different Belgian varieties on tap. I always remember liking Grimbergen, but unfortuantely I forget that when I actually taste it, it’s a lot plainer and less complex than I expect. It has a very clean, unsurprising taste, which is not often what I’m looking for.

This stop signalled an unfortunate trend for the day: although the bar had almost no customers, it was excruciatingly slow because they had no incentive to kick us out of our seats. It took far too long to be served and settle our bill.

The next leg to Crafton was shorter, maybe 13-15 miles? The pace of all riders was fairly well matched, but one of us was riding a single speed. With one gear they could keep pace on the hills, but “spun out” on the flats and couldn’t keep up with the geared riders… not that there were many flats anyway. None of our riding so far was particularly scenic: it was mostly suburban. I quickly decided I prefer urban riding over suburban, though rural is even better. We hoped to get some back road riding in when we left Sewickley up into the hills.

At the creek house, I had a De Koninck. My experience with this beer is the opposite of how I feel about Grimbergen: it is always better than I expect it to be. I’m not sure what gave me my long-standing idea that I don’t like it very much. Soon we noticed it was 4pm: this is when we expected to arrive at Sewickley, but we were far behind schedule. I called Marla and we tentatively rescheduled our family dinner, though it was seeming like we might not make it before the kids’ bedtime at all.

After a seemingly interminable wait we left for Sewickley, another 13-15 miles. But Wait: does anyone know the address? No? I thought you had it. A call to Marla and a GPS consultation got us back on the right track.

The day had really warmed up on the last leg, and this slowed us down a lot. We hit some long but not horribly steep hills, and the group really started to stretch out: some riders were starting to run out of steam.

We got to Sewickley at the 50 mile mark. None of us had been to this location before. Unfortunately, this hoity-toity “bistro” met all of my expectations: they really didn’t want a group of smelly cyclists in there. Having been to 2 other Sharp Edge locations that day made it really obvious that the prices for identical items were higher, the menu was smaller, and the beer selection more limited. The space was cleaner, but lacked the character of the older locations in Crafton and Friendship. We were all unimpressed by the bartenders/servers, and overall I wasn’t that interested in returning.

It was already almost 6pm. One of us decided to bail and call for a sag wagon, and the rest of us thought it would be best to eat dinner here. So, we cancelled the family dinner plans, and decided we’d tentatively stop at the Friendship location on the way home, since we could probably fit 5 of us at the bar even with the crowds.

Since I was also having food, I splurged and had a Karmeliet Triple, which I always really enjoy. It’s fairly sweet, but has a nice complex flavor. After that I tried Zotten, a “Belgian style pale ale” by Weyerbacher in Easton PA, and on tap exclusively at Sharp Edge. It was fairly good for an Amerian craft brewed Belgian style beer, but it’d be hard to mistake it for a true Belgian. It was sweet, but had “too much high end.” (I tend to use sound-related terms to describe the flavors or spices in food and drink: in my mind a good audio mix is comparable to well balanced flavors in a dish or beer. Sometimes I wonder if this is what synaesthesia feels like?)

By the time the remaining 5 riders set off, it was already a bit after 7pm! It was almost 9 hours since we started, and according to our plans we still had over 20 miles of riding and one more stop.

At this point, we started cutting corners. We decided to go back across the river and take Rt 51 back to town, instead of finding our way through Sewickley’s hills to the North. None of us were familiar with the back roads, and we weren’t that interested in getting lost up there with limited daylight left.

We could’ve gone across Neville Island for a flatter, straighter route home, but it was only after we failed to do this that we remembered 51 didn’t stay next to the river. More hills! We all managed to get up the hills in a fairly close group: we were keeping a good pace. What goes up must come down, so we had some really excellent descents. On one hill my GPS caught a maximum speed of 42mph as we pulled away from the cars which were following us. That record was soon bested by 43.8mph on a subsequent hill. If I were more familiar with the roads I would’ve known I didn’t need to brake for those curves, but unfortuantely that hindsight will likely go wasted.

The next corner to be cut was any illusion of making another stop. Even without a stop, we’d be pushing the limits of daylight, and the fathers in the group thought it prudent to try to see their kids before bedtime. So we took the most direct route back to our starting poing. When we got close to town, we entered the Station Square parking lot, met up with the South Side trail (smooth, flat) and headed towards South Side Works. Two of the riders left there, sore and badly in need of beer, after 66.7 miles of riding.

The rest of the ride was easy: basically my daily commute home. The last two riders other than me got to Regent Square at 73 miles, and I made it home at 74.4 miles and almost exactly 9pm.

According to my GPS, our meaningless numbers for this trip were:

  • 74.4 miles travelled, my second highest mileage day ever
  • 5823 ft of elevation gain
  • moving time of 6:02 hours
  • average moving speed of 12.3mph
  • max speed 43.8mph (maybe that’s the part Mom shouldn’t read?)

Overall, I have mixed feelings, and a few lessons learned.

Make no mistake: I really enjoyed the ride!

But it didn’t go according to plan, and it’s unfortunate we couldn’t all finish. I’m glad we had no mechanical problems, and that we all ended up riding well together though we hadn’t all ridden with each other before.

We were out for ten and a half hours, but my GPS said we were only riding for 6. I planned for our 6 hour riding time, but for only 2 hours of stops before reaching the family dinner. What the heck? Since we didn’t originally plan to eat at Sewickley, it only would’ve taken about an hour less waiting to get to the family dinner on time and complete the trip as planned.

A lesson learned: Sunday is Slow Day. The roads are empty, traffic is wonderful, and you’ll get a table with no waiting at almost any place you care to go. But since no one is in line behind you, and since they don’t pay high-end staff for low-end days, you wait. A lot.

For me, this was about a week’s worth of riding in a day. But we got a lot more than an average week’s worth of jerky drivers on the trip, especially considering the low traffic density. I expect it’s because there were 6 of us. The most common exclamation heard from seemingly friendly people is “Lance!” so I’m sure the jerks also found us indistinguishable from the average pack of racer-wannabes, despite the motley, unconventional appearance any “roadie” would see from a mile away.

The only other minor complaint I have for the Tour des Sharps in general, is that the most direct routes possible are also pretty bad. They mostly stay in the suburbs, riding on what would ordinarily be busy commercial streets. If I could choose any 75 mile loop starting from my house, this route would definitely not be it.

A day after the ride, I basically don’t feel any soreness as long as I’m sitting still, and I had no problem riding to and from YAPC today. It’s only when I try to be active that my muscles quietly say “please don’t do that.”

At this point, I’m still interested in doing at least one or two more 60-100 mile rides this year. However, it’ll probably be at least next year before another Tour des Sharps is in the cards. Beer and cycling are both very enjoyable, but I think I enjoy them more separately rather than simultaneously.
Air and Space and Bicycles

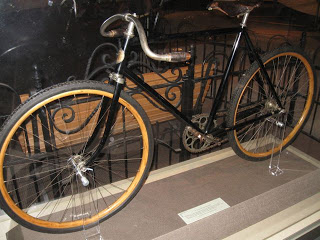
It’s pretty well known that Orville and Wilbur Wright built bicycles before they built airplanes. The Smithsonian Air and Space museum has one of the five Wright bicycles currently known to still exist. It’s eleventy-one this year (111, built in 1898) and still wouldn’t look all that out of place if someone rode it down the street today.

It has wooden rims, which were standard issue at the time. Wooden rims were replaced by steel, and then aluminum. Now, carbon fiber rims are not uncommon for “weight weenies” who aren’t afraid of a little wheel explosion once in a while.

Interestingly, carbon fiber rims have some of the same problems as wooden rims: they aren’t a good surface for brake pads, and they tend to shatter when they break instead of failing gracefully. Wooden rims are still available, I wonder if they’ll make a comeback?

Leather saddles like the one on this bike are still available. In fact, Brooks had already been building saddles for a decade when that bicycle was built.

This bike has a single speed hub with a coaster brake, and a skip link chain (or maybe a block chain?) These chains and sprockets seem to be the only part on the bike which I don’t think is made anymore. (The handlebar shape would look a lot more common if you turned it upside down. Or right-side up?)

Build a Wheel

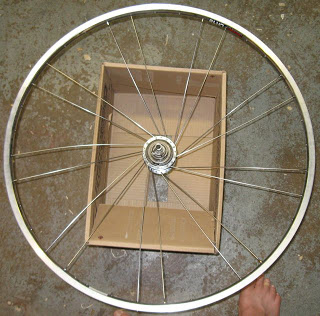
Building a bicycle wheel is one of those endeavors which seems complicated to the uninitiated. It looks difficult, and seems like it would be dangerous if you screw up. It’s actually pretty easy to build a wheel, if you can follow step-by-step instructions. There are hundreds of machines in Taiwan doing that very thing, as you read this.

Building a good wheel may be slightly more difficult. I’m a Jack, not a Master, so it may be the case that I’ve never actually built a good wheel. But it’s easy to tell when you have an unridable wheel, and any wheel which is ridable probably passes quality control for a machine-built wheel. So if you’re satisfied riding on machine built wheels, then no worries: build a wheel! It’s fun!

Sheldon Brown has very good instructions on how to build a wheel, so I won’t try to bore you with the step-by-step. Instead, I’ll provide the background thought-track I used while I was building a wheel tonight.

The reason I’m building this wheel is because I bought a Sturmey-Archer 3-speed hub: just like the ones on the bikes of our parents’ generation (or: your generation, mom and dad) when they were young, a decade or so before the big bike boom of the early 1970’s. In fact, this hub was built in 1966: not the best year, but it should have a lot of life left.

The hub came with spokes and nipples, so I only had to supply the rim. I chose a Sun CR-18, which is a nice, strong, inexpensive rim which supports wide tires and looks nice on “retrogrouch” bikes. I also have Sun CR-18’s on a few of my other bikes, so I can swap wheels without mismatching anything. (I’m sure it’s not worth pointing out that I didn’t describe the rim as “light” or “aerodynamic.” At least it isn’t chromed steel.)

Lacing the wheel comes first. This seems like it should be the hard part, but it’s not!

Oops. I’m sure it’s impossible to tell, but all of the spokes in this picture are off by 2 spoke holes on the rim. If you put them in the wrong place, the valve stem will be obstructed by spokes and it’ll be hard to pump up your tire. The fewer spokes you have in your wheel, the more wrong places you have left to put them. Just like when weaving baskets, the key is to find your mistakes and fix them as soon as possible, to avoid taking apart anything you don’t absolutely need to.

I vaguely remember the first time I built a wheel. When I was a kid, I built a set of wheels for my BMX bike, with Dad’s help. I’m guessing I was around 13 years old? I’d guess we bought all the parts at Bike Nashbar, back in the days when it was an interesting enough store to sell things like frame building lugs, instead of just being a discount/clearance outlet. If I remember correctly I bought some kind of plastic rims? What the heck was I thinking?

I don’t know why I remember this, but I’m pretty sure we laced the wheel incorrectly. I think I interlaced the spokes over each other too many times. It was pretty tight, working on a small 20″ wheel. In any case: it didn’t matter. I wasn’t the hardest BMX/freestyle rider around, but I did certainly beat up those wheels; but I never had any broken spokes (though it may have gone out of true, I really don’t remember).

Eventually, I traded the wheels with a friend who had some solid-spoke “mag” wheels (they were plastic, not magnesium, but that’s what we called them all) which I put on my freestyle bike. (No more BMX for me!) It was a 1984 Haro Freestyler frame and fork, which I got cheap because it was a year or so out of date.

I rode that bike basically everywhere, at least until I got a driver’s license. When I was on an internship in Richland Washington after college, I had my parents mail it out there so I could ride with the other 13 year olds, because there was literally nothing better for a 23 year old to do in that gods-forsaken desert (so say we all). I left the bike there when I left; hopefully the neighborhood kids appreciated it, or at least made some money on ebay. (The family I stayed with lived in a type A converted to single-family use.)

When the wheel looks done, the fun has just begun!

Putting the spokes in properly is necessary, but not sufficient, to build a proper wheel. The next phase, which can be a lot trickier, is making sure the wheel is “true” and that the spokes have enough tension. The rim can’t wobble back and forth, and must be round without any any “bumps” in it. It also must be centered left-to-right with respect to the hub.

At this point, you’re basically debugging: identify the place where the wheel is the most out of spec, and correct it (preferrably without affecting any other adjustment in the process). Repeat
until you’re finished. (How close to perfect is “finished,” anyway? Sheldon doesn’t say.)

Wheel building machines are really good at making wheels perfectly straight and true when they come off the machine. The problem is, the wheels are often undertensioned: without enough tension in the spokes, wheels go out of true, and spokes fail prematurely.

Bicycle wheels work in a counterintuitive way. To most people, it seems that when riding a bike, the hub must “hang” from the spokes between the hub and the upper part of the rim. If that were the case, then when weight was added to the bicycle, those spokes would increase in tension. In fact, that’s not what happens at all for properly built wheels. Instead, the spokes between the hub and the ground decrease in tension: a bicycle wheel works as if it had thick spokes under compression, and the weight is borne by the lower spokes. This is why high tension is so important in bicycle spokes- weight on the bike reduces the tension in the spokes, it doesn’t increase the tension.

Improperly built wheels with tension that is too low do work as if the hub was hanging from the rim. In those wheels, the spokes fatigue and break much more quickly than in a properly tensioned wheel.

Machine built wheels also generally don’t stay true for very long, because machines can’t tell the difference between twisting a spoke, and turning the nipple on the end of the spoke. If a spoke is twisted without the nipple turning, eventually that stress will relieve itself, and the wheel will go out of true. You can reduce that effect by lowering spoke tension, but then you’ll have an undertensioned wheel: choose your poison.

I haven’t built many wheels from scratch, but I have rebuilt, repaired, and retrued many more machine built wheels. Machine built wheels are really inexepensive: cheaper than buying the parts reqiured to build the identical wheel, and far less expensive than a hand-built wheel. So, why not just buy a machine-built wheel, and finish it by hand? In fact, this is what a good bike shop should do for every new bike they send out the front door. Not many shops actually do this, unfortunately.

I think it’s a great deal to buy a machine-built wheel, then retension it myself. I’ve had much better luck with wheels I’ve finished this way, than with wheels I’ve ridden straight out of the box.

“Department store bikes” are ridden, on average, less than 20 miles over their entire lifetime. Yes, I ride more in 2 days than the average Wal-mart bike is ridden ever! The bikes are built with this in mind: most of them can’t ever be adjusted properly, or won’t stay in adjustment. Mike had a Wal-mart road bike. I built him a replacement, a 25 year old Schwinn with a handful of parts I had lying around the basement, and it worked better and he enjoyed it more than his brand new Wal-mart bike.

(Mike, are you still riding that World Sport? Do you still like it? Daniel has another World Sport from the same year, and he seems to be enjoying it as well. I think they must have been on sale that year.)

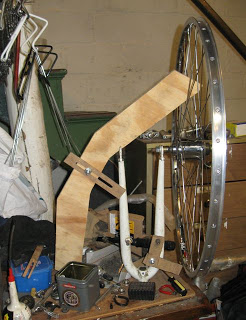
This is my truing stand and dish stick. I don’t have a multi-hundred-dollar Park Tools professional truing stand. I have a fork stuck into a hole in an ugly coffee table. It works just fine, and it was free. The truing stand is used to identify high and low spots on the rim, and locations where it is untrue from side to side. I used a few scraps of masonite and a nut and bolt attached to the fork’s cantilever post, as a feeler gauge. Although this is a completely adequate substitute for a proper truing stand, it requires understanding how a truing stand should be used, before you can build and use it effectively.

I also built my own “dish stick” out of plywood and masonite instead of paying for the real thing. A dish stick, or “wheel alignment gauge,” is used to make sure that the lock nuts on the hub axle and the sides of the rim are centered in relation to each other. If they aren’t centered, you’ll need to misalign your brakes to compensate for the crooked wheel.

At this point, my new wheel is “almost done” and only requires a bit of fine tuning before I put it on a bike and try it out. It took me about an hour and a half to get to that point on the wheel, and slightly longer to write about it (or, to write about what I was thinking while I was building it).

First Impressions: Kid-backing

On Saturday, five families met outside Hofbräuhaus for a family bike ride on the South Side trail. It was the first “real” ride with Martine and I on the tandem, and it was instructive, if not very strenuous. But first…

The tandem didn’t need much work to make it road worthy. I replaced both seat post clamps, which were cracked. A shorter stem made the front end fit a lot better for me. I rewrapped both handlebars and replaced a few cables and the rear chain. I changed the larger front chainrings from “two adults go fast!” to “one adult needs help carrying a kid.” Finally, I mounted wider tires: Panaracer Paselas, 32mm wide. I might be able to fit fenders above these tires, but probably not (and this might not bother most of you anyway).

Martine and I talked about how riding the tandem together would require cooperation from both of us. After a few laps around the block in the morning, it was clear that we needed to adopt some short, clear signals to aid communication.

We decided that “Coast!” meant either “stop pedalling now” or “I’m about to stop pedalling.” Martine uses this to mean “my foot fell out of the toe clip, please stop whacking it with the pedal.” I most often use it to mean “stop pedalling backwards while we’re stopped, you’re hitting me in the shins,” but I should be telling Martine that I’m about to stop pedalling while we’re riding.

I try to say “shift” when I’m about to ease up on the pedals to change gears, but truthfully I can hardly feel Martine’s pedalling unless she’s trying to backpedal, or standing up to pedal (“Coast!”).

After our test ride around the block, we packed up the car with the tandem and Marla’s bike on the roof, and drove to the Eliza Furnace trail parking lot. We rode over to Hofbräuhaus, and I bought a pair of gloves at REI that didn’t smell like “homeless person.”

Soon, everyone arrived and we set off towards Station Square. It quickly became apparent that we on our tandem, and Daniel and Levi with their trail-a-bike “brought guns to a knife fight.” Martine and Levi were antsy to start riding quickly, but everyone else was sensibly keeping pace with the other young kids who rode their solo bikes.

The ride was uneventful, but Martine wasn’t satisfied going as slow as we were. Next time, she’ll bring her solo bike too, if we can figure out how to get all the bikes onto the car.

At Station Square, we hung out and looked at the fountains, and generally got in the way of racer wannabes barreling through the pedestrian area at unreasonably fast speeds. This is a great place to take a panoramic picture of downtown, and some tourists were happy to do us the favor. (They didn’t even steal the cameras.)

On the way home, Daniel and I decided to leave the rest of the group in order to indulge the kids’ need for speed. We took them across the Smithfield Bridge and up the Eliza Furnace trail, then across the Hot Metal bridge to meet everyone else at Over The Bar (OTB), Pittsburgh’s first bicycle-themed bar.

Martine was clearly in need of food or sleep on the way back. We made it back without any serious incidents, but that portion of the ride taught me she has far more opporuntities for mischief on the tandem than on the trail-a-bike: she can reach my pockets (wallet), my back (poke, poke), and all sorts of things she shouldn’t be fiddling with.

OTB is a nice place, I’ll probably go back. I work only a block away… why didn’t anyone tell me East Carson St. was under major construction? I feel lucky to miss that traffic nightmare two times a day five times a week. Bike parking at is limited to standard on-street parking meters and telephone poles, but at least it’s still easier than parking in a car. This year’s EEBC Keg Ride ended at OTB as well. I have no idea where they parked 400-500 bicycles for that!

At OTB, the food is fine and the beer selection merely adequate, but it has a friendly atmosphere. It seems to be all-inclusive in terms of the type of cyclists it caters to. They serve hamburgers with peanut butter, but also veggie burgers and salads; Pabst Blue Ribbon pounders, but also local micro brews. The meals are all named after stereotypical bicycles, cyclist categories or local outdoors/activist groups. I believe I ordered the Tour de Greece, a somewhat anatopistic meal (don’t worry, I had to look it up too).

After everyone ate, we went back to the fountain at South Side Works to let the kids play and cool down. It was all fun and games until someone found an eye… I mean, until Levi fell and hit his head. No one suffered any permanent damage, as far as I know.

We rode back to the car, and Martine agreed to ride all the way home with me on the tandem. We took one of my normal commutes home from work on the roads, without incident.

Overall, I think the kidback tandem setup presents a greater opportunity for us to go on longer rides together. It is a bit easier to pedal than the trail-a-bike, but the handling is very different than either a solo, or the trail-a-bike. The length of the bike makes me feel like I’m strapped to the front of a locomotive, and it’s extremely front-heavy. I hate to flog this particularly dead horse, but I think the tandem would really benefit from a much lower trail geometry (a greater fork offset). I’m used to low trail on my solo bikes, and even tandems with an adult on the rear are better off with lower trail to compensate for the weighted front end.

Oh yeah: it is possible (but difficult) to get the tandem in and out of the basement. I carry it upstairs nearly vertically with the front seat tube over my right shoulder, and carry it downstairs backwards in the same orientation.

There are a few minor kinks to work out in my front end setup, but I look forward to more rides with Martine this summer.

I Like Hills

Last year, a cyclist from one of the mailing lists I read visited Pittsburgh from somewhere in the midwest*, and we took him on a ride. He explained his experience riding in hills: “I rode the Hilly Hundred.” This was a century (a 100 mile ride) with the route chosen especially to hit as many hills as possible. “It had 2000 feet of elevation gain!”

I nodded and smiled, but didn’t really think that sounded very hilly. Our 20 mile ride that day turned out to have about 1800 feet of elevation gain, without really trying very hard. It wasn’t his fault- there just aren’t very many hills out there.

In the midwest, you need to go out of your way to find any hills at all, but in Pittsburgh it’s difficult to avoid them. You can stick to the river trails and rail trails, or stay in the flats around Oakland and Shadyside. But if you want to bicycle to go somewhere, instead of going somewhere to bicycle, you’ll eventually encounter hills of the “up” variety.

Maybe it’s just Stockholm Syndrome, but I have come to enjoy hills.

Hills are certainly a physical obstacle, but they can be an even greater mental obstacle. In the worst case scenario, you can always walk your bike up any hill you could walk up. But most often, stopping for a rest is all that’s really needed: today’s mountain bike gearing goes almost as low as walking. At that point, it’d be a greater challenge to maintain balance at such a slow speed, than to provide enough power to get up most hills. It seems natural to stop for a rest when you’re walking and become tired. Why not do the same on a bicycle?

For fast riders, wind resistance slows them down more than hills do. This is why racers make a great effort uphill, but coast downhill. If you waste your effort pedalling downhill, everyone else will just get behind you, easily keep up with you, and pass you well-rested at the bottom of the hill.

For the rest of us mere mortals, headwinds can be at least as bad as hills, even when your ground speed is relatively slow. There’s nothing worse than having to pedal down hill to maintain a reasonable speed.

Hills provide several benefits. The most obvious is that without hills, you never get to go down hill either! I like going fast, and “downhill” provides my best opportunity. I’m comfortable descending at speed, especially on hills I’m familiar with. Descending safely but quickly is a skill well worth striving for, and very attainable to anyone with a well-tuned bicycle.

When I first commuted by bicycle to and from work, I chose routes which had long shallow ascents, and relatively steeper descents. These are longer but less steep than the more direct routes. Eventually, I started riding a steeper, more direct route when I needed to get home quickly. Now, the longer, less steep routes don’t provide enough challenge, so I end up searching for longer, steeper routes home. This lets me get in more exercise in a limited time. It doesn’t extend my ride home very much to take a hillier route, but I put in a lot more effort going up steeper hills. On weekend rides, I can stay a lot closer to home with more exercise, if I choose a hilly route.

Hills provide a good way to judge your progress as a cyclist. Riding up a difficult hill is a memorable experience, whether you succeed or fail. The key is to turn your bad memories of the past into success in the future. The first time I rode up Swinburne street, before I started commuting to work, I nearly died in the Sestili nursery parking lot (at least it felt that way). Now, I make it up that hill easily, and it’s not the steepest route home I regularly ride. It is fun to go back to a hill that “beat me” and make it up without stopping for a rest. You can do this even if the hills that beat you now aren’t very steep.

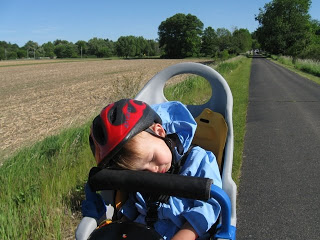
Hilly terrain is a lot more interesting to me, than the “flat, straight” rail trails I’ve ridden in the midwest. We went to Mill Creek Park in Youngstown this weekend, which had some interesting hilly roads. The nearby MetroParks Bikeway, shown here, is considerably less interesting to me, personally (Ezra would’ve been happy to sleep anywhere).

My favorite hills are “rollers” which are matched well with my pace. On rolling hills without stop signs, you can carry most of your downhill speed up the next rise. With a minimum of effort, you can reach the next crest and continue your descent down the next hill. I haven’t encountered many rolling hills around here which match my speed well, but they’re a joy when I find them.

Although Pittsburgh has steep hills (the steepest paved street in the US, in fact) we don’t have many long ascents. I’ve heard stories of the mountains out west, where you can climb for an entire day’s ride, and then go down the other side the next day. That sounds like a good challenge, but not one I’m likely to face any time soon.

I would like to ride up “Mount” Davis some time, though. It’s the highest point in Pennsylvania, but it’s the high point on a ridge and not a true peak. Apparently there’s a long ascent to the top from Confluence, PA. That might make a nice day trip this summer…


* Pittsburgh isn’t in the Midwest
(in the same way that New York is definitely not a part of New England). It may be the “gateway” to the midwest, but it’s at the edge of the East. However, I’m from New Hampshire. So even though Pittsburgh isn’t in the Midwest, it is in the West. Relatively speaking, anyway.

Memorial Day at the Farm

Well, it turns out we’re City Folk. This was a conscious decision, but I don’t always remember until I’m out of the city. I was reminded when the whole family went up to Ross and Brigid’s house on Memorial day. They might not call their place “the farm,” but it is from our perspective.

I rode my bike up, and everyone else went in the car. This avoided any problems with my back seat driving, and I got a nice 19 mile ride in.

But before I even got there, I missed all the fun. One of Brigid’s neighbor’s told them a pair of deer were born that morning, so everyone (except Robin) went out for a visit before they left.

The mother was gone, and the babies weren’t very human-shy yet. Ezra asked, “Pick up deers? Pick up deers?” and they would’ve been small enough to pick up (for an adult). They were only a few hours old. One of them was still wet, but the other one could already stand and walk around.

Later, Marla helped paint the nursery, and I went down to the creek with Brigid, Robin, and the kids. Robin enjoyed a little swim on the hot day, and Brigid and the kids caught some crayfish and minnows.

The real excitement started when Brigid showed us how to make “paint rocks.” With the soft sedimentary stones out here, you can rub two wet stones together to make a paint-like paste. We found a good selection of browns, greys, black, orange, and red, but no blue, green, or white. We probably could’ve found a good match for the new nursery walls. The red doesn’t wash out very easily.

After we got back, the kids played around in the pool and visited the chickens. Ezra reenacted Queen’s Bicycle Race video on his tricycle (no pictures, this is the Internet after all). We ate dinner, and before long it ended up late.

I took a different route home, and Marla left 40-50 minutes later. We got home at about the same time, and as usual, the kids would have preferred to stay up late instead of going to bed.

A Project Built for Two… or Three?

How does an adult carry two kids with one bike? I have several bikes, a rear kid seat, a trailer, and a trial-a-bike pedal trailer. The only combinations of kid carriers which will work together with one bike are the trail-a-bike with the trailer behind it, or the rear seat and the trailer.

With Martine on the trail-a-bike, I already use my lowest gear up some of the hills around here. I’m not sure I could handle dragging another 40+ pounds on two more wheels behind her. And I know she has no interest going back to riding in the trailer; she never enjoyed that even when it was her only choice.

The only other options I know of require a two-seater bike of some sort. With a tandem, any of the we have could hold a third passenger easily. Or, Marla and I could carry both the trail-a-bike and trailer behind us as a group of 4.

I’ve been researching this lately, since I don’t think I’ll enjoy staying home all summer whenever Marla takes the cat car. We found several solutions aimed specifically at the kid-adult tandem market.

  • The Love Bike is a compact kid-adult tandem, with the child riding in front. This gives a better view for the child, and takes up less space, but it looks like it’d have horrible handling.
  • The Kidz Tandem is another child-adult tandem with the child in front, but it uses a steering linkage instead of a compact wheelbase and shared steering.

The problem with these child-specific solutions is, not only are they expensive, but they’re only useful for children of an appropriate size. I expect they’d hold their resale value well if taken care of, but it would be better to get longer use out of them.

So I considered a full tandem, suitable for use by adults as well as children. One good option which doesn’t take up a lot of space, and adjusts easily for use both by children and adults is the Bike Friday Family Tandem. This is a small-wheeled folding bike, and the rear seat can adjust for use by very short and very tall riders.

The Bike Friday was my preferred solution, but then I came across another option on craigslist: a used Burley Duet tandem, with a kidback stoker kit. On a tandem, the front rider is the Captain, and the rear rider is the Stoker. A Child Stoker kid or “kidback” converts an adult-sized tandem for use by children otherwise too small to ride it. It adds another set of pedals which are within reach of the seat, but the child can’t put their feet on the ground.

I bought the tandem. It’s a pain to get into the basement, and I haven’t tried getting it back out again yet; we’ll see how that goes. The main problem with it is the space it takes up, and moving it around when we aren’t riding it. It weighs about as much as Marla’s recumbent weighed, but it’s much more unweildy. It uses the same roof rack that we already had, for use with the recumbent.

The tandem doesn’t need a lot of work, but it does need some; and it wants some more. So I get to learn about tandems.

Most aspects of bike hacking and maintenance apply equally to tandems, with a few exceptions. First of all, there are a lot more chains and chainrings to take care of, and some of the chains are longer than a normal bike chain. Cables for rear brake and derailers must also be extra long in order to reach.

I want to reduce the stem length slightly, and increase the height. It turns out this tandem has a 1 1/8″ threaded headset, which is an uncommon enough size that I don’t have anything suitable sitting around. Both seat binder clamps were broken due to misuse; luckily they’re cheap and easy to replace. The front seat post was stuck in the tube, but again very luckily, I was able to loosen it with oil and brute force instead of having to resort to cutting tools.

At this point I basically need to wait for some pars in the mail before I can make much more progress.

An initial short ride tells me this handles very differently than an ordinary bike, or even a bike with a trail-a-bike: it’s going to take getting used to. Martine rode on it a bit, and I think she’s going to really enjoy it. But it’ll be a while before I try two kids at once.

Routine Maintenance

I enjoy riding bikes. I also enjoy hacking on bikes: building them, taking them apart, rebuilding them, and trying new parts and configurations. These are definitely two completely separate activities, and there’s no reason anyone needs to enjoy both of them, if they happen to enjoy one of them.

On the proverbial third hand, I really don’t enjoy bicycle maintenance, and so I tend to ignore it. I may not ignore it as much as some other folks do, since my well stocked basement makes it a lot easier than taking my bike to a shop once per year. But it’s definitely not in the same category as “bike hacking,” as subtle as that may seem: it’s the difference between “maintaining the old” and “creating the new.”

I ride probably between 3500 and 4000 miles per year. My bikes require regular maintenance to maintain their current performance, as well as to avoid future costly problems. This is a summary of what I do with my bike (whether I like it or not) and when.

A few maintenance items are necessary frequently enough that I’m tempted to not mention them: keep air in your tires (but maybe not as much as you think you need), and patch holes in your tubes whenever necessary.

The single most important maintenance I perform (though not the most frequent) is oiling, cleaning, and replacing my chain. If I were willing to thoroughly clean my chain more often, I could replace it less often, but it’s still unlikely I could get more than 2000-3000 miles out of a chain without wearing out other more expensive components. So, I oil my chain when it squeaks, I clean and degrease it when it’s convenient, and I replace it when it has stretched by at least .75% of its total length. This is usually around 1000-2000 miles, or one chain per year on each of my summer and winter bikes.

“Chain lube” is a holy war in bicycle maintenance circles. My summary is: it hardly matters what lubricant you use, as long as you use something. Anything from melted paraffin, to olive oil, or purpose-made chain lubricants will do just fine (but WD-40 won’t! See also: holy war). Apply oil to the entire chain, let it sit, and wipe off the excess (I rarely do that last step, but it keeps your chain from attracting dust and dirt).

Chain cleaning is another holy war, and again, the summary is: you’re better off cleaning your chain than not cleaning it. If you listened to manufacturers’ recommendations, you couldn’t ride five miles without completely disassembling your chain and cleaning and oiling every individual part. But at under $20 per chain, I err on the side of replacement. The only other point worth making is that high quality fenders help keep your chain a lot cleaner.

I use a tool to measure chain stretch, but you can also use a ruler. Two links of chain are one inch in length, measured from the pin center to pin center. If 24 links of chain are more than 1/16″ longer than a foot, then it’s time to replace your chain. If they’re more than 1/8″ longer than a foot, then you’ve probably already worn out your chainwheels and/or rear cogs: even if you replace your chain, you’ll likely continue to have shifting problems. At this point, I generally recommend doing nothing at all, until you can’t stand the crappy shifting anymore. Then, just replace the chain, all chainwheels, and the freewheel or cassette. (Or, donate your bike and get a new one: in some cases, this is the cheaper option.)

A chain is made of flat plates and round pins: the plates rub against the pins, and eventually wear them out. Lubrication and a lack of debris delays this wear, but doesn’t eliminate it. When the pins wear out, the chain increases in length. As a chain “stretches,” it fits the cogs less and less perfectly, and wears them out at a greatly increased rate. Sheldon Brown has an excellent article about chain stretch (with pictures!), but the crux is: clean your chain often, and replace it regularly.

In hilly Pittsburgh, the next most important maintenance I do is replacing brake pads. This is easy: just before they wear down to the metal bits, replace them. I probably replace front pads once every year or so on each bike: 2000 miles or so. The rear pads last a lot longer, because rear brakes are nearly useless. They’re good for slowing down, but you should always use your front brakes (“carefully,” says the seasoned handlebar-diver) if you need to stop quickly. The life you get out of your brake pads depends a lot on how much you use them, what they’re made of, and how thick they were to start with.

I guess I buy durable tires, or I’ve been a bit fickle with choosing a new style of tire before the old ones are worn out, but I haven’t managed to wear through a set of tires even after many thousands of miles. I have a few pairs which are coming close, but they may be more likely to burst from too many glass cuts than from running out of rubber. Although tires seem like the top of the list for replacement items, they last a lot longer than you might expect.

My current favorite tire is the Panaracer Pasela. These are relatively fast and comfortable tires, quite durable, and inexpensive: overall, a very good value. They also come in many sizes: 27″, 700c, and 26″, in a variety of widths. They’re very good for “mostly on-road” riding.

For most other parts, I replace them only when they’re broken or not working as well as I’d hope. When I was young, I went through brake cables like crazy, but I haven’t had to replace any brake or shifting cables due to wear recently.

As for other maintenance, the main topic is bearings and their associated grease. I generally repack all bearings once when I rebuild a bike, but in most cases I haven’t had to repack them again after that. I did recently repack a front hub and replace some of the balls (on a fairly new wheel), because it was making a horrifying grinding noise. I’ve switched to using cartridge bearing bottom brackets, which last a long time but can’t be repacked once they go bad. I haven’t had to replace any bearings, but I’ve had several locking cups/rings break and cause trouble. In general, all of these parts can go thousands of miles and many years without maintenance, unless you dump your bike in the river or ride through sand dunes regularly.

I don’t bother with keeping my wheels straight (truing them) unless I have the wheel off anyway, or I notice a problem: either a wobble when I’m riding, or brakes rubbing. Since I started using higher quality, properly tensioned wheels, this has basically become a non-issue (except when I stick my foot in the spokes or something).

In summary, my experience is that required regular bike maintenance is not very substantial, but it is most necessary where you may least expect it. Keep an eye on your chain, because you can run into costly repairs if you neglect it for too long.

New Bike Lanes in Pittsburgh: Forbes Ave!

They painted bike lane stripes down Forbes between Squirrel Hill and Braddock Ave.

If you had asked me previously, whether that section of road was wide enough for bike lanes, I’d have said no. But I have ridden down Forbes with the lanes full of traffic, and had plenty of room, so I guess I would’ve been wrong.

In any case, the bike lanes are 4-5′ wide on each side, and they leave plenty of room for cars in the car lanes. This is a road where bike lanes will make it safer for cyclists, but even a small shoulder would make this road safer for bicycles.

I happy to have the bike lanes, but even happier that the’ve repaved the potholes.

Update: Here’s an article in the Bike Pittsburgh forums about the new stripes.

New Bike Lanes in Pittsburgh: Wightman and Beacon

Pittsburgh has added a few new short sections of bike lane on Wightman and Beacon in Squirrel Hill. These were no-brainers: the streets are wide, and it’s not clear whether there was one car lane or two. Now, there’s one car lane and one bike lane.

A rumor on the Facebook page of Scott Bricker (Executive Director of Bike Pittsburgh) suggests that the newly repaved section of Forbes Ave between Squirrel Hill and Braddock Ave will get some kind of bicycle-friendly marking as well. I was happy enough not to dive into a pothole every time I rode down Forbes, but sharrows or a bike lane would make it even better.

Bike lanes aren’t really enough to make a street safer. But they do help get more people cycling on the roads where they belong. More cyclists on the road make all cyclists safer, by teaching motorists to watch for cyclists whenever they’re driving.