Malifaux: Samael Hopkins

Samael Hopkins

I finished Samael Hopkins, another Guild figure I started along with Perdita and her crew.  I was disturbed by his superfluity of straps and decided to set him aside for a while.

He was a bit easier to paint than I expected, but I totally cheesed out on his boots and knee pads.  I decided that the sculpt has enough detail as it is, I don’t need to try to ruin it with too much fancy paint.  So I just used black with a bit of grey highlighting.

This time, my Army Painter dull varnish was really really dull.  It’s not as dusty looking in real life, but it still doesn’t photograph well.  I picked out the metallics with gloss varnish. 

I got this figure on discount without a card, and I’m unwilling to pay Wyrd’s shipping price for a single $.50 card, so I may have to make my own.

Malifaux Terrain

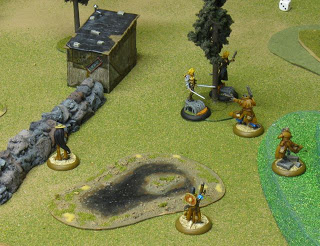
Here are a few shacks I painted up for Malifaux.

These are from an O-scale model railroad plastic kit.  It’s the Hobo Jungle from Bachmann’s Plasticville USA series.   Despite its horrifyingly bad name, there are a few good models in the Plasticville range.

According to the TMP All About Scales page, O-scale is supposed to be 1/43.5 scale or equivalent to 37mm miniatures.  In practice, these are great with the 32mm Malifaux figures and fit well alongside Mordheim terrain (intended for 28mm).  They’re quite small overall, and most of our 32mm figures won’t fit through the doorways.

I’m not sure how brown can be described as “bright,” but I think some of these turned out brighter than I intended. The rusted metal turned out well enough, though the rust may be a bit too “fresh” looking… or just too bright.

I also have a Plasticville sniper water tower to put together, and I haven’t finished the outhouse from the Hobo Village.  I think I’ll put the outhouse on the edge of a swamp terrain piece.

DBA: Gallic Cavalry

I wanted to play in the Two Davids campaign at Fall-In, and this time the theme is Gallic Wars. Almost all of the armies are Gauls, with a few Romans to kick around and maybe a few others who aren’t even as civilized as the Gauls.  I had most of a Gallic army in the form of Carthaginian allies; I just needed some cavalry to round out the list.

In this campaign, I chose the Remi.  These guys are allowed more cavalry and less warband, so I painted 4 elements (the maximum).  None of the cavalry are allowed to be chariots.

These are Black Hat miniatures that I added to one of JM’s orders.  I really don’t like the rest of my Gallic figures, they’re very “old school.”  These are also fairly old school sculpts, and they aren’t my favorite figures, but I’m happy with how they came out considering how much effort I put into them.  I painted them as quickly as possible, by blocking out the solid colors and then using more of my Army Painter Strong Tone quickshade dip.  That’s the only shading done on them, but this stuff works really well.  The figures had enough sharp detail to catch the dip.

I’m a lot happier with these than I thought I’d be before I painted them.  I don’t like Gauls, don’t like the rest of the army, and don’t really like these sculpts.  They may be a bit too bright, but I skimped and didn’t paint any plaid.

Malifaux: Nino and Santiago

 I finished painting Nino and Santiago Ortega, for my Malifaux Perdita crew.

Nino’s repeating rifle is excellent at long range, and his Hunter ability lets him shoot into cover more effectively.  Nino reminds me a bit of Badger from Firefly, mostly because of his bowler hat.  I’m afraid he’s going to break off at the ankle, but I’ll just try not to drop him.

I looked a others’ interpretations of santiago online, and there is a clear consensus: he wears blue pants (jeans) with an offwhite shirt (dirty t-shirt) and a brown duster.

The figures are displayed here on the second floor of one of Frank’s ruined houses. 

Malifaux: Cowboys versus Samurai

Frank and I played a 25 stone game of Malifaux on Saturday. We had a surprisingly balanced outcome compared to most past games, and we played through 5 turns before the end.

I chose my Perdita crew, set up straight out of the box: Perdita, Santiago, Francesco, Nino, and Papa Loco. Frank didn’t actually have any samurai, he chose his Viktoria crew: 2 Viktorias, 3 Ronin, and Misaki. I had the advantage in ranged combat, but Frank’s crew had high mobility and great melee.

Andy was around to watch and learn, so he set up terrain. We flipped on the extended encounter chart and wound up with a Shared Deliver a Message strategy: both of us had to take a (2) interact action within 2″ of the enemy Master, to deliver a message and gain victory points. This ended up having a large effect on the way we played, which means that as a game strategy, “it worked.”

We announced all our schemes.  I chose to Bodyguard Perdita, and to Kill the Protege: Misaki.  I chose Bodyguard since Deliver a Message required Frank to keep Perdita alive; but in retrospect it wasn’t the best choice, as it gave Frank more incentive to kill Perdita as a contingency plan.  Frank chose Steal Relic, which also required him to take an action near Perdita, and Gather Soulstones: end the game with more stones than me.  He started with only 3 stones and I had 2; but he had the option of sacrificing Ronin to get more stones.

For the first few turns, I did the most important thing possible: get Papa Loco as far away from me as possible, and close to Frank; so when he dies, the explosion doesn’t hurt me.  We got surprisingly close to each other on the first turn, and had a bit of a shootout.  Papa didn’t survive, I’m sorry to say, and his final explosion had no effect.  One of Frank’s Ronin died soon after: Perdita shot her for failing to Obey her orders to run down Misaki.

In the mean time, the Viktorias were approaching Nino and Santiago around a building, while Misaki hid behind it.   The two remaining Ronin were on the other flank, seemingly out of the action for now.  The Viktorias hit Santiago in melee, and in response he took 2 actions to Deliver the Message.  Since I completed the scheme first, I got 3VP.

At this point, Santiago survived long odds for longer than I expected. All my remaining guys emptied their guns at the Viktorias in rapid succession, in one huge Companion activation for the whole crew.  Since I was shooting into combat, all of the shots required me to randomly determine which model was the target, but Santiago avoided all but one of the attacks.  Unfortunately, the only luck I had was used up missing Santiago; I also did almost no damage to the Viktorias.

On their turn, Viktoria (no, the other one) killed Santiago, and Frank’s remaining Ronin closed in on Perdita, locking her in combat.  He Delivered the Message for only 1 VP, and then Stole my Relic (so we thought) and started running away.  I killed Misaki.  By now we were both out of soulstones, and the score was at 7VP for me (completing the strategy and both schemes) and 4 for Frank.

But the game wasn’t over yet.  Frank killed Perdita, knocking me down to 5VP.  For him to win, he needed to keep one Ronin alive (giving him 2 of his current 5VP) and sacrifice the other to gain soulstones (for another 2VP).  For me to win, I needed to kill either of his Ronin.

In the final turn (turn 5), my shooting was ineffective but Frank’s was not.  He got initiative, allowing him to get one Ronin out of the way. I wasn’t able to kill the other because it was Hard to Kill, and Frank cleaned out all of my remaining crew with the Viktorias.

So in the end, it seemed like Frank won with 6 VP, and I had 5VP.  But wait! He realized he was supposed to make a Willpower duel in order to steal my relic, but we forgot to do it. The result is unclear; but I think with the cards I had, I wouldn’t have been able to beat him.

I made some mistakes: I spent too much time shooting with Perdita to remember to keep her out of harm’s way.  I expected more from my guns based on their past performance, and Perdita was frustrated that no one would Obey her.

The strategies and schemes definitely affected gameplay and our play motivations.  I put Perdita into danger, counting on Frank not to harm her until he got his strategy and scheme VP’s… unfortunately I wasn’t able to get her out of trouble quickly enough once that happened.  In the end, I could’ve won the game with all my models lost, if I had only killed one more model.  I still really like the Malifaux encounter system, and we haven’t repeated any strategies yet.

I like this crew, especially how different it is from Ramos. I also the opportunity to demonstrate that it was in fact possible to beat them; maybe now I’ll hear fewer complaints about how broken they are.

Malifaux Update

I’ve taken a break from painting DBA models, and finished some more Malifaux figures.

Here is Ramos with his mechanical minions.  I’ve added another Steampunk Arachnid Swarm and an Electrical Creation.  I’ve always used Johann in this crew, but he seems to be best at dying.  When a few more nice looking models are released from the Rising Powers set, I’ll be adding those.

I’ve also built some scrap counters to match my crew, since Ramos needs scrappy bits to convert into more spiders.  In the center is a treasure counter I modelled for Mordheim, that I’ve been using when the need arises in Malifaux.  Of course, I replace the Wyrdstone with Soulstones first.

I’m also painting a Perdita crew.  I’m very happy with the way her pants turned out, but she definitely has a face made for radio; luckily she keeps a hat over it.  Once again I started this crew with a full can of Army Painter dull varnish.  Unfortunately it’s hard to shake the can enough, which results in a semi-gloss finish at the beginning of the can, and an ultra-flat finish near the end of the can.


And here’s the star of our show: Francesco “Zappa” Ortega, aka The Grand Wazoo.  Is that a real poncho or a Sears poncho?

His cohorts may consider his shirt a bit flambouyant, but Francesco always uses the right tool for the job.

Papa Loco likes fire.  Heh.  Blow stuff up!

I still have a few more Ortegas to paint before I can field a full Guild crew.  I also have a Peacekeeper, because I like the big robots; and Samael Hopkins. I’ll post more pictures once they’re finished.

DBA Army II/4: Warring States Chinese, Double Army

I’ve completed the elements necessary to field two Warring States Chinese armies at the same time, or a double Chao army.  It’s been hot in the attic so I haven’t gotten a chance to take pictures for a while.

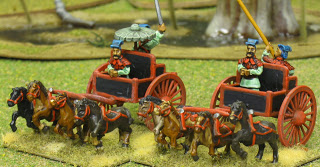
The green army is II/4c: Chao, which has no options: 2xHCh (gen), 2x2LH, 4x4Sp, 3x4Cb, 1x2Ps.  I needed to finish the chariots, crossbows, and psiloi to field this army.

All of the figures are Museum Miniatures.  Overall I really enjoy working with these figures.  There is very little flash or other cleanup required.  The poses are limited, but I like the overall effect in this army.  The infantry has enough detail, but not too much, and lends itself to a clean simple color scheme.

I’m not quite as happy with the green army chariots as I am with the blue ones I painted a few months ago.  I mounted the umbrella too low on the general’s chariot, and didn’t paint the red quite as well.

For the cloth, I used a light base coat and mixed a wash from darker paint, gloss varnish, and water until it flowed well over the cloth.  A few highlights on top finished it off well.

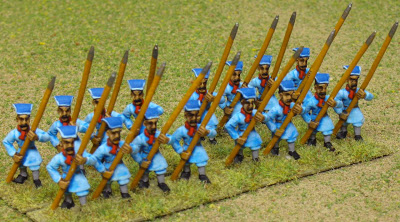
The blue army started as II/4a: Qin, but I quickly decided I wanted to morph it into other Warring States armies.  The first morph was into II/4c: Chao, but along with the green army I can now morph into any of II/abcd with all options.  I’m missing the 3Bd and 3Cb elements for II/4e.

Here, I have 2xHCh (gen), 1x3Cv, 2x2LH, 4x4Wb (with halberds/dagger axes), 4x4Sp, 3x4Cb, 2x2Ps.
In this round of painting, I only needed to paint the 4x4Sp and 1x2LH elements.

I chose to model the warbands with halberds to differentiate them from the spearmen (shown here).  According to the DBM army lists, the same troops are categorized as warbands in the Qin army and spear in other armies, due to their different motivation and not different weapons: Qin soldiers were paid by the head.

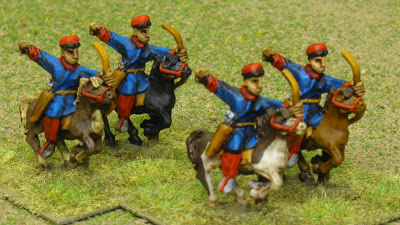
The light horse is the only element I needed to match colors with an existing element.  It’s not identical but they’re close enough that it makes no difference.

With only a few elements of light horse, I don’t mind that there’s only one pose. With an entire army of light horse, I need either different poses or different colors to keep things from getting boring.

This is all the Chinese I need to paint for our planned BBDBA tournament at Fall-In; but it’s fun, so I could forsee getting around to painting some more.  Maybe I’ll build enough to morph into a double army other than Chao, or maybe into Han.

DBA Army IV/11: North-Western American: Tlingit

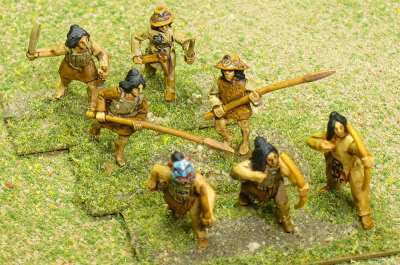
I finished painting my Tlingit army.  The camp will wait a bit while I finish some other projects.  Here’s the whole army: 10x3Bw including the general, and 2x2Ps.  Since the main body of the army is bows, I decided to use melee troops for the psiloi.  The only sources I’ve read about Tlingit fighting suggest that they’d be better classed as warband.  At the Battle of Sitka they apparently rushed at the enemy in an attempt to win individual combats, and didn’t shoot en-masse from a distance or advance in formation.

On the other hand, most folks seem to agree there weren’t enough of any North American warriors to build a “real” DBA army.  That really doesn’t bother me: I painted these guys because they look cool, what more do you need?

Here are pictures of individual elements.  On the right side of this image is the General, distinguished by melee weapons, and the fact that all three warriors are wearing helmets.

I looked at sources on the Internet for inspiration to paint the patterns on the helmets, armor, and conical hats.  My patterns are paraphrased versions of the real patterns, but the overall effect should be similar.  Most of the helmets were done with a brush and paint, while some of the fine black lines on armor and hats were done with a Pigma Micron pen, .005″.

Almost all of the helmets and armor patterns are taken directly from specific images I found online. Some of the helmets are patterned after modern helmets carved and painted by Tommy Joseph: specifically, his Wolf War Helmet and a human helmet whose images I can’t find anymore. 

Other designs, including all of the hide armor patterns, are inspired Tommy’s pictures of Tlingit artifacts in museums around the world, which are available only on his Facebook pages.  One of the helmets (top center in the second detail picture) is patterned after a Shark Transformation helmet, depicting a human (on the front) transforming into shark form (on the rear).

Overall, the coloration on most helmets seemed very uniform. Faces of humans and most animals were copper/tuquoise blue, with red (iron oxide?) on the lips, nostrils, and ears.  Eyes, hair, eyebrows, and other details were black, and teeth are inlaid in white.  Depending on the specific animal detailed, portions were left wood colored, painted white, red, or black.  The blue paint I chose was somewhat more blue than it should be, but I had a very hard time mixing a blue-green that didn’t read as “way too green” at this scale.  Some animals (bears) are depicted with a black face, but lips and nostrils are still red.

On the wooden slat armor, I painted the body of the armor khaki, similar to the color of the fresh bindings shown on Tommy Joseph’s reconstructed Tlingit body armor.  I detailed the exposed wood portions at the edges with a lighter yellowish wood color.  Historical artifacts all show much darker wood and bindings, but those are hundreds of years old.  I expect in battle, the armor would look much newer.  Many of the wooden armors have a detailed crest on the chest, but some are plain or have patterns of exposed wood between the bound areas.

I didn’t find any evidence for the colors used for bows or arrow cases. I expect both were more decorative than I’ve depicted them here, but I’d rather err on the plain side just in case.  I don’t think any of the arrow cases are visible in pictures here anyway.

I’m very happy with the way this army turned out, but I don’t have a lot of hope for its prospects in open battle.  Luckily there are two North American theme events at Fall-In 2010, so I’ll have a chance to win a battle with them.

Overall, I like the Eureka sculpts.  It might have been better for me to choose a different mix of helmet/armor options, but another limiting factor is in the shapes available for the helmets.  They are far more limiting than the wide variety of animal shapes used on real Tlingit helmets.  The other problem with the Eureka sculpts is that they don’t use a large enough collar: I think the helmets should be sitting much higher than they are here, compared to the head height of the warriors without helmets.

I sat on these half-painted figures for a while, worried that I’d wreck them by detailing the helmets and crests.  I’m glad I finally jumped in and finished them, because I think they turned out quite well. 

Review: Army Painter Strong Tone Quickshade

Army Painter makes some interesting hobby supplies designed specifically for painting miniature wargaming armies quickly and effectively.  Quickshade is a tinted varnish intended to shade painted miniatures… quickly (duh).

I’m not usually interested in using the “dip” method for painting (or shading) miniatures. But at Historicon I found a deal in the flea market I couldn’t pass up: a large painted Carthaginian army for less than the price of unpainted figures.  The army is useful for killing Romans (surely a noble pursuit), but I wasn’t interested in painting Carthaginians, so it seemed like a good deal.

Unfortunately the paint job was very “old school.” There was no shading, and although most of the figures were painted with glossy enamels there were some painted in acrylics, and a variety of styles.  There was obviously more than one painter at work here, though all the figures had been based somewhat uniformly. Overall it was totally not my style or preference, so I decided to try out the Army Painter quickshade to see if it would help.

I haven’t used any other “dip” formulas, so I don’t have any similar products or techniques to compare this to.  I don’t intend to get good at dipping, so I wanted to get it right the first time. Army Painter was the obvious choice, since the point of this exercise was “adequacy through laziness.”

The typical use for Quickshade and other “dip” formulas is to dip the painted miniature directly into the can of varnish, remove it, and shake off the excess.  This seemed very wasteful and messy to me, so I decided to use the alternate technique: apply the varnish with a brush and more carefully brush off the excess.

The first annoying thing I noticed about the Quickshade is that it is not a water based product.  It’s oil based and requires mineral spirits to clean your brush, hands, spills, and so on.  It’s definitely not for indoor use!  I wouldn’t be able to use this while painting through long winters even if I wanted to.

Before varnishing the figures, I rebased them, touched up some chipped paint, and repainted some inappropriate colors. I tried to remove any stray dust or flock, but there were still clumps of unnaturally bright green flock glued near their feet.  I decided to see what effect the quickshade would have on the flock on a few stands, before spending even more effort to clean it up.

I used a wide flat brush to apply the varnish.  The process was easy, but a lot messier than I expected.  The varnish has the color and consistency of used motor oil, and has a tendency to drip all over the place and get your hands quite sticky.  I now think dipping and shaking could actually be less messy than brushing it on, but you’d waste a lot that way.

The most important part of appyling the product was to clean up the messy pools before they got too sticky.  This was especially problematic at the bottom of flat areas such as shields.

When the varnish dried, it was as glossy as possible and looked pretty horrible to me.  A topcoat of Army Painter dull spray varnish improved things considerably.

Overall, I was pleased with the results, with a few caveats.

The varnish turned the extra flock brown, at least as dark as the brown MDF bases I used.  This was exactly what I was hoping for, and provided a much better color behind the new basing material, but in general you definitely don’t want to use this over flock or other loose basing material.

The Strong Tone is a dark brown, comparable to GW’s Devlan Mud wash.  The color is similar, but it didn’t darken other colors as much as Devlan Mud does.  It did a very good job of staying in the cracks to provide shadows, while keeping the high spots lighter.

The effectiveness of the Quickshade depends directly on the quality of the miniatures you’re shading.  The figures need to have enough details for the Quickshade to creep into, or they’ll still have large areas of flat color when you’re finished.  The Carthaginians were mostly old Viking Forge figures with limited detail.  Most of the Gallic infantry was painted too thickly, obscuring the little detail present.  Because of this, the Gauls turned out much worse than other figures with better details.

I was happy with the Quickshade’s effect over other colors, especially white.  It shaded stark white into a pleasing off-white without ruining it.  The shading effect is good over a wide range of colors, even typically difficult ones.  It’s certainly not as nice as hand-painted shading and highlighting, but it’s an acceptable solution for a fraction of the effort.

One effect I often notice with washes or dips without additional highlighting is that the color ends up a lot deeper than you’d get if you painted lighter highlights. It’s the same deal here.  Typically I paint things a bit lighter than I want them to be in the end, but in this case I didn’t have that option, so some of the colors are darker than I might otherwise prefer.

After painting approximately 54 stands of 15mm foot, infantry, and elephants (maybe 150 figures or so), well over 3/4 of the pint can of Quickshade remains.  I don’t yet know how it’ll stand up to long term storage, or if it’ll start to evaporate and become too thick to use.  The “dip” method wouldn’t work once you used up enough of the varnish: the figures would start to hit the bottom of the can.

The Carthaginians look much better to me than they used to (pictures should be coming soon), but they’re still definitely my “beater army.”  They won’t be winning any beauty contests, but hopefully I can at least kill some Romans with them.

I won’t be putting the Army Painter Quickshade into regular use, but it will serve well for limited purposes: quick shading of figures Martine paints, and rehab of other armies I find cheap at convention flea markets.