That Looks Just About Right…

This is a sketch of the rodback chair. I made it before I started working on the chair using tracing paper over a photograph of the chair I was inspired by. I changed things where necessary to show the chair I planned to build.

Rod Back chairs are a later (1800-1820) “degenerate” style windsor. They typically have much straighter legs and less deeply carved seats than earlier styles and most of them used a square stretcher pattern instead of the “H” stretchers here.

I like the more comfortable deeply carved seats of earlier chairs, but I prefer the turnings used on later chairs. So, I paired the seat shape and leg angles of an earlier Comb Back chair with the turnings and square back of the rodback. Compared to the photograph I traced, this seat is carved more deeply, the swell in the spindles is higher, the posts are different, and the leg angles are different.

I took a photo of my chair-in-progress, from approximately the same angle as the photo I traced. It looks pretty close!

I like the much slimmer look of my chair, compared to the sketch. I think the angles are a bit exaggerated in my chair because I was very close to it when I took the picture.

Since the chair isn’t finished yet, I’ll take this opportunity to be critical. The front legs of the chair are splayed a bit more than the plan called for; I’ll have to see whether I built it incorrectly or planned it incorrectly. It may be only because the front of the seat is higher than the chair I planned from. That’s the main thing that looks a bit odd with it, when I look at one portion of the chair critically, instead of standing back and admiring it.

It’s quite comfortable, but I haven’t spent a lot of time sitting in it yet since I haven’t epoxied the seat back together yet.

Today I trimmed the spindles. If it weren’t for the unfortunate crack, it would be basically ready for a quick sanding and a few coats of paint.

There are a few other things that didn’t work as well as I would have preferred, but worked out in the end. I didn’t orient the seat blanks properly. When carving the wood along the join, in some places I needed to carve in one direction on one side of the line and the opposite direction on the other side, which made things tricky. It’s easier to glue up seat blanks when both halves come from the same board.

I used wedged through tenons on the post-rod joint. This worked well enough, and it’ll be strong, but I had problems with drilling a through hole without breaking the grain out on the other side of the post. I think I need to replace my crappy 1/2″ bit, as I did with my 5/8″ bit. Although these bits from Highland Hardware got good reviews in Fine Woodworking, they’ve been horrible in my experience.

I’m also not completely happy with the wedged joints between the spindles and rod. They’re a bit loose. I may dab a bit of epoxy in, while I’m patching the cracked seat. In general, I need more practice carving spindles. That’s understandable, since I’ve been working on stools lately, and I’ve been using suboptimal spindle wood.

I’m in the home stretch now. I’ve been wondering whether I have enough stamina for another chair, but Marla tells me I can’t stop making chairs (or at least parts) until I’m done clearing the wood off the porch. I guess I’ll have to at least rough out a bunch of spindles, rods, and legs.

Nearly a Chair

My rodback chair is almost fully assembled. One more night to glue things up, and then it’s down to trimming and finishing.

In fact, pretty soon I’ll probably have two chairs! Well, two halves of one chair, anyway.

When inserting one of the spindles, the seat cracked. A few of the spindle ends might have been a bit too fat, but in this case the main problem was that this hole ended up directly over a crack on the bottom of the seat. Here, the crack goes all the way through the seat. I should’ve made this spindle loose rather than risk splitting the seat, if I had realized it might be a problem.

I expect I can salvage it, though I’m not sure which glue would be best to use here. Super glue might keep the crack from spreading, but it won’t fill the space to hold the cracked parts together. Maybe urethane (gorilla) glue would work better for that, but I’m not sure how to get it in the crack and keep it there; and I wouldn’t want it to push the seat apart even more.

Maybe I’ll use both. Start by applying super glue to the edges, and letting it dry. Then, clamp the seat lightly so it can’t expand any further, push some urethane glue into the crack, and apply tape on top to keep it in place while it dries.

The worst part will be finishing it. The crack will definitely be noticeable, and milk paint doesn’t stick to super glue. I’m not sure about the urethane glue, though.

I think the rest of my seat plank is not checked on the surface the way this one is. Both of my pine seated stools have check-cracks on the bottom, which are not a problem. The difference in this case is the spindles. With 9 holes across the back, I would have had to plan a lot farther ahead to avoid putting this crack in the middle of one of them.

Chairlike

I’m making progress on the Rodback chair.

The turnings other than the stretchers are done. This maple is wonderful to turn, and it seems very stable when it’s drying. Now that I have the legs tapered, I can measure the stretcher lengths and turn them as well.

The spindles and rod are roughed out, but they’re still oversize. The drying rack worked very well, after I put a rack on it to keep the pieces from falling down whenever I bumped it.

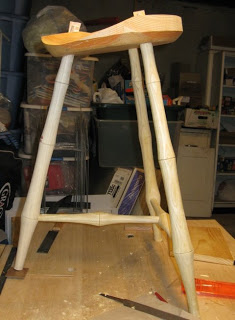
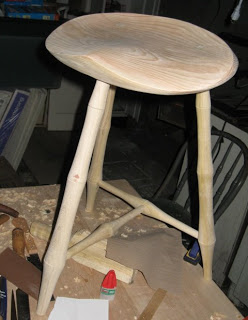
I’ve also drilled and cut the seat. After tapering the leg and post holes, I set this picture up so I could see what the chair will look like when it’s done. I think the shape of the post turnings will be fine.

I’ve started carving the seat, but I need to sharpen one of my spokeshaves and it’s giving me trouble. Once that’s taken care of, I’ll finish the seat and “leg up:” finish the stool half of the chair.

After that, I’ll finish the rod and assemble the two posts and the rod to each other. Then I’ll finish the spindles, drill the rod, and put the rest of the back together.

Drying Parts

Dad suggested I could use my forced-air heat (as limited as it is these days) to dry my chair parts faster. I did this a bit already with some stool legs, but I had figured these parts would be sitting around long enough to be dry by the time I’m done with the stool portion of the chair.

Tonight I turned a preliminary set of back posts (I’ll see if I like the shape or not). Now I have all the turnings and spindles done for one chair, but the spindles are still much wetter than I expected. When I brought the parts upstairs to put them by a heating vent, I remembered another reason I didn’t do this yet: there’s no place upstairs the parts would be safe from kids using them as play swords, and probably hurting each other.

So, I set up a hanging support in front of the vent in the basement (and opened it, for the first time in years). It isn’t enclosed, so it probably won’t overheat things, but it’ll be a lot more dry there. I also found a use for a few of those old botched leg turnings I had lying around…

Bending Sticks

I had some free time today, so I decided to bend the rods for the rodback chair.

I built the steam box a week or so ago. The bottom board is a 11″ wide pine board, and the upper portions are made from dimensional 2″x6″ lumber. It’s heavy, but it works. There are 3 dowels set into the box, to raise the parts to be bent above the bottom of the box.

I closed the box as Brian Cunfer did: using open-celled foam (like chair seat foam). Where the box sits over the pot, there’s a 4-5″ hole. I used 3/4″ or 1″ foam at the seam with the pot to make sure it’s sealed fairly well. In each end of the box I used a chunk of 1 1/2″ thick foam to seal the ends, while still letting steam pressure out. The wood joints are sealed either with gorilla glue or silicone.

I made two bending forms from 2″x6″ lumber screwed onto plywood. One side has the shape of the rod, and there are blocks to wedge the rod against and hold it into place. The parts should dry on the form, so in order to have a spare “just in case,” I made two forms so I could bend two parts at once.

The rodback sticks are about 20″ long. I shaved one from ash a week or so ago. The other I made today, out of the odd greenish/yellowish open grained wood I haven’t managed to identify well yet.

I steamed them for 45 minutes in the steam box. The pan started about half full of water, and didn’t come close to running out. After that, you have to work quickly: bring the stick to the bending form, bend it into place, and pound wedges in to hold it onto the form.

The ash felt quite stiff when I bent it; basically what you’d expect a green stick from a tree to feel like when you bend it. It didn’t crack, so the initial bend was a success. But, I wouldn’t be surprised if it sprung back at least a bit after it has dried.

When I bent the other stick, it felt the way I remember from the previous times I bent parts. The stick resists bending pressure, but then releases. I want to describe it as a “chalky” feeling, though I’m not sure why. I’m more confident this stick will stay bent.

Neither of the bends were immediate failures, but we’ll see if they stay bent in a week when I take them out. I think it’s likely they will both work.

While I’m waiting for the spindles and rods for the chair to dry, I’ll build the lower half of the chair: basically, everything I’ve already done for stools, but with a place to install the top. I’ll drill the holes for the top before I carve it, but the upper portion isn’t assembled until after the entire stool is complete.

A Slight Change of Plans

In the last few days, I figured out how my angle calculation tool was incorrect, and fixed it. Now it’s correct, just not very convenient to use. The reference axes are a bit “here and there” so you really need a sense of what makes sense, in order to extract the right answer.

I then went over all of my previous calculations, and made corrections to the seat plan.

Luckily, the amount of error in an angle calculation was directly related to how far away from perpendicular the hole is. Because of this, the errors on my spindle angles were so small that they almost all rounded off in the same direction as before. The exception was with the outside posts, which had to shift their sight angle by half a degree.

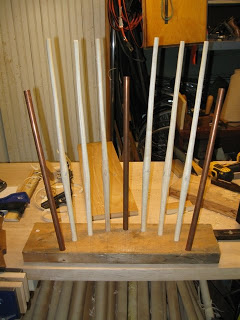
Today, I used my new plan to drill test holes for the back spindles in a scrap of dimensional lumber, to see if the back matched my expectations. It was basically a complete success: I have nothing to change with these angles. The tops of the spindles form a good curve (when viewed from above), and they’re evenly spaced. As shown here, I built up the test back with some spindles I’ve already shaved, along with some sections of 1/2″ pipe. The pipe is a lot straighter, and allows better measurements. (I picked this tip up on Peter Galbert’s blog as well, unsurprisingly.)

This gave me better information than I had about the shape of the seat back. The top of the end posts here are close to where the horizontal rod will end up. It’s wider in relation to its height than I expected. Obviously, my spindles are too long; I’ll need to trim them down on both ends and/or make some new ones. I think it’ll look fine when it’s finished, but it will be a significantly smaller chair than the bow back I made previously. This is good, since that’s what I was aiming for.

Back to the plans: My original leg lines were a complete mess. I couldn’t even figure out the values I used to I calculate them, let alone the error introduced by the tool. Always show your work! They were reasonable angles, and would have made an adequate chair, but they wouldn’t have matched my original intent. From a design perspective, I don’t know whether my plans or the old angles would result in a better chair, but I’m going to try my original plans and work from there.

I’ve already shaved some spindles, and they need to dry a lot before I can use them. I’m not using a kiln right now, so I really need let them sit around for a while: hurry up and wait. Next I need to make the top rod, bend it, and let it dry as well.

This requires a steam box, so I started building one. It is small, 30″ long, becuase I plan to use it in the kitchen. We’ll see how well it ends up working in the next week or so. I also need to accurately measure the location for the rod, so I can figure out how long to make it and build a bending form.

Making Plans

“I love it when a plan comes together.”

On Monday, I drew up some plans for my next project: a rod back chair.

Some woodworkers look at windsor chairs, and think they’re hard to build. Building windsor chairs isn’t difficult, but it is different from other “normal” woodworking. Non-woodworkers don’t necessarily think Windsor chairs look hard or easy to build; they have nothing to compare it to. I think the different way of working which windsor chairmaking requires fits well with my longing to extract order from chaos, and my generally intuitive way of solving problems.

The way windsor chair plans are laid out and used is also different from joined furniture plans. The plans tend to be very compressed. A rule of thumb in Information Theory says that “information (as opposed to pure data) is any difference which makes a difference.” By that measure, windsor chair plans are nearly pure information: they record only the aspects of a chair which are important, and only those which differ from other chairs. Anything not included in the plans is either not a critical dimension, or it’s derived from a partially finished chair in the same way it’s done for similar chairs.

In most woodworking, the order of the day is “square corners and flat surfaces.” The first step in a project is producing boards with all surfaces perfectly flat, and all corners exactly 90 degrees. Throughout construction, these flat surfaces and right angles act as references for various measurements. If you’ve done your job, most of these reference surfaces are interchangeable. Many finished projects retain these square angles in the finished construction.

On the other hand, a windsor chair has only one flat surface: the bottom of the seat. You usually can’t even see it, which is probably why it’s left flat. Most of the parts are never transformed into a flat board: they’re split out of logs and turned directly into legs, stretchers, spindles, posts, rods, or bows.

Since the seat is the only flat board used in a chair, it is the only natural reference surface. Because of this, windsor chair plans are centered around the seat. A seat pattern defines the outline of the seat, and the location and angle of every stick which protrudes from it.

Usually, none of the drilling angles for the legs and stretchers are included in a plan, or they are included only as a sanity check. When building a chair, you derive the required drilling angles and stretcher lengths from the partially finished chair instead of using predetermined dimensions, so your chair will fit together even if the legs aren’t installed perfectly.

This is another difference between windsor chair building and “other woodworking.” In most woodworking projects, you (ideally) construct a number of identical interchangeable parts whose dimensions are all fully specified, and then you assemble them. If you mess up a part, make a new one. You almost never take measurements from a half-finished project and build a part which fits. That would be like hand carving the missing piece from a jigsaw puzzle after it’s almost finished.

So, how do you make a chair plan? I don’t know. I mean… I don’t know how other people do it, and no one ever taught me how, so I figured it out. I may have gotten it wrong.

I started with measured drawings, which I cut and pasted together to show the chair I wanted to make. I know what a finished plan should look like. Making the plan is just translating the drawings into a usable plan. The problem with measured drawings is that many of the measurements are irrelevant, and the rest are not measured in the way a chair maker uses them. To create a plan from a drawing, I had to convert the measurements on the drawing into the measurements used to build the chair.

The biggest conversion task is angles. Measured drawings generally show 3 views: top, front, and side. You can easily measure the rake and splay angles of the legs and spindles from the front and side views of the chair, but these are not the angles used when drilling holes for a chair. Instead, you use an incident angle, which is the angle at which the drill bit enters the seat, and a sight line which tells you which direction to point the drill (the bit is always perpendicular to the sight line).

Apparently Drew Langsner has charts in the back of one of his books, which convert rake and splay angles into incident angles and sight lines. Unfortunately, I don’t have a copy of that book; it’s out of print and expensive. But I do have a bachelor’s degree in math/computer science, which was even more expensive. So, in lieu of a set of tables, I wrote a script.

Unfortunately, now that I’m “done” with my plan and I’m sitting down to write about it, I see that my script is not giving entirely consistent results. Doh! I’ll have to go revisit that before I post a link or build the chair.

I ran into another complication with the drawings I’m working from. This chair has its seat at a 3.5 degree angle in relation to the floor, but the drawings depict everything with the horizon set to the floor, and not to the seat. There was no way to measure the “front” angles properly with relation to the seat. So my script had to take that angle into account as well.

The result of these labors is the plan shown above. As you can see, it only depicts one half of the seat; the other half is a mirror image. I follow Brian Cunfer’s practice of using half-patterns, to avoid screwing up half of a pattern and building asymmetrical chairs.

With only a seat plan, there are clearly some undefined aspects of the chair, but only some of them are determined in advance. I’ll have to calculate the length of the legs to achieve the proper seat height, but the shape of the turnings isn’t very important from a structural standpoint as long as the leg is thick enough at the joints. The stretcher lengths and angles are measured from the position of the legs in the chair. The post lengths are chosen from a design perspective, and the spindles are made long enough to fit the bent rod. The rod itself needs to have the proper length and curve to meet the spindles and bows properly, but if I’ve calculated the spindle angles correctly they’ll match the measured bow from my drawings.

There’s a saying that “In carpentry, you work to the nearest 1/16th of an inch. In woodworking, you work to the nearest 1/64th of an inch. In boatmaking, you work to the nearest boat.” In other words, it’s more important to keep water out of the boat, than it is to get the measurements correct. Stated another way, this applies to windsor chairmaking as well: It’s more important for your parts to fit together properly, than for the measurements to be correct.

A Painted Perch

Last weekend, I finished the perch.

I painted it with one coat of Real Milk Paint’s new Butternut Squash color, followed by 3 coats of Mustard. I also used their anti-foam agent, and it made a big difference in reducing foam and generally making the paint easier to apply.

I think with milk paint, once it looks almost good enough, it’s time to stop: “better is the enemy of good.” Whenever I add “just one more thin coat in the spots that need it” I end up worse off, and have to smooth things out more than I’d prefer. Maybe it just doesn’t work to apply the paint when it’s too watered down.

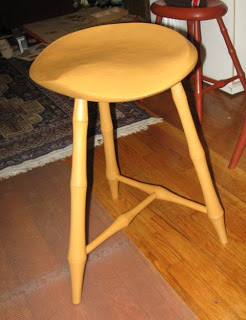
After the paint, I applied 2 coats of Minwax wipe-on poly, as usual. In the picture above you can see what a big difference it makes to the color. I’m quite happy with the final color. The dark parts of the first image are more representative of the color than the washed out second image. I think the Squash undercoat made it darker overall, but luckily the yellow covered it enough, because they didn’t seem to go well together.

Marla’s initial reaction to the seating position wasn’t very favorable. It’s quite a bit higher than the other stools she has been sitting on, and it pitched her forward more than she’d prefer. I sat on it, and found myself sliding down the seat too much; maybe the poly wasn’t the best finish for this?

I trimmed the rear legs off by about an inch, but we’re not sure yet whether this will be the final position. Hopefully we’ll stop trimming before we reach the stretchers. I think to a certain extent, her desk ought to be raised up a bit, because we previously had it adjusted for a lower seating position. Luckily it is very adjustable, if we’re willing to clear it off.

This was a really fun stool to build. Everything went well, and I didn’t make any major mistakes, but it was also different from the other chairs and stools I’ve made.

Whole Lotta Wood

Last night I turned the large, excellent maple (I think?) log section I had into leg blanks. I wanted to get the leg blanks turned early so they can dry a bit and stabilize before I turn final legs out of them. I have 6 leg blanks and maybe 2-3 back posts, 24″ long with no knots or runout at all. It’s definitely the best log I’ve found so far for turning legs and stretchers.

So tonight, I went back and got some more: two and a half 5′ long sections of log (some split), about 10-12″ diameter. You can see those pieces in the rear left of this image. I should be able to get two more chairs worth of legs out of those, while avoiding the knots.

On the right in the rear there’s a standing cherry log which is unfortunately rotten, and a pile of split cherry in front of it. In front of that is a stack of ash and possibly elm, about 3′ long. The ash is very straight, but the elm is a bit wavy and has some knots.

I have enough wood. Maybe. Wood for shaving spindles and bows is scarce, but I’d expect that. If only I could find an oak log as straight and clear as that maple, but accessible enough to retrieve…

Now I need to assess the pile I have sitting in the basement, and determine which pieces would be better off burned than turned. I’m going to guess “most of them” is the best answer.

The bags in front are all full of shavings, and the boxes are larger scraps. Unfortunately I must’ve cut a log with some mold growing in it, because the wet green shavings in my barrel started to mold severely and quickly. I hope the shavings are at least useful to burn, if they aren’t useful for chicken bedding.

Now I have wood, so I’ll need a plan. This one won’t be as easy as the stools, but at least I have some good practice “legging up”. Unless I find or buy some good bow stock, I can’t build one of the chairs I’ve already built. I don’t want another sack back arm chair anyway, and the bow back side chair needs an even longer bow. It would require a piece of perfectly clear, perfectly straight oak (or similar) about 5′ long.

On the other hand, if I can’t get any spindles out of the logs I have, I’ll have to buy wood anyway, so I may as well buy a bow, too.

Leaving bows out of the equation, there are several chairs which would not require such demanding wood: a comb back, a fan back, or a rod back.

But why do I need yet another different side chair? Oh, I know! The kitchen! We could have two separate sets of matching chairs, right? Half finished sets that I might never complete!

Brilliant! Now I just need some plans for the chair itself.

The rod back is a later Windsor form, from around 1800 or so. It’s less formal, and the design is heavily influenced by asian furniture. It uses the “bamboo” style turnings that I prefer, and it’s a smaller chair than the bow back, so it would make a nice kitchen chair. Overall, I really like the look of these chairs.

The main downside is, seats in these later “degenerate” windsor forms typically aren’t saddled as deeply, which sacrifices most of the Windsor form’s famous comfort. I may decide to just saddle it more deeply anyway.

There is a measured drawing of a fairly nice looking rod back chair in John Kassay’s windsor chair book, which has enough detail that I think I can make a plan for it. I’m not very happy with the splay of the legs, but I’m not sure whether I really want to start experimenting with the plans for a chair I’ve never built.

Whether or not I build a chair with a long bow, I’ll need to start a few new processes and set up some more equipment. Mainly, I’ll need to build a steam box, get a propane cylinder, and build bending forms for whatever bent parts I need on the chair I’m building.

So my next step ought to be to determine what size spindle I’ll need for a rod back, and try shaving one out of the wood I have. If that’s a no-go, I’ll have to buy wood, so I may just get a bow as well and make another bow back.

In the end, we may never have any matching set of chairs. But if we do have enough chairs to sit in, and they’re all hand made by me, then I’ll still like them a lot better than the ones we use now, even if they don’t happen to match.

A Perch

A woodworking update: I’ve completed a Perch using the plans Peter Galbert posted on his blog. I haven’t painted it yet, because I’m not sure I want another red stool.

Two of the legs and both stretchers were turned from the first batch of logs I found in the park. They started out looking like the firewood sitting on the floor in this image, and ended up looking like the leg on the lathe.

I turned this leg too soon after bringing the log in from the 20F weather outside: the wood was still frozen. I couldn’t get any clean cuts on it, so for the other two legs I just turned them round and let them warm up and dry a bit before finishing them. Although I planned to clean up the first leg later, it ended up way too warped to even consider this.

The third leg, this one’s replacement, I turned from some Hackberry dad left down here at Christmas time. When I first turned all the legs, I thought this might also be a hackberry log, but now I think it’s more likely Elm. I know these are not ideal leg woods, but they’ll be strong enough, and the details on bobbin legs are minimal and not easy to screw up, even with wood that doesn’t hold detail well.

More news on the Free Wood front: near Martine’s school, 3 or 4 trees toppled down on top of each other in the woods. One of them split and splintered on its way down. Someone was almost hit by another one, when they fell. I waited until they cut them into smaller pieces, and today we went and collected some. I have some long, straight, clear sections of I think Maple which will make some nice legs. I may have to bring a wedge and mallet and go back for more, this is really nice wood. I also got another cherry log because it was there, and some more of this open-grained greenish yellow colored wood I’m having such a hard time identifying properly.

In this picture, you can see my increasing collection of spindles, under my bench. These are all from the logs I’ve collected, and hopefully they’ll eventually turn into legs, stretchers, or wooden boxes.

It’s quite fun to rough out spindles from the log, but it feels like a big waste to create so much waste wood in the form of chips. But then I remember the city’s wood crew trucks, which chip all of the logs as soon as they clean them up. Even if only a tiny fraction of the wood I collect ends up being used in a project, it’s still better than leaving it on the ground and letting it rot. The rest will go to my in-laws’ where they’ll use it for chicken bedding, or burning for maple syrup.

There are some really depressingly nice, huge, straight, 2′ diameter, 6′ long logs in the park that I just can’t think of any good way to retrieve. It pains me to see them sitting there, ready to start rotting at any moment. I could probably get back bows out of those logs, if I could get them out of the park.

Peter Galbert does a few things differently than I’ve done on previous chairs and stools, so I learned a bit on this Perch. First, he drills his holes from the top down. Since they’re angled, the hole enters and leaves the seat at a different place: you need to know whether to drill from the top down or bottom up, in order to get your legs in the right place.

When I drilled from the bottom up on previous stools, I didn’t have problems with tearout: I just carved it away when I carved the seat. But this time, I left unsightly scars on the bottom, unfortunately. Let this be a lesson to me! I need to use a backing board or a better bit (see below).

Peter also leaves more of his seat uncarved than I am used to, before assembly. This was a very fun seat to carve, but I didn’t really enjoy the new, improved clamping challenges posed by finishing the seat after assembly. The shape of this seat is quite nice, and the lines flow well and make sense, once you actually do it. Again, Peter’s videos helped a lot in remembering the carving steps, and they’ll help for my next shield-shaped seat as well, I’m sure.

One detail worth noting on this image is the blood on the front leg: I cut myself while fondling one of my tools. It wasn’t even the cutting edge. But it wasn’t as bad as my previous cut, from sharpening my drawkife. Drawknives look dangerous and imposing, but most of the time you aren’t near the cutting edge. Except when you’re sharpening them.

Speaking of better bits, I bought another 5/8″ spur point bit. What an amazing difference! My old bit took forever to cut, dulled itself cutting through even relatively soft wood, and burnished the holes. It was one of the highly rated bits from Highland Woodworking, and it sucked straight out of the box. I replaced it with a no-name bit I got locally at Rockler, and what a huge difference it made! I’ve only used it on the Perch’s undercarriage so far, but it’s already far better than the other bit ever was.

This time, I think I finally cut my wedges thin enough. I can never seem to sink them deeply enough into the legs.

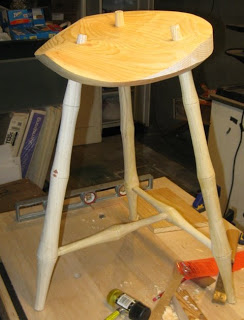
In this picture you can see the bins of childrens’ clothes and other “stuff” that will be sold at the annual Pittsburgh Mothers’ Center Kids’ Stuff Sale. But it may be more interesting to note the angle of the seat: yes, it really does pitch you forward as much as it looks like it will; but this is a good thing.

The future is looking bright, with respect to me keeping enough momentum to complete an actual chair before slipping into a different hobby for a while. I guess I’ll have to start doing some drawing to figure out exactly what it is I want to make.

And now, finally, the image you’ve been waiting for: the finished perch. Marla’s initial sit upon it sounded promising, so we’ll see how that goes.

Seat carving is an area where I seem to be improving. I look at the chairs I made in classes, and they’re downright rough and lumpy compared to my more recent stools. This pine is a real pain with tearout, especially where the curves leave high and low spots on the grain. But this time, I managed to scrape the seat enough to move straight to 220 grit, so that’s good.

I used the superglue to stop some checks in the bottom of the seat: hopefully this will prevent them from getting much worse over time, but we’ll see. The grey chair in the background isn’t a “real” windsor, it’s a factory chair I got at a yard sale for $2.

That’s it for now, it’s late. Damn Daylight Stealing Time, I never can get used to the time change.