Malifaux Update

I’ve taken a break from painting DBA models, and finished some more Malifaux figures.

Here is Ramos with his mechanical minions.  I’ve added another Steampunk Arachnid Swarm and an Electrical Creation.  I’ve always used Johann in this crew, but he seems to be best at dying.  When a few more nice looking models are released from the Rising Powers set, I’ll be adding those.

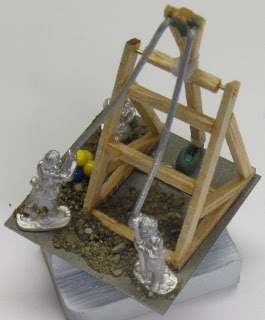
I’ve also built some scrap counters to match my crew, since Ramos needs scrappy bits to convert into more spiders.  In the center is a treasure counter I modelled for Mordheim, that I’ve been using when the need arises in Malifaux.  Of course, I replace the Wyrdstone with Soulstones first.

I’m also painting a Perdita crew.  I’m very happy with the way her pants turned out, but she definitely has a face made for radio; luckily she keeps a hat over it.  Once again I started this crew with a full can of Army Painter dull varnish.  Unfortunately it’s hard to shake the can enough, which results in a semi-gloss finish at the beginning of the can, and an ultra-flat finish near the end of the can.


And here’s the star of our show: Francesco “Zappa” Ortega, aka The Grand Wazoo.  Is that a real poncho or a Sears poncho?

His cohorts may consider his shirt a bit flambouyant, but Francesco always uses the right tool for the job.

Papa Loco likes fire.  Heh.  Blow stuff up!

I still have a few more Ortegas to paint before I can field a full Guild crew.  I also have a Peacekeeper, because I like the big robots; and Samael Hopkins. I’ll post more pictures once they’re finished.

DBA Army II/4: Warring States Chinese, Double Army

I’ve completed the elements necessary to field two Warring States Chinese armies at the same time, or a double Chao army.  It’s been hot in the attic so I haven’t gotten a chance to take pictures for a while.

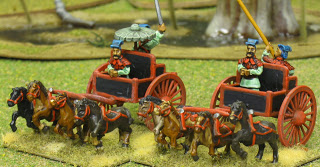
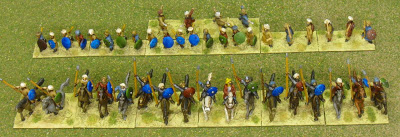
The green army is II/4c: Chao, which has no options: 2xHCh (gen), 2x2LH, 4x4Sp, 3x4Cb, 1x2Ps.  I needed to finish the chariots, crossbows, and psiloi to field this army.

All of the figures are Museum Miniatures.  Overall I really enjoy working with these figures.  There is very little flash or other cleanup required.  The poses are limited, but I like the overall effect in this army.  The infantry has enough detail, but not too much, and lends itself to a clean simple color scheme.

I’m not quite as happy with the green army chariots as I am with the blue ones I painted a few months ago.  I mounted the umbrella too low on the general’s chariot, and didn’t paint the red quite as well.

For the cloth, I used a light base coat and mixed a wash from darker paint, gloss varnish, and water until it flowed well over the cloth.  A few highlights on top finished it off well.

The blue army started as II/4a: Qin, but I quickly decided I wanted to morph it into other Warring States armies.  The first morph was into II/4c: Chao, but along with the green army I can now morph into any of II/abcd with all options.  I’m missing the 3Bd and 3Cb elements for II/4e.

Here, I have 2xHCh (gen), 1x3Cv, 2x2LH, 4x4Wb (with halberds/dagger axes), 4x4Sp, 3x4Cb, 2x2Ps.
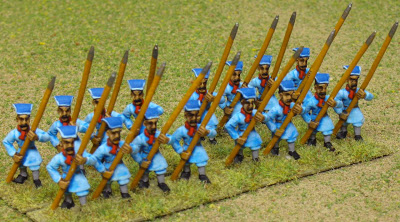
In this round of painting, I only needed to paint the 4x4Sp and 1x2LH elements.

I chose to model the warbands with halberds to differentiate them from the spearmen (shown here).  According to the DBM army lists, the same troops are categorized as warbands in the Qin army and spear in other armies, due to their different motivation and not different weapons: Qin soldiers were paid by the head.

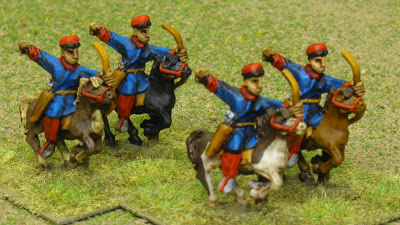
The light horse is the only element I needed to match colors with an existing element.  It’s not identical but they’re close enough that it makes no difference.

With only a few elements of light horse, I don’t mind that there’s only one pose. With an entire army of light horse, I need either different poses or different colors to keep things from getting boring.

This is all the Chinese I need to paint for our planned BBDBA tournament at Fall-In; but it’s fun, so I could forsee getting around to painting some more.  Maybe I’ll build enough to morph into a double army other than Chao, or maybe into Han.

Review: Army Painter Strong Tone Quickshade

Army Painter makes some interesting hobby supplies designed specifically for painting miniature wargaming armies quickly and effectively.  Quickshade is a tinted varnish intended to shade painted miniatures… quickly (duh).

I’m not usually interested in using the “dip” method for painting (or shading) miniatures. But at Historicon I found a deal in the flea market I couldn’t pass up: a large painted Carthaginian army for less than the price of unpainted figures.  The army is useful for killing Romans (surely a noble pursuit), but I wasn’t interested in painting Carthaginians, so it seemed like a good deal.

Unfortunately the paint job was very “old school.” There was no shading, and although most of the figures were painted with glossy enamels there were some painted in acrylics, and a variety of styles.  There was obviously more than one painter at work here, though all the figures had been based somewhat uniformly. Overall it was totally not my style or preference, so I decided to try out the Army Painter quickshade to see if it would help.

I haven’t used any other “dip” formulas, so I don’t have any similar products or techniques to compare this to.  I don’t intend to get good at dipping, so I wanted to get it right the first time. Army Painter was the obvious choice, since the point of this exercise was “adequacy through laziness.”

The typical use for Quickshade and other “dip” formulas is to dip the painted miniature directly into the can of varnish, remove it, and shake off the excess.  This seemed very wasteful and messy to me, so I decided to use the alternate technique: apply the varnish with a brush and more carefully brush off the excess.

The first annoying thing I noticed about the Quickshade is that it is not a water based product.  It’s oil based and requires mineral spirits to clean your brush, hands, spills, and so on.  It’s definitely not for indoor use!  I wouldn’t be able to use this while painting through long winters even if I wanted to.

Before varnishing the figures, I rebased them, touched up some chipped paint, and repainted some inappropriate colors. I tried to remove any stray dust or flock, but there were still clumps of unnaturally bright green flock glued near their feet.  I decided to see what effect the quickshade would have on the flock on a few stands, before spending even more effort to clean it up.

I used a wide flat brush to apply the varnish.  The process was easy, but a lot messier than I expected.  The varnish has the color and consistency of used motor oil, and has a tendency to drip all over the place and get your hands quite sticky.  I now think dipping and shaking could actually be less messy than brushing it on, but you’d waste a lot that way.

The most important part of appyling the product was to clean up the messy pools before they got too sticky.  This was especially problematic at the bottom of flat areas such as shields.

When the varnish dried, it was as glossy as possible and looked pretty horrible to me.  A topcoat of Army Painter dull spray varnish improved things considerably.

Overall, I was pleased with the results, with a few caveats.

The varnish turned the extra flock brown, at least as dark as the brown MDF bases I used.  This was exactly what I was hoping for, and provided a much better color behind the new basing material, but in general you definitely don’t want to use this over flock or other loose basing material.

The Strong Tone is a dark brown, comparable to GW’s Devlan Mud wash.  The color is similar, but it didn’t darken other colors as much as Devlan Mud does.  It did a very good job of staying in the cracks to provide shadows, while keeping the high spots lighter.

The effectiveness of the Quickshade depends directly on the quality of the miniatures you’re shading.  The figures need to have enough details for the Quickshade to creep into, or they’ll still have large areas of flat color when you’re finished.  The Carthaginians were mostly old Viking Forge figures with limited detail.  Most of the Gallic infantry was painted too thickly, obscuring the little detail present.  Because of this, the Gauls turned out much worse than other figures with better details.

I was happy with the Quickshade’s effect over other colors, especially white.  It shaded stark white into a pleasing off-white without ruining it.  The shading effect is good over a wide range of colors, even typically difficult ones.  It’s certainly not as nice as hand-painted shading and highlighting, but it’s an acceptable solution for a fraction of the effort.

One effect I often notice with washes or dips without additional highlighting is that the color ends up a lot deeper than you’d get if you painted lighter highlights. It’s the same deal here.  Typically I paint things a bit lighter than I want them to be in the end, but in this case I didn’t have that option, so some of the colors are darker than I might otherwise prefer.

After painting approximately 54 stands of 15mm foot, infantry, and elephants (maybe 150 figures or so), well over 3/4 of the pint can of Quickshade remains.  I don’t yet know how it’ll stand up to long term storage, or if it’ll start to evaporate and become too thick to use.  The “dip” method wouldn’t work once you used up enough of the varnish: the figures would start to hit the bottom of the can.

The Carthaginians look much better to me than they used to (pictures should be coming soon), but they’re still definitely my “beater army.”  They won’t be winning any beauty contests, but hopefully I can at least kill some Romans with them.

I won’t be putting the Army Painter Quickshade into regular use, but it will serve well for limited purposes: quick shading of figures Martine paints, and rehab of other armies I find cheap at convention flea markets.

Tlingit Preview

I’ve finished painting my Tlingit helmets, and I’m excited to share some initial results.  The pictures aren’t great, and the figures aren’t based yet, but I’m quite happy with these guys. Most of the helmets are patterned after Tlingit artifact images I found online, or helmets carved and painted by Tommy Joseph.  Thanks for the excellent inspiration, Tommy!  I apologize for my inferior work and any errors my ignorance of the subject material have produced.


Essex Arab Camp

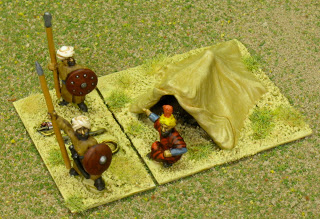
If I remember correctly, this is Essex part number TT9: Tent with fire, seated Arab leader with two bodyguards.  I painted it for my Arab Conquest army.  The fire has a pile of sticks with two plates next to it; on one plate is a chunk of food (meat?  let’s pretend) and a knife.

The tent is tiny, only as high as the seated leader.  It’s certainly not a general’s campaign tent in most armies I’d know, or a stereotypical arabian merchant’s tent.

However, the cloth sculpting on the tent is excellent.  It took drybrushing very well.  I’m happy with how this camp and camp followers turned out; I might even like it better than the army itself.

DBA Army III/25b: Arab Conquest

Here is another Essex DBA army pack: III/25b: Arab Conquest.

The army is evenly split between mounted and infantry: a cavalry core is supported by warband and bows (or psiloi, if that’s the way you roll).  The army list I’m most likely to play is: 5x3Cv (gen), 1x2LH, 4x4Wb, 2x3Bw. 

I liked my color scheme until it became too montonous.  I intended to go primarily with offwhite/tan, grey-blue, and red, and fill the rest in with various browns. But when it came time to paint some shields, I was at a loss.  The brighter blue wasn’t too bad, but I think the green was a mistake.

Luckily I don’t have strong feelings about this army.  It took a while to get motivation to paint it, and now that it’s done I’m happy that it’s finished and not upset that it’s not what I’d prefer.

I used the same basing technique as on my Early Bedouin army.  The metal bases have a layer of spackle with sand dusted on top. Then I paint them with Vallejo Middlestone, followed by Yellow Tan and finally Buff.  It’s a bit weird, but it ends up working well especially after I apply the static grass patches in green and yellow.  I based the Bw, Ps, and LH elements prior to painting them, but based the Cv and Wb after they were painted.  Spraying with varnish keeps the sand in place before painting the bases, which is convenient.  However, overall I think the basing on these is a huge pain in the ass.  I’m not likely to continue with this technique in cases where I’ll be using grass-like flock over the entire base.  I’d prefer to do selected spots of dirt/sand on an otherwise grassy base.  It’s a lot less messy and requires less touchup than applying spackle to bases with already-painted figures.

I tried another new technique with these figures, and I’m very happy with the results.  The red tunics and head wraps are done with Vallejo Transparent Woodgrain, a dark maroon-red.  I applied this in a single coat over the white-primed figure, and it did an excellent job of darkening the shadowed areas while leaving the highlights lighter without any additional inking required.  Adding a bit of water to thin it out produced no ill effects.  This is truly a transparent (or translucent) paint: adding more layers of paint darkens the color significantly instead of reaching a final tone the color of the pigment.

If I were picky, I’d change a few things about this army:

  • I think the warbands would be better off using spears rather than swords
  • I’d research more appropriate colors
  • I’d look into the possibility that my cavalry stands should have mixed figures instead of identical figures on each base
  • Overall, the cavalry seem better suited for use in the Crusades period

However, I’m not picky.  Lucky me!

I still have an arab tent camp to paint, but otherwise this army is ready to bring to Historicon 2010.

Painting Workspace

Neldoreth started a thread on the Fanaticus forums about the workspace we use for painting miniatures.

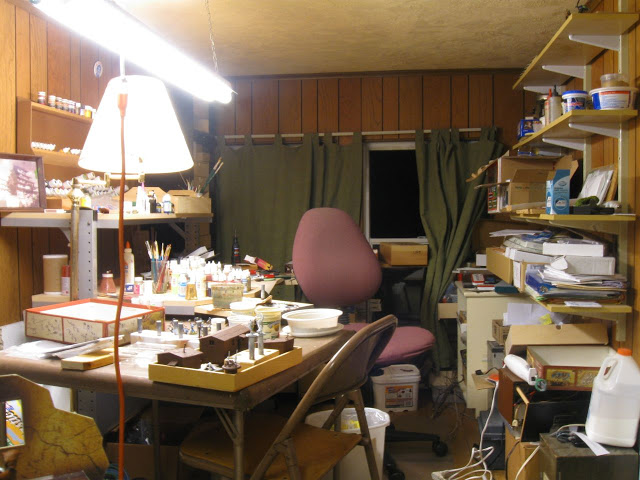
My main workspace for painting miniatures and other modelling work is a nook in our attic dormer: probably 7’x8′ and 6′ high.  I use the rest of the attic for gaming space and general storage.

Points of interest in the first image include:

  • My paint shaker: a converted electric knife
  • O scale model railroad buildings destined for use as Malifaux terrain
  • Games Workshop boxes are good at catching excess flocking material
  • Elmer’s glue by the gallon? I may as well buy a horse.
  • Yes, there are other hobbies stored on the shelves.
  • The card table provides supplemental horizontal surface area, as well as a workspace when friends come over to paint and watch crappy movies.
  • Crayola Model Magic! It’s excellent for building hills and other terrain features out of a flexible, moldable 3D material.

It’s probably obvious that I lean towards the “a clean house is the sign of a misspent life” school of thought.  When I organize my workspace, it is almost always as I’m planning or about to start a new project, and not when I’m finished with the previous one.  Organizing my workspace and organizing my plans for the next project go hand-in-hand.  If I don’t need to put much thought into the next project, I also tend not to put much effort into preparing my workspace for its execution.

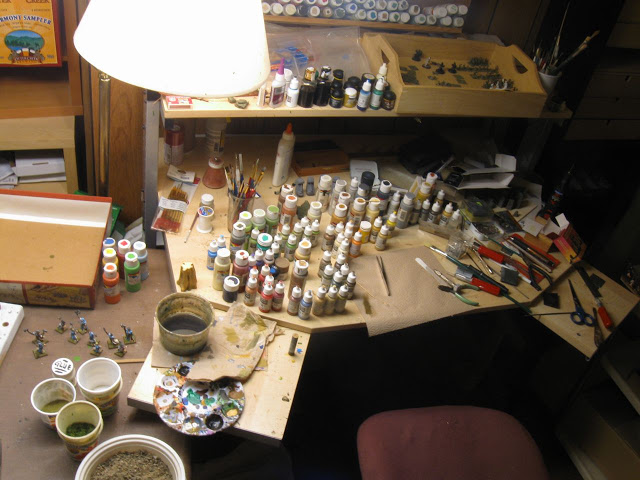
In the second photo:

  • This is an Ikea Jerker desk, one of the best computer desks made by man.  With independent height adjustment for the keyboard and monitor, this desk provided the best ergonomics available to mere mortals.  Luckily, with my adoption of a laptop and console gaming, I don’t need it for programming or gaming anymore.  The only downside of the Jerker is its lack of drawers.
  • Although I built a paint rack from MDF and pine, I obviously don’t use it as much as I could.  I’d benefit from a table top model instead of putting it against the back wall.
  • The only projects visible here are either not mine, or haven’t been worked on in years. 
  • Yes, I use inexpensive brushes in high volume, except for a few “special” brushes.
  • Craft paint is fine for terrain, grey, and black. Modern GW washes and Didi’s Magic Ink are good for shadows.  Other than that, I use Vallejo paints almost exclusively.
  • Yes, I have piles of unpainted figures.  The fact that you can’t see them is a good thing.

There you have it!  They aren’t the tools of the trade, because this is no trade.  They’re the tools of fun!

Magister Militum Elephant: SEL009


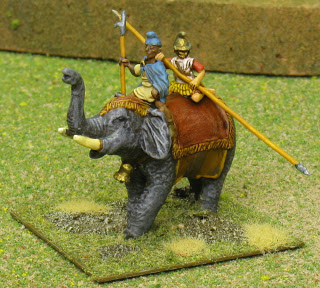
Here is a 15mm elephant sold by Magister Militum and sculpted by Chariot Miniatures, SEL9 or SEL009: “Elephant: Driver and Pikeman Astride.”  Judging by the pictures on the Magister Militum site, this elephant is available with alternate head sculpts.

The elephant is smaller than Essex elephants, and has a much more dynamic pose. It’s in scale with its crew, which are also smaller and slimmer than Essex 15mm people.  It’s appropriate for use in Alexandrian and early successor armies.

The elephant came with two pikemen, but I only used one.  There’s no reasonable way to put two pikemen on this beast except back to back, and they don’t fit well that way.

I really like the way this elephant assembles.  It doesn’t have any base, which is fine since elephant feet are so large.  The two halves of the body and the head all have pins to hold things together while the epoxy dries.  This works much better than the Essex assembly technique.

The pikes are much longer, thinner, and more flexible than Essex pikes.  I don’t expect it to last very long, and it’ll probably be hard to drill out and replace with wire.

Essex Elephant: MEPA36

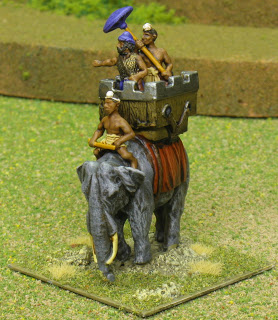
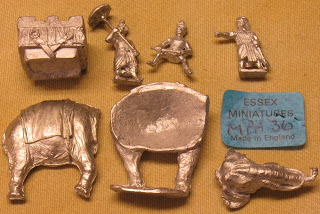
I’ve finally finished painting a few more elephants.  This one is a 15mm Essex MEPA36, labelled MPA36 on the package: “General in howdah with umbrella holder mounted on elephant with driver.”  I intended to use this as a general element in an Indian army, but I think the howdah looks more like it should be used in an Alexandrian successor army.

This elephant comes with the same driver and body as the Essex MEPA23 elephant.  As with all Essex elephants I’ve seen, the pose is very static. It’s more like an elephant on the march than one being shot at by arrows.  The howdah is a crenellated box with woodgrain on the lower parts and no texture on the crenellations.  It appears to be held on with leather straps, but the straps aren’t continued onto the body.

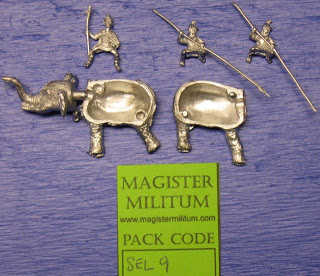
This time I took pictures of the unassembled elephant as well.  You can see the three part body and head, three crew, and howdah.  I assemble with epoxy and use greenstuff to fill the gaps.  I painted this one with the howdah and driver on the elephant, and the other crew separate.