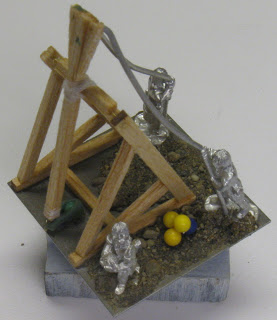
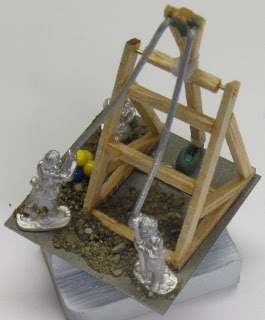
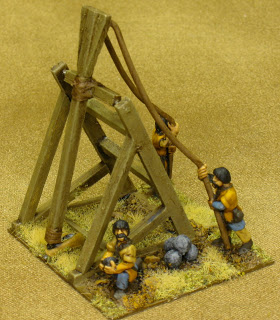
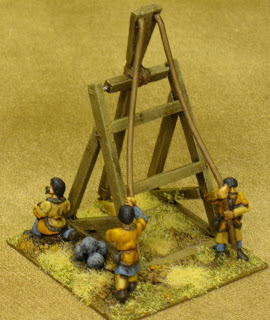
Here are a few pictures of my scratchbuilt Mongol Trebuchet, before paint was applied.
Magister Militum Elephant: SEL009
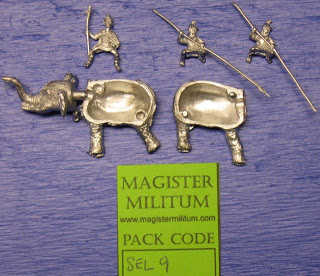
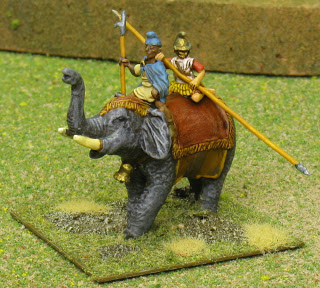
Here is a 15mm elephant sold by Magister Militum and sculpted by Chariot Miniatures, SEL9 or SEL009: “Elephant: Driver and Pikeman Astride.” Judging by the pictures on the Magister Militum site, this elephant is available with alternate head sculpts.
The elephant is smaller than Essex elephants, and has a much more dynamic pose. It’s in scale with its crew, which are also smaller and slimmer than Essex 15mm people. It’s appropriate for use in Alexandrian and early successor armies.
The elephant came with two pikemen, but I only used one. There’s no reasonable way to put two pikemen on this beast except back to back, and they don’t fit well that way.
I really like the way this elephant assembles. It doesn’t have any base, which is fine since elephant feet are so large. The two halves of the body and the head all have pins to hold things together while the epoxy dries. This works much better than the Essex assembly technique.
The pikes are much longer, thinner, and more flexible than Essex pikes. I don’t expect it to last very long, and it’ll probably be hard to drill out and replace with wire.
Essex Elephant: MEPA36
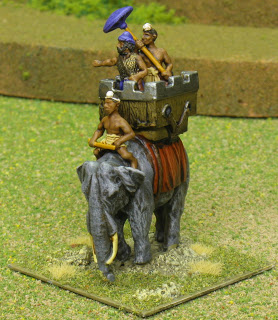
I’ve finally finished painting a few more elephants. This one is a 15mm Essex MEPA36, labelled MPA36 on the package: “General in howdah with umbrella holder mounted on elephant with driver.” I intended to use this as a general element in an Indian army, but I think the howdah looks more like it should be used in an Alexandrian successor army.
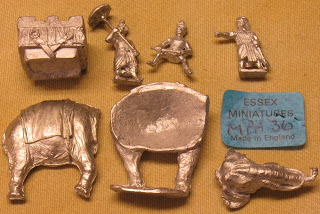
This elephant comes with the same driver and body as the Essex MEPA23 elephant. As with all Essex elephants I’ve seen, the pose is very static. It’s more like an elephant on the march than one being shot at by arrows. The howdah is a crenellated box with woodgrain on the lower parts and no texture on the crenellations. It appears to be held on with leather straps, but the straps aren’t continued onto the body.
This time I took pictures of the unassembled elephant as well. You can see the three part body and head, three crew, and howdah. I assemble with epoxy and use greenstuff to fill the gaps. I painted this one with the howdah and driver on the elephant, and the other crew separate.
Stoogecon 2010
On Saturday I attended Stoogecon for the first time. This was the second DBA tournament-type event I’ve played in. I had a lot of fun, and hopefully learned a few “what not to do” lessons. My goal was to win at least one game, and I won 2 (out of 6).
I don’t know if my experiences so far are typical, but my overall impression of DBA tournaments is that they’re basically just like friendly DBA gaming days, but you play more games against more people you don’t usually play with, and people aren’t quite as willing to tell you when you screw up.
There were 7 of us: Larry and Rich were running the event; Kevin, Jim, and I were also local; John came in from out of town and I’m not sure if Mike lives in Pittsburgh or was just visiting.
The first event was an open: Rich played, and Larry sat out to run things. I hadn’t decided whether to play II/4c Warring States: Chao, or III/10 Hindu Indian, and didn’t have a strong preference. Larry’s taunting convinced me I’d suffer less if I didn’t take the elephants, so I played II/4c.
My first game was against Kevin, who played Ayyubid Egyptians (IV/20). I defended and placed one of my typical terrain setups: two woods and a steep hill at the corners of a triangle, disrupting deployment zones. I deployed my spear line between bad going, with my bows to protect my left flank and my light horse screening the right. Kevin attempted a wide sweep around my right flank with his light horse, which I repelled, and then sent in some cavalry.
He ran out of steam when he got around the hill and out of command radius of his general, but he did manage to take my camp. That left the game tied at 4-4. Taking back the camp was my surest way to win, but my general was out of range, so I’d need to hold out for a turn or so.
I got to the camp without losing any other elements, and the odds were in my favor: 5 to 3 with a quick kill gave me a 26/36 chance of success. Unfortunately, the combat was tied, and play continued! On Kevin’s turn, he killed my Psiloi, but lost the camp, so I won 5-3.
This started a few trends for the night: I only ever beat Kevin, and all of the wide flank attacks failed. It was also the first game I’ve played where a camp was taken.
My second game was against Rich, who played Italian Condotta (IV/61) as the defender. This was a much more straightforward “line ’em up, knock ’em down” game. There was a bit of back-and-forth between our bows on my right flank, but I lost on the left flank where my spears were crumpled by his knights. Although “Diceman” had uncharacteristically good die rolls, I should have learned not to try to win against knights with my undersupported spears. Rich won 5-2 in the end.
In the final round of the open, I played against Mike’s Teutonic Orders (IV/30). I defended and placed a slightly different triangle of terrain. As you can see in this picture, I didn’t learn any lesson regarding knights and spears. The game went very quickly once we made contact: he crushed my spear and the psiloi behind it, and then an additional spear in two of the first three combats. I managed to kill one element, I don’t remember what, but he killed one more element and I was done. He won 4-1.
John won the open and took home an Essex Maccabean Jewish army pack to complement the Maccabeans he brought for matched pairs.
For the Matched Pairs event, I brought Later Spartans (II/5a), and Later Achaemenid Persians (II/7). The Spartans had all the non-Spear options possible, and Persians chose 4 spears and another psiloi instead of a scythed chariot. This time, Larry played and Rich sat out.
My first game was against Kevin again, and we played with my armies. Kevin chose Persians, and somehow the Spartans ended up defending. I set up virtually identical terrain to the first game we played (oops), but we ended up on different sides. Once again, Kevin attempted a sweeping flank around my right side, to get to my camp. But this time, he stopped too close to the woods, and I rolled a lot of PIPs on my first turn. I sent my psiloi into the woods, flanked one light horse, and killed it (or pushed it off the board).
This game demonstrated again the difficulty of flanking attacks around terrain that blocks command. I don’t remember anthing other than the complete failure of his flanking maneuver: I won 4-0.
The next game demonstrated that you learn a lot more by losing than by winning. Unfortunately I don’t have any pictures of this game, but I played against Larry using his armies: Athenians (II/5b) vs. Thessalians (II/5d). I chose the Thessalians with the light horse option. I defended and played less terrain than in my other Arable games, but still placed it in the deployment zones.
Can you see where this is going yet?
Yes, obviously: I attempted a wide flanking maneuver around the woods at Larry’s right flank. I got into trouble when my light horse were out of command, and he destroyed most of my attacking force. I managed to pull some of the light horse out, but shortly after our main lines clashed I lost 0-4.
In the final round, I played against Mike again. We used his armies, and I chose Scots-Irish (II/54) against his Picts (II/68), both with the Warband option. He defended, and placed a long marsh and large wood opposite his waterway. We played with the waterway to our side. We both deployed with our infantry in the bad going and our cavlary in the open.
My first move was to send my chariots across the board in front of my infantry to try to take on his cavalry force and avoid his spears. In retrospect, it would obviously have been better to just deploy on that side in the first place. The rest of the game was a bit of a muddle: it ended up being a bunch of disconnected skirmishes that clashed before our main lines formed ranks, so most of the kills were attacks of opportunity and not a clash between two straight lines. Overall I think that may end up a bit better for the Auxilia when it’s fighting against Spears, and it’s probably not unlike historical fights between Picts and Scots-Irish.
I killed off his light horse, and failed several attempts to flank and kill his general. In the end he beat me 4-2. It was an interesting and hard-fought game whose outcome was never obvious, but we also both made mistakes and suffered from them.
Jim won the Matched Pairs event and took home an Essex Later Polish army pack.
It was still early, so we threw together a triple game of Knight armies using allied commands on a 2×5′ board. On our side, John was on the right flank facing Kevin; I was in the center facing Jim; and Rich was on our left facing Larry.
We basically just lined up some useful matches and pushed ahead. Kevin’s command broke first, but that’s just because John’s knights were running the fastest. I managed to kill off 4 of Jim’s elements in the middle when we clashed, and that ended the game because he was the C-in-C.
This was a very straightforward lineup: there isn’t as much subtlety in BBDBA style games when you have three allied commands instead of variable command sizes. I continued to learn that I don’t find double-depth knights very useful. I did inadvertantly learn a useful tactic against them, however: if you aim bows at their front corner, they won’t necessarily have enough room to contact you due to their extreme length.
This was a good day of DBA, I’m glad I attended it. I enjoyed facing opponents and armies I don’t usually play against. Thanks go to the Stooges (Larry and Rich) for organizing this shindig and providing a full day of meals (donuts)!
Scratchbuilt: Mongol Trebuchet
This is the traction trebuchet (human-powered stone thrower) I built for my DBA army IV/35: Mongol Conquest.
I purchased a Perrier (traction trebuchet) model from Museum Miniatures, but it’s way too big to fit on a DBA 40mmx40mm base. I also think it’s stretching the upper size limit of historically used human-powered trebuchets. So, I decided to find a design that would fit on a base and scratch build it.
The crew is from Museum Miniatures, and was originally intended to man their trebuchet. These guys are monsters: they stand about as tall as the rest of my Mongols, but those guys are riding horses! The only reason they fit in with the rest of the army at all is because they’re on a separate base with a big machine.
The catapult itself is constructed from balsa wood, thin brass rod for the pivot, and thread for the small ropes on the throwing arm. The pulling ropes came with the crew figures. The stones are round pin heads. I used greenstuff to build up the cloth-looking sling around the loaded stone. The base has sand glued on, and it’s finished with some flock and static grass to match the rest of my Mongol bases.
The design of this trebuchet was based on an image I found online of a reconstructed Mongol traction trebuchet in a museum, as well as images in Osprey’s Siege Weapons of the Far East (1). The reconstructed trebuchet has no size reference, but looks about 6′ high judging by the sign placement on the wall, which seems too small. The images in the Osprey book are primitive contemporary drawings which make it look as if the catapult should have a hundred crew pulling its ropes. I opted for something in between: small enough to be relatively portable but not so small that you’re better off not bothering.
The Mongols used a variety of siege weapons as they expanded their empire. They learned how to use gunpowder when they conquered China, and gained a lot of experience sieging cities. I wanted my Mongol army to represent the time of the European invasion: the early 1240’s when the Mongols defeated Russian, Hungary and Poland. Accounts of the campaign in Europe describe the use of stone-throwers, but don’t mention the rockets or cannons that were used elsewhere (and later) by the Mongols.
In retrospect this design is possibly a bit too tall for the size of its base; and clearly it’d need a larger crew. But it’s a lot more usable in DBA than the Museum model.
DBA Army I/6c: Early Bedouins
I purchased some DBA army packs “not for a squeamish General” from a denizen of the Fanaticus forums. These are packs assembled from mixed manufacturers, and might not contain all of the army’s options, but they’re playable and inexpensive. The first I’ve painted is Early Bedouin.
I have no particular attachment to this army, or I’d have gotten a more quality-controlled army pack. It’s also an easy paint job, so I decided to do some experimentation and try some new techniques. In the past, these experiments have succeeded, so I forget that sometimes they don’t. Although not everything went as smoothly as I had hoped, it’s a playable army that looks basically fine in the end; but it’s not my favorite paint job.
The infantry are all Essex Midianite figures, appropriate for the Early Bedouin (c) list. The light camelry and camelry that match it are also Essex, but they originally would have two riders per camel. The other non-general camelry stand is from Falcon Figures. They’re the worst figures in the lot: the camels are far taller than the rest, and are smooth like dinosaurs. The men look like pudgy cave men with poorly defined faces. I don’t know which manufacturer made the General and companions, but their armor, robes, and turbans are definitely out of place in an army this early. I can only assume they’ve faced some Persians and Medes and stolen their fashion magazines.
Unfortunately, the army pack came with 4 oddball figures for the Auxilia: a Nubian, a few Philistines, and an inappropriately elaborate standard bearer. Luckily it also came with twice as much Psiloi as was required, including some slingers that were easy to convert into additional javelinmen for the Auxilia. The guys holding their javelins low were originally slingers.
I used only bowmen for the psiloi, to make it less obvious that I converted slingers for the Auxilia.
I tried a new technique on the bases: I used spackling compound to blend the individual figure bases smoothly into the base, and a dusting of sand for texture. For both the psiloi and auxilia, I based the figures prior to painting them, and this worked out great. Thanks for the idea, JM!
The color progression for the sandy base came from a Flames of War article about desert basing. I chose the Middlestone/Tan Yellow/Buff colors. Unfortuantely this didn’t do what I intended, but it looks fine in the end. Middlestone is very green, and Tan Yellow is pinkish (flesh colored). Buff goes well with Middlestone, but the overall effect is not “sand” if you look at it closely enough.
This is my first army with Camelry and Light Camelry. For these stands, I painted the figures first and then applied spackle after basing them. Unfortunately this resulted in a few white spots on the camels’ legs, but overall it worked well. I could’ve painted the Light Camelry when it was already based, but probably not the 3 camel stands. To affix the sand to the base before painting, I sprayed with dull varnish prior to painting. Usually the primer takes care of this, but not if your figures are already painted. I used Army Painter dull varnish for the first time on this army, and it came out almost as dull as Testors Dullcote at a lower cost: that change was a success.
The other thing that didn’t work as well as I had hoped is the flesh color. I started by trying a new color, Vallejo Dark Flesh. I prefer Tan Yellow for a middle eastern flesh color; Dark Flesh is too orange. The inking didn’t work well either. I used my now-standard Didi’s Magic Ink, which usually works well, but it needs to be applied over very dry paint. I applied it too soon after painting, and it pooled and caused some very dark spots. I mostly fixed these problems with Tan Yellow highlights, but the shading is a lot more harsh and messy than I prefer.
I look forward to seeing this army in action! With all these light troops I don’t expect it to perform particularly well against any random army, but I can’t wait to see what the Camel General can do against enemy mounted: it’s even odds against an elephant.
Aborted Experiment: Facebook
I’ve read some opinions recently about how tools such as Facebook might be the “new paradigm” of post-email communication on the Internet that some of us have been waiting for. Email is just like writing letters, but faster. But Facebook is a new, fundamentally different way of communicating with people. Even my mom is on facebook now! And I’m supposed to be technically savvy?
So, I decided to start an experiment, since I’d only have one chance: I signed up to Facebook with the intent to see how long it took for someone, anyone (except Marla) took to find me and send a friend request, without me actively looking for anyone.
The closest answer I have is “a week or two.” Even though I was not an early adopter of Facebook, I’m an early adopter of the latest new trend: cancelling your Facebook account.
Like many folks, I recently read Top Ten Reasons You Should Quit Facebook as well as a few related posts. I had heard of the spate of privacy violations and snafus that have happened lately regarding Facebook data, so when I read about why I should cancel, the only reason I needed was very straighforward once I thought about it: As a Facebook user, you are not Facebook’s customer; you’re Facebook’s product. The way they make money is by selling your personal information.
Now that I’ve cancelled, don’t send me a friend request; I need to go 14 days without logging in so my account will be purged.
I still think tools like Facebook represent a new and useful means of communication. I only want to wait for the time when an open tool is available that provides similar functionality. I’m confident this will happen. One side effect of opening up Facebook data to more and more consumers is that it makes it easier for customers to move away and take their data with them since it’s already visible to the world.
Today, news arrived of the latest Facebook privacy problem: when you’re logged into Facebook and visit some web sites, they install a Facebook app for you whether you like it or not, without asking, and without telling you they did it. If anyone else tried this it would be called malware or a virus, why is Facebook allowed to get away with it? The fact that these apps are installed is visible to all your friends, which also happens to tell everyone about some of the web sites you visit. Maybe that’s the point, since it spreads word about the sites that are paying Facebook to do this; but maybe you don’t want the world to know what sites you visit?
You don’t need to stop using Facebook. Just know that when you use it, every piece of information you post to Facebook is owned by Facebook, and will probably be used to sell you to companies so they can sell things to you.
DBA Army IV/35: Mongol Conquest
I haven’t finished painting a DBA army since February? Weird. I blame it on the goblins.
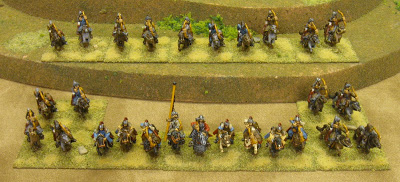
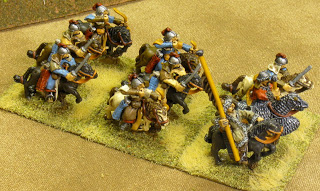
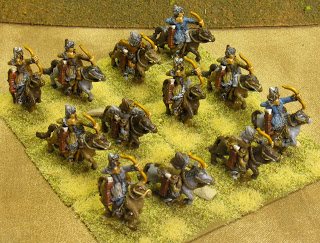
I chose to paint a Mongol Conquest army to participate in the Baltic Crusades themed campaign event at Historicon 2010. This is a fairly one-dimensional army in this configuration: 3x3Cv, 9x2LH. The figures are Museum Miniatures from their Mongol line. I also purchased a traction trebuchet model from Museum for the artillery option, but it was way too huge to fit on a DBA base. A future update shows the alternate model I scratch built.
I used medium cavalry with swords and bows for the Cavalry elements. They’re helmeted, but otherwise look very much like the light horse archers.
Painting this army was an exercise in finding all my different shades of brown paint. I used a grey-blue and dark red for highlights, based on images in the Osprey Mongol Warrior book.
There are two cavalry poses (MG09BP, MG09CP) except for the general (MG01P) and standard bearer (MG02P), and three poses for the light horse archers (MG06P).
This will be another challenging army to play (along with the Skythians). Maybe I just like losing. I’m not very good at playing light horse armies yet, but I want to be.
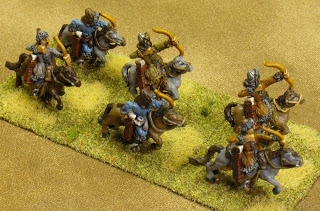 The surface of these figures is glossier than I prefer. This time I used a few base coats of semi-gloss varnish before topcoating with Dullcote. I probably should’ve waited longer before the dullcote layer.
My next DBA army is already in the works, so it won’t be 2 months before that one’s finished. I also need to paint one more army before Historicon for another theme.
Malifaux: Ramos’ Crew
Wyrd Miniatures makes some very nice miniatures. They also make some really creepy ones, if that fits your tastes.
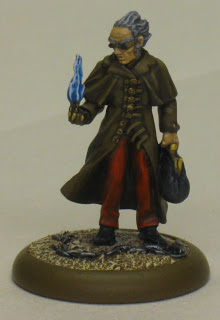
Personally, I really enjoy the steam punk elements available in their line. After perusing their miniatures for quite some time, I settled on purchasing Ramos the Steampunk Sorceror and his crew. He builds robot spiders out of scrap, and sends them off to do his dirty work.
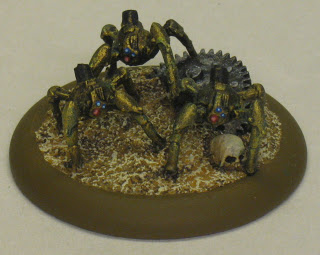
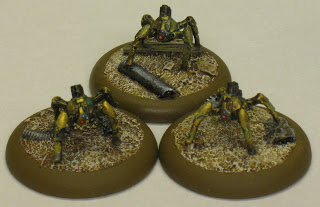
I started by painting the arachnids. Assembling these figures was a big pain in the butt, and there was almost no gluing surface at all. They were definitely designed as display figures and not gaming figures.
The spiders are painted black with metallic dry brushing. Except for a few lights and lenses they’re very straightforward. In real life they have a nice monochrom metallic look that doesn’t come across well in images, and they have just enough color to be interesting.
They can break up into individually based spiders for more flexibility. They can explode! And Ramos can summon new ones when the old ones die. We’ll see if any of this is worth doing, once we actually play the game.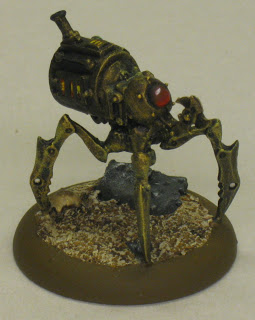
The larger Brass Arachnid is Ramos’ totem: basically a magical familiar, but his is appropriately a spider. This guy is quite large for his 30mm base. I like the model a lot, though the paint job looks better in person as usual.
All the bases are from Dragon Forge’s Wastelands II series. I intend to find some long grass to tune the bases, but can’t seem to get it locally.
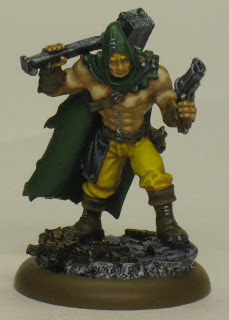
I chose Johann, a mercenary, for my other main dude. Although he’s usually part of a different crew, his special ability allows me to take him with Ramos as if he were also an Arcanist.
I painted Ramos (above) and Johann using a blending technique for basically everything except the metallic portions and the base. I’m very happy with how they turned out, especially considering how long it’s been since I’ve tried to do a good job on a 28mm+ figure, and also considering the amount of time I spent on them.
These figures are just enough to play a 25 point game, which is kind of small. I’ll provide some feedback on the rules once we try it out, but I’m very hopeful.
New Hops Trellis
Spring has sprung a bit sooner than I anticipated. I saw the hops buds peeking their noses out; it seemed like only a week or so ago. Now all of a sudden they’re 3-4′ long.
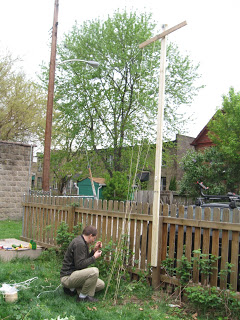 I decided I needed a higher hops trellis this year, since last year’s yield wasn’t that good. I suppose another way to look at it is: I haven’t actually used last year’s hops yet, so what does the yield matter anyway? But where’s the fun in that? This is all about the process and not the result.
In past years, I saw others’ complicated trellis systems, but didn’t think much about building anything similar. But I brainstormed a bit since last weekend, and came up with a plan for a taller trellis that lets me lower the top beam for picking.
My previous trellis was made from 1″ galvanized pipe, and it seemed strong enough. It was about 9′ high in the center, with twine running horizontally from there. However, the main hops bines don’t like to grow horizontally, so that was mostly a waste.
The new trellis uses a 12′ 2″x4″ with a metal ring on top, screwed to my fence post. A rope is attached to the top beam, through the ring, and down to a rope cleat mounted on the post. I raised it above the ground somewhat, so the total height is closer to 13′. The twines are tied tightly to the top beam, but they’re lashed at the bottom so I can tighten or loosen them there if necessary. I also left a small amount of slack in the main rope in case it needs tightening. The twine goes slacker and tighter depending on the weather, and needs adjustment throughout the season.
Until the hop bine grows to the top, the weak link is the twine. The bines are much thicker than the twine, so once it reaches the top the main concern will probably be with the pulley ripping out at the top.
Unfortunately, many of the strongest looking bines had their tops broken off before I could train them. I cut a lot of spare bines off, and trained about 7 bines up the twine.
We’ll see how well it works as the season progresses, but I’m happy with how inexpensive and easy this was to set up.
