It Comes in Pints?

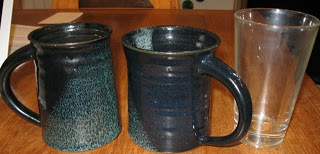
Dee got my “It Comes in Pints?” reference, so I thought I’d post a picture of my “It Comes in Pints?” mugs.

For those of you not familiar with this quote, it’s one of my favorite lines from The Lord of the Rings: Fellowship of the Ring. After entering a human Inn for the first time ever, Merry, Pippin, and Frodo sit down for a few beers.

Pippin: “What’s that!?”
Merry: “This, my friend, is a pint.”
Pippin: “It comes in pints? I’m getting one!”

My sister Sarah is a potter, so a few years back I asked for an “It comes in pints” mug, inspired by the ones they used in the movie. The mugs above are what she came up with (the pint mug is shown for size comparison). They fit a pint with room for head (which is generally hefty on my home brews).

Thanks, Sarah!

Defendered 2: Electric Boogaloo

“Yep… That went well.”

Same deal, different wheel.

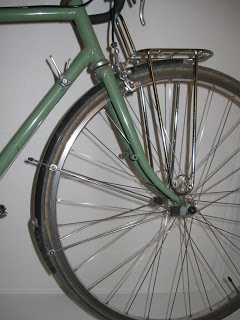
I got another stick stuck while riding home from work through the park, this time in my front wheel. Now I have a pair of broken fenders. I’m going to go order another pair or maybe two, after I’m finished here.

The quick release worked well. The fender stay bent and the fender broke in one place (instead of two), but the quick release released, and it didn’t even really stop me, let alone send me over the handlebars. Apparently I forgot to knock on wood after saying I didn’t want to test the quick release fender stays.

After breaking the rear fender, I realized I need a rear fender, because I need something to keep my leather saddle dry. I transplanted the wider rear fender from my blue bike, cringing the whole time at the mismatched pair, I’m sorry to say. It fit well enough, but it’s completely unsatisfying.

I’m going to get a pair of the Velo-Orange aluminum fenders. Solid aluminum fenders are longer, lighter, and stronger than the “alumiplast” laminated fenders I have. They won’t crumple the way these do, when a stick gets stuck. As an added benefit, the VO fenders are long enough in the front that I can do without a mudflap, and I might even be able to learn Yehuda’s trick.

In the mean time, I hope it doesn’t rain. Wait, isn’t it supposed to rain tomorrow? sigh…

A Slight Change of Plans

In the last few days, I figured out how my angle calculation tool was incorrect, and fixed it. Now it’s correct, just not very convenient to use. The reference axes are a bit “here and there” so you really need a sense of what makes sense, in order to extract the right answer.

I then went over all of my previous calculations, and made corrections to the seat plan.

Luckily, the amount of error in an angle calculation was directly related to how far away from perpendicular the hole is. Because of this, the errors on my spindle angles were so small that they almost all rounded off in the same direction as before. The exception was with the outside posts, which had to shift their sight angle by half a degree.

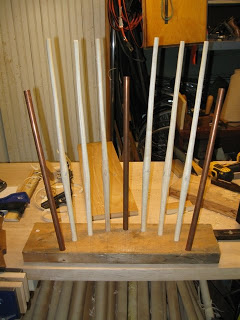
Today, I used my new plan to drill test holes for the back spindles in a scrap of dimensional lumber, to see if the back matched my expectations. It was basically a complete success: I have nothing to change with these angles. The tops of the spindles form a good curve (when viewed from above), and they’re evenly spaced. As shown here, I built up the test back with some spindles I’ve already shaved, along with some sections of 1/2″ pipe. The pipe is a lot straighter, and allows better measurements. (I picked this tip up on Peter Galbert’s blog as well, unsurprisingly.)

This gave me better information than I had about the shape of the seat back. The top of the end posts here are close to where the horizontal rod will end up. It’s wider in relation to its height than I expected. Obviously, my spindles are too long; I’ll need to trim them down on both ends and/or make some new ones. I think it’ll look fine when it’s finished, but it will be a significantly smaller chair than the bow back I made previously. This is good, since that’s what I was aiming for.

Back to the plans: My original leg lines were a complete mess. I couldn’t even figure out the values I used to I calculate them, let alone the error introduced by the tool. Always show your work! They were reasonable angles, and would have made an adequate chair, but they wouldn’t have matched my original intent. From a design perspective, I don’t know whether my plans or the old angles would result in a better chair, but I’m going to try my original plans and work from there.

I’ve already shaved some spindles, and they need to dry a lot before I can use them. I’m not using a kiln right now, so I really need let them sit around for a while: hurry up and wait. Next I need to make the top rod, bend it, and let it dry as well.

This requires a steam box, so I started building one. It is small, 30″ long, becuase I plan to use it in the kitchen. We’ll see how well it ends up working in the next week or so. I also need to accurately measure the location for the rod, so I can figure out how long to make it and build a bending form.

Change and Technology

I learned at a fairly early age that I “fear change.” I had a lot of stress entering new schools or changing jobs, for example.

Eventually I also learned that I’m “risk averse,” especially with respect to finances.

But some of my other characteristics do not seem to fit these labels. While I don’t generally consider myself an “early adopter”, I am very comfortatble with technology, gadgets, and the change that is propelling our increasingly “digital lifestyle.” This doesn’t seem consistent with my “fear of change.”

I recently found the name for a pattern which is consistent with all of my self-observations. I hate to admit it, but just like almost everyone else in the world, I have a fear of the unknown. The difference is, the things which are unknown to me are different than what is unknown to many other people.

Although I’m very comfortable with the predictable nature of computers, I am very uncomfortable with social interaction with other people. I don’t know how other people will react in a social situation, and when people start behaving aberrantly I don’t know how to to debug them. The fact that I call it “debugging” is probably another indicator of where I’m coming from. Some of the strongest negative memories I have are related to social fauxes pas I’ve made in the past. The unknowns I’m afraid of almost always have to do with people and social situations. The fact that I fear failure in a social situation means I must care about this; I’m just not very good at it.

On the other hand, I know that many other people are afraid of the unknowns related with technological change. I know this, because businesses are throwing millions of dollars trying to stifle certain forms of technological innovation, and lawmakers are trying to pass laws against certain previously unanticipated uses of technology, even when the constituents I’m most familiar with and most sympathetic with disagree with these policies. From my perspective, there must be a very great fear of the unknown or fear of change driving these dangerous trends.

I don’t remember exactly who made this observation, but it stuck with me: Generally, when businesses imagine potential uses of technological innovations, they tend to frame things in a way which benefits the business, but doesn’t harm or significantly change their current business model. They imagine the current industry leaders will be able to take advantage of the benefits of new technology without significantly changing or impacting their current business practices.

The biggest current example of this is the electronic distribution of content (of any form), versus the incumbent physical object distribution industries: The Internet vs. Everyone Else. Making a copy of electronic content is essentially free, and that copy can be made at almost any remote location just as easily as where the original resides. On the other hand, books, magazines, photographs, movies, and even audio CDs have huge costs associated with them, both in making the copy, but also in moving, storing, promoting, and selling the physical objects themselves.

The incumbent content distribution industries saw the Internet from a long way away, but they imagined a world where they would benefit from the reduced costs of making copies for free, while still acting as a distribution oligopoly. Step 3: Profit!

The reality is somewhat different: reducing the cost of a copy to zero lowers the barrier of entry so far that it’s a risk to incumbent businesses. Many middleman companies have become irrelevant, because content creators and the end users of content can now connect directly and bypass them completely. In my mind, this is a good thing, and we should embrace it. Unfortunately, the industries which no longer need to exist are bleeding money in an effort to resist change, instead of finding a successful place in the new world which is to come.

In recent months I’ve read some very good articles describing the changes which are currently going on, and some of them have positive suggestions for how incumbent industries might change to survive in the new reality.

Clay Shirky recently wrote an excellent article about how the newspaper industry has been dealing with technological change (or not dealing with it, as the case may be) in the last few decades. One quote (about the syndicated newspaper column, specifically) which really stuck with me, from the early 90’s, rings as true today as it was then, but unfortunately no one was listening: “When a 14 year old kid can blow up your business in his spare time, not because he hates you but because he loves you, then you got a problem.”

Ian Rogers gave a talk to the Record Industry basically about how they need to get over it, and either change (with suggestions on how to do this) or die. Seth Godin gave a similar talk about the future of the music industry, to a bunch of music industry execs a year ago. They both seem to agree that the music industry is not failing, but the recording industry is; and, that this should not matter at all to the primary parties involved: the artists, and their fans.

I understand the Internet and the change it has brought, so I do not fear it. What I do fear is the reaction other people (or industries) are having to that change. It may be a painful change, but in the long run I think it’ll be better for all people and the welfare of the planet itself, when we can all access the content we want to access, without the waste associated with the creation, distribution, and disposal of physical objects.

Defendered

The days are getting longer, so I got out the summer bike. Today was chilly, but a good day for a ride anyway. Daniel and I took an interesting route home, and rode through the park.

We parted ways, and I stayed in the park for a while longer. Going up the last hill towards the old Center for Creative Play, I heard a “Crunch!” and skidded to a stop. It felt like my chain broke or got caught in my spokes or something.

Nope! My rear wheel kicked up a stick, which got caught in my fender. I didn’t even see the stick before I stopped to check it out. The fender basically exploded; there are pieces still sitting on the trail.

So, now I have a bunch of spare fender mounting hardware, but I need a new fender. Unfortunately they only come in pairs. A week or so ago, my blue bike’s front fender cracked off where the mudflap attaches. So I sort of need a new fender there as well. Unfortunately they’re different sizes, and the mismatched pair probably won’t really fit on either bike very well.

In case you’re wondering: the front fender has quick-release attachments for the fender stays, which should let the fender detach before my front wheel locks up and send me head over heels. I’m not very anxious to test that theory, though.

Making Plans

“I love it when a plan comes together.”

On Monday, I drew up some plans for my next project: a rod back chair.

Some woodworkers look at windsor chairs, and think they’re hard to build. Building windsor chairs isn’t difficult, but it is different from other “normal” woodworking. Non-woodworkers don’t necessarily think Windsor chairs look hard or easy to build; they have nothing to compare it to. I think the different way of working which windsor chairmaking requires fits well with my longing to extract order from chaos, and my generally intuitive way of solving problems.

The way windsor chair plans are laid out and used is also different from joined furniture plans. The plans tend to be very compressed. A rule of thumb in Information Theory says that “information (as opposed to pure data) is any difference which makes a difference.” By that measure, windsor chair plans are nearly pure information: they record only the aspects of a chair which are important, and only those which differ from other chairs. Anything not included in the plans is either not a critical dimension, or it’s derived from a partially finished chair in the same way it’s done for similar chairs.

In most woodworking, the order of the day is “square corners and flat surfaces.” The first step in a project is producing boards with all surfaces perfectly flat, and all corners exactly 90 degrees. Throughout construction, these flat surfaces and right angles act as references for various measurements. If you’ve done your job, most of these reference surfaces are interchangeable. Many finished projects retain these square angles in the finished construction.

On the other hand, a windsor chair has only one flat surface: the bottom of the seat. You usually can’t even see it, which is probably why it’s left flat. Most of the parts are never transformed into a flat board: they’re split out of logs and turned directly into legs, stretchers, spindles, posts, rods, or bows.

Since the seat is the only flat board used in a chair, it is the only natural reference surface. Because of this, windsor chair plans are centered around the seat. A seat pattern defines the outline of the seat, and the location and angle of every stick which protrudes from it.

Usually, none of the drilling angles for the legs and stretchers are included in a plan, or they are included only as a sanity check. When building a chair, you derive the required drilling angles and stretcher lengths from the partially finished chair instead of using predetermined dimensions, so your chair will fit together even if the legs aren’t installed perfectly.

This is another difference between windsor chair building and “other woodworking.” In most woodworking projects, you (ideally) construct a number of identical interchangeable parts whose dimensions are all fully specified, and then you assemble them. If you mess up a part, make a new one. You almost never take measurements from a half-finished project and build a part which fits. That would be like hand carving the missing piece from a jigsaw puzzle after it’s almost finished.

So, how do you make a chair plan? I don’t know. I mean… I don’t know how other people do it, and no one ever taught me how, so I figured it out. I may have gotten it wrong.

I started with measured drawings, which I cut and pasted together to show the chair I wanted to make. I know what a finished plan should look like. Making the plan is just translating the drawings into a usable plan. The problem with measured drawings is that many of the measurements are irrelevant, and the rest are not measured in the way a chair maker uses them. To create a plan from a drawing, I had to convert the measurements on the drawing into the measurements used to build the chair.

The biggest conversion task is angles. Measured drawings generally show 3 views: top, front, and side. You can easily measure the rake and splay angles of the legs and spindles from the front and side views of the chair, but these are not the angles used when drilling holes for a chair. Instead, you use an incident angle, which is the angle at which the drill bit enters the seat, and a sight line which tells you which direction to point the drill (the bit is always perpendicular to the sight line).

Apparently Drew Langsner has charts in the back of one of his books, which convert rake and splay angles into incident angles and sight lines. Unfortunately, I don’t have a copy of that book; it’s out of print and expensive. But I do have a bachelor’s degree in math/computer science, which was even more expensive. So, in lieu of a set of tables, I wrote a script.

Unfortunately, now that I’m “done” with my plan and I’m sitting down to write about it, I see that my script is not giving entirely consistent results. Doh! I’ll have to go revisit that before I post a link or build the chair.

I ran into another complication with the drawings I’m working from. This chair has its seat at a 3.5 degree angle in relation to the floor, but the drawings depict everything with the horizon set to the floor, and not to the seat. There was no way to measure the “front” angles properly with relation to the seat. So my script had to take that angle into account as well.

The result of these labors is the plan shown above. As you can see, it only depicts one half of the seat; the other half is a mirror image. I follow Brian Cunfer’s practice of using half-patterns, to avoid screwing up half of a pattern and building asymmetrical chairs.

With only a seat plan, there are clearly some undefined aspects of the chair, but only some of them are determined in advance. I’ll have to calculate the length of the legs to achieve the proper seat height, but the shape of the turnings isn’t very important from a structural standpoint as long as the leg is thick enough at the joints. The stretcher lengths and angles are measured from the position of the legs in the chair. The post lengths are chosen from a design perspective, and the spindles are made long enough to fit the bent rod. The rod itself needs to have the proper length and curve to meet the spindles and bows properly, but if I’ve calculated the spindle angles correctly they’ll match the measured bow from my drawings.

There’s a saying that “In carpentry, you work to the nearest 1/16th of an inch. In woodworking, you work to the nearest 1/64th of an inch. In boatmaking, you work to the nearest boat.” In other words, it’s more important to keep water out of the boat, than it is to get the measurements correct. Stated another way, this applies to windsor chairmaking as well: It’s more important for your parts to fit together properly, than for the measurements to be correct.

A Painted Perch

Last weekend, I finished the perch.

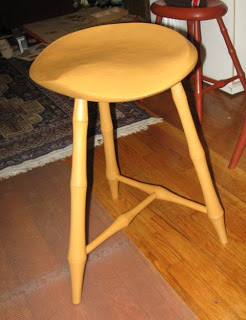
I painted it with one coat of Real Milk Paint’s new Butternut Squash color, followed by 3 coats of Mustard. I also used their anti-foam agent, and it made a big difference in reducing foam and generally making the paint easier to apply.

I think with milk paint, once it looks almost good enough, it’s time to stop: “better is the enemy of good.” Whenever I add “just one more thin coat in the spots that need it” I end up worse off, and have to smooth things out more than I’d prefer. Maybe it just doesn’t work to apply the paint when it’s too watered down.

After the paint, I applied 2 coats of Minwax wipe-on poly, as usual. In the picture above you can see what a big difference it makes to the color. I’m quite happy with the final color. The dark parts of the first image are more representative of the color than the washed out second image. I think the Squash undercoat made it darker overall, but luckily the yellow covered it enough, because they didn’t seem to go well together.

Marla’s initial reaction to the seating position wasn’t very favorable. It’s quite a bit higher than the other stools she has been sitting on, and it pitched her forward more than she’d prefer. I sat on it, and found myself sliding down the seat too much; maybe the poly wasn’t the best finish for this?

I trimmed the rear legs off by about an inch, but we’re not sure yet whether this will be the final position. Hopefully we’ll stop trimming before we reach the stretchers. I think to a certain extent, her desk ought to be raised up a bit, because we previously had it adjusted for a lower seating position. Luckily it is very adjustable, if we’re willing to clear it off.

This was a really fun stool to build. Everything went well, and I didn’t make any major mistakes, but it was also different from the other chairs and stools I’ve made.

Hofbrauhaus

“It comes in litres? I’m getting one!”

Hofbräuhaus Pittsburgh opened today, for dinner. They’re still laying brick sidewalks and pouring concrete outside, but they’ve started pouring beer inside. It’s located in Southside Works, about 2 blocks from my work.

For the last few days, they’ve been training. Those with a special invitation could go eat free food while tormenting the waitresses-in-training with special orders, though you still had to pay for beer.

Well, Daniel works in Southside Works proper, instead of just next to it, so they all got invitations at his company. He went for lunch on Friday, and they invited our family for lunch on Saturday.

It was a nice day, so I rode down with Martine on the trail-a-bike, and Marla and Ezra drove out to join us (I still need to work on that). We met Kristan, and then waited for Daniel and Levi to arrive via bus from their St. Patrick’s Day festivities. They let us in before Daniel arrived to facilitate things. It turns out the “Invitation” was really nothing more than instructions to ignore the huge “We aren’t open, we’re in training” sign.

The food is provided in huge portions and would be expensive if we were paying for it. They have a veritable plethora of meat products whose construction you wouldn’t want to observe, as well as a larger than expected selection of “not German, strictly speaking” food, including vegetarian options. It tasted fine, but my dish was easy: Caesar salad with blackened salmon. Marla had Alfredo and enjoyed it. I tasted the Tilapia, which was also just fine. I guess I’m not a very good food critic, but my tastes lean more towards non-european ethnic foods.

The building itself is as just as you’d expect: it’s the nicest looking giant faux German beer hall in town. It has huge ceilings, and the “long bench” table seating. They don’t seem to use the “meet your neighbors” dining style as it would be done in Germany, but we had a fairly large party in a fairly empty hall, so it didn’t really matter.

Finally, the beer! Well, it’s German beer, Hofbräu beer. It’s now brewed on premises, but they got a bit of a head start; I think they had Penn Brewery contract brewing before they opened. They had the Hefeweizen, Lager, and Dunkel when we were there, but in general they’re also supposed to have a Light and one seasonal beer. Dan and I had a liter of the Hefeweizen, and the wives ordered a sampler. I think I prefer the Hefeweizen out of the choices they had there, with the lager taking a surprise 2nd place. It’s not Belgian, but they give you a whole liter to make up for the lower alcohol content. It’s also only a bit over $7 for 1l, which is less than some 20-35cl servings of Belgian beer on tap at Sharp Edge.

Now that I’ve gone once, I won’t be disappointed to follow my original plan, which was to not go at all for a few months, while I let everyone else try out the New Popular Restaurant. Though, they have around 500 seats inside, and they’re supposed to have several hundred more outdoors (though those aren’t done yet), so I don’t expect they’ll be really crowded until Oktoberfest.

Whole Lotta Wood

Last night I turned the large, excellent maple (I think?) log section I had into leg blanks. I wanted to get the leg blanks turned early so they can dry a bit and stabilize before I turn final legs out of them. I have 6 leg blanks and maybe 2-3 back posts, 24″ long with no knots or runout at all. It’s definitely the best log I’ve found so far for turning legs and stretchers.

So tonight, I went back and got some more: two and a half 5′ long sections of log (some split), about 10-12″ diameter. You can see those pieces in the rear left of this image. I should be able to get two more chairs worth of legs out of those, while avoiding the knots.

On the right in the rear there’s a standing cherry log which is unfortunately rotten, and a pile of split cherry in front of it. In front of that is a stack of ash and possibly elm, about 3′ long. The ash is very straight, but the elm is a bit wavy and has some knots.

I have enough wood. Maybe. Wood for shaving spindles and bows is scarce, but I’d expect that. If only I could find an oak log as straight and clear as that maple, but accessible enough to retrieve…

Now I need to assess the pile I have sitting in the basement, and determine which pieces would be better off burned than turned. I’m going to guess “most of them” is the best answer.

The bags in front are all full of shavings, and the boxes are larger scraps. Unfortunately I must’ve cut a log with some mold growing in it, because the wet green shavings in my barrel started to mold severely and quickly. I hope the shavings are at least useful to burn, if they aren’t useful for chicken bedding.

Now I have wood, so I’ll need a plan. This one won’t be as easy as the stools, but at least I have some good practice “legging up”. Unless I find or buy some good bow stock, I can’t build one of the chairs I’ve already built. I don’t want another sack back arm chair anyway, and the bow back side chair needs an even longer bow. It would require a piece of perfectly clear, perfectly straight oak (or similar) about 5′ long.

On the other hand, if I can’t get any spindles out of the logs I have, I’ll have to buy wood anyway, so I may as well buy a bow, too.

Leaving bows out of the equation, there are several chairs which would not require such demanding wood: a comb back, a fan back, or a rod back.

But why do I need yet another different side chair? Oh, I know! The kitchen! We could have two separate sets of matching chairs, right? Half finished sets that I might never complete!

Brilliant! Now I just need some plans for the chair itself.

The rod back is a later Windsor form, from around 1800 or so. It’s less formal, and the design is heavily influenced by asian furniture. It uses the “bamboo” style turnings that I prefer, and it’s a smaller chair than the bow back, so it would make a nice kitchen chair. Overall, I really like the look of these chairs.

The main downside is, seats in these later “degenerate” windsor forms typically aren’t saddled as deeply, which sacrifices most of the Windsor form’s famous comfort. I may decide to just saddle it more deeply anyway.

There is a measured drawing of a fairly nice looking rod back chair in John Kassay’s windsor chair book, which has enough detail that I think I can make a plan for it. I’m not very happy with the splay of the legs, but I’m not sure whether I really want to start experimenting with the plans for a chair I’ve never built.

Whether or not I build a chair with a long bow, I’ll need to start a few new processes and set up some more equipment. Mainly, I’ll need to build a steam box, get a propane cylinder, and build bending forms for whatever bent parts I need on the chair I’m building.

So my next step ought to be to determine what size spindle I’ll need for a rod back, and try shaving one out of the wood I have. If that’s a no-go, I’ll have to buy wood, so I may just get a bow as well and make another bow back.

In the end, we may never have any matching set of chairs. But if we do have enough chairs to sit in, and they’re all hand made by me, then I’ll still like them a lot better than the ones we use now, even if they don’t happen to match.

A Perch

A woodworking update: I’ve completed a Perch using the plans Peter Galbert posted on his blog. I haven’t painted it yet, because I’m not sure I want another red stool.

Two of the legs and both stretchers were turned from the first batch of logs I found in the park. They started out looking like the firewood sitting on the floor in this image, and ended up looking like the leg on the lathe.

I turned this leg too soon after bringing the log in from the 20F weather outside: the wood was still frozen. I couldn’t get any clean cuts on it, so for the other two legs I just turned them round and let them warm up and dry a bit before finishing them. Although I planned to clean up the first leg later, it ended up way too warped to even consider this.

The third leg, this one’s replacement, I turned from some Hackberry dad left down here at Christmas time. When I first turned all the legs, I thought this might also be a hackberry log, but now I think it’s more likely Elm. I know these are not ideal leg woods, but they’ll be strong enough, and the details on bobbin legs are minimal and not easy to screw up, even with wood that doesn’t hold detail well.

More news on the Free Wood front: near Martine’s school, 3 or 4 trees toppled down on top of each other in the woods. One of them split and splintered on its way down. Someone was almost hit by another one, when they fell. I waited until they cut them into smaller pieces, and today we went and collected some. I have some long, straight, clear sections of I think Maple which will make some nice legs. I may have to bring a wedge and mallet and go back for more, this is really nice wood. I also got another cherry log because it was there, and some more of this open-grained greenish yellow colored wood I’m having such a hard time identifying properly.

In this picture, you can see my increasing collection of spindles, under my bench. These are all from the logs I’ve collected, and hopefully they’ll eventually turn into legs, stretchers, or wooden boxes.

It’s quite fun to rough out spindles from the log, but it feels like a big waste to create so much waste wood in the form of chips. But then I remember the city’s wood crew trucks, which chip all of the logs as soon as they clean them up. Even if only a tiny fraction of the wood I collect ends up being used in a project, it’s still better than leaving it on the ground and letting it rot. The rest will go to my in-laws’ where they’ll use it for chicken bedding, or burning for maple syrup.

There are some really depressingly nice, huge, straight, 2′ diameter, 6′ long logs in the park that I just can’t think of any good way to retrieve. It pains me to see them sitting there, ready to start rotting at any moment. I could probably get back bows out of those logs, if I could get them out of the park.

Peter Galbert does a few things differently than I’ve done on previous chairs and stools, so I learned a bit on this Perch. First, he drills his holes from the top down. Since they’re angled, the hole enters and leaves the seat at a different place: you need to know whether to drill from the top down or bottom up, in order to get your legs in the right place.
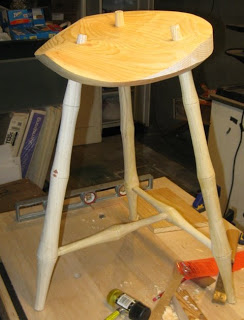
When I drilled from the bottom up on previous stools, I didn’t have problems with tearout: I just carved it away when I carved the seat. But this time, I left unsightly scars on the bottom, unfortunately. Let this be a lesson to me! I need to use a backing board or a better bit (see below).

Peter also leaves more of his seat uncarved than I am used to, before assembly. This was a very fun seat to carve, but I didn’t really enjoy the new, improved clamping challenges posed by finishing the seat after assembly. The shape of this seat is quite nice, and the lines flow well and make sense, once you actually do it. Again, Peter’s videos helped a lot in remembering the carving steps, and they’ll help for my next shield-shaped seat as well, I’m sure.

One detail worth noting on this image is the blood on the front leg: I cut myself while fondling one of my tools. It wasn’t even the cutting edge. But it wasn’t as bad as my previous cut, from sharpening my drawkife. Drawknives look dangerous and imposing, but most of the time you aren’t near the cutting edge. Except when you’re sharpening them.
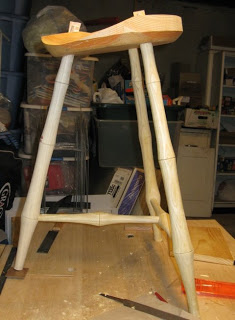
Speaking of better bits, I bought another 5/8″ spur point bit. What an amazing difference! My old bit took forever to cut, dulled itself cutting through even relatively soft wood, and burnished the holes. It was one of the highly rated bits from Highland Woodworking, and it sucked straight out of the box. I replaced it with a no-name bit I got locally at Rockler, and what a huge difference it made! I’ve only used it on the Perch’s undercarriage so far, but it’s already far better than the other bit ever was.

This time, I think I finally cut my wedges thin enough. I can never seem to sink them deeply enough into the legs.

In this picture you can see the bins of childrens’ clothes and other “stuff” that will be sold at the annual Pittsburgh Mothers’ Center Kids’ Stuff Sale. But it may be more interesting to note the angle of the seat: yes, it really does pitch you forward as much as it looks like it will; but this is a good thing.

The future is looking bright, with respect to me keeping enough momentum to complete an actual chair before slipping into a different hobby for a while. I guess I’ll have to start doing some drawing to figure out exactly what it is I want to make.
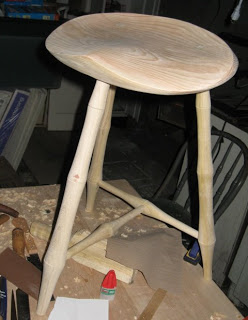
And now, finally, the image you’ve been waiting for: the finished perch. Marla’s initial sit upon it sounded promising, so we’ll see how that goes.

Seat carving is an area where I seem to be improving. I look at the chairs I made in classes, and they’re downright rough and lumpy compared to my more recent stools. This pine is a real pain with tearout, especially where the curves leave high and low spots on the grain. But this time, I managed to scrape the seat enough to move straight to 220 grit, so that’s good.

I used the superglue to stop some checks in the bottom of the seat: hopefully this will prevent them from getting much worse over time, but we’ll see. The grey chair in the background isn’t a “real” windsor, it’s a factory chair I got at a yard sale for $2.

That’s it for now, it’s late. Damn Daylight Stealing Time, I never can get used to the time change.